
Taiwan & The World’s Most Dangerous Festival
Moon landscapes, fireworks shot at you, UFO houses, and a 500m tall building on an earthquake fault line - there’s a lot to see in this blog post!

Earlier this year I had the chance to spend a week in Taiwan (or the Republic of China, as it is officially called), starting in the south and making my way way north on the westerly, more populated, side (the east with its beautiful countryside is still on my list). What drew me to Taiwan was the Beehive festival - which has nothing to do with our striped flying friends at all. Read on to find out what this insanity is all about!
Start here with a few video impressions from some of the experiences that you can have in just a few days on the island.
Southern Sights
I arrived to Taiwan from Palawan, one of the Philippines’ most beautiful islands, flying to the country’s largest city on the southern tip, Kaohsiung, with a plan to experience some of its sights and festivals while making my way north to Taipei, the capital.
On my arrival I first wanted to visit the landscape of badlands in this area, often called Moon World due to their interesting rock formations.


There are different areas with these mudstone formations sculpted by years of wind and erosion, the most famous and easily accessible one is in Tianlao, seen above.


Colorful Nights of Tainan
After that, I spent an evening in the city of Tainan, exploring some of its famous old streets from the Qing Dynasty with their picturesque shops and lantern-lined streets. Especially around the time after Chinese New Year, decorations were in full swing - even extending to our furry companions.


Pastime
Like every Taiwanese city, Tainan is home to plenty of these little stores. Claw machines and their similar variants can be found everywhere, and took over a little less than 10 years ago. The craze has died down a bit since then, but they still act as a source of income for their owners and the landlords renting the space to them. Guess who needed a lot of coins during his stay in the country…
On the next day, I visited the Wushantou Reservoir, the largest of its kind in Asia when it was completed in 1930. Its interesting shoreline patterns gave it the nickname Coral Lake, and it’s a popular recreational spot today. The hazy weather made photography a little tricky, but I could still see where it got its name from.


Madou Daitian Temple
Not far from the reservoir lies this rather unusual temple with its beautiful colored roof ornaments, originally constructed in the 17th century, but rebuilt and expanded several times.

🐉
Its most recognizable feature is arguably this large dragon, with a 76m long tunnel leading up to the head through different heaven and hell worlds (shown in rather detailed questionable animatronic presentations) before spitting you out at the mouth, where stairs lead back down.
A small ceremony was being filmed while I was there, which allowed me to get a few traditional casual portraits.


The Yanshui
Beehive Festival
.
In the afternoon, it was time to prepare for the main event, and what really drew me to visit the south of Taiwan during this time of the year. A tiny town in the Yanshui province, about 30km north of Tainan, turns into one of the most insane festivals on the planet. Let’s start from the beginning: As the story goes, in 1885 the area suffered from a cholera outbreak that couldn’t be contained. The solution people turned to - as they often do in times of despair - is a higher power: The god of war, Guandi. To appease him to help drive out the disease, his palanquin (little carts with the statues inside seen on the top right and in some of the photos below) were paraded through the streets, with firecrackers set off to rid the town of the plague.
Preparation
Since then, local residents prepare for this yearly celebration far in advance, setting up the firework displays, mainly in square clusters full of bottle rockets: the so-called Beehives. The largest ones are the size of a truck, and people try to outdo themselves every year, storing the precious creations in their garages and living rooms - literally! - hidden from view until the big day. Millions of crackers are attached by hand to the metal and wooden frames that later get pulled out on the streets.


Living with Fire
One can only hope that smoking is banned in this house until the big day, but from what I saw in terms of safety, this assumption is questionable.

Lined Up
Guandi's palanquins are ready to go in front of the Wumiao temple, where the procession starts.
Judging from what I experienced a few hours later, my guess is that this futile attempt to protect the car parked on this street with a few card boxes would not prove to be a very successful strategy.


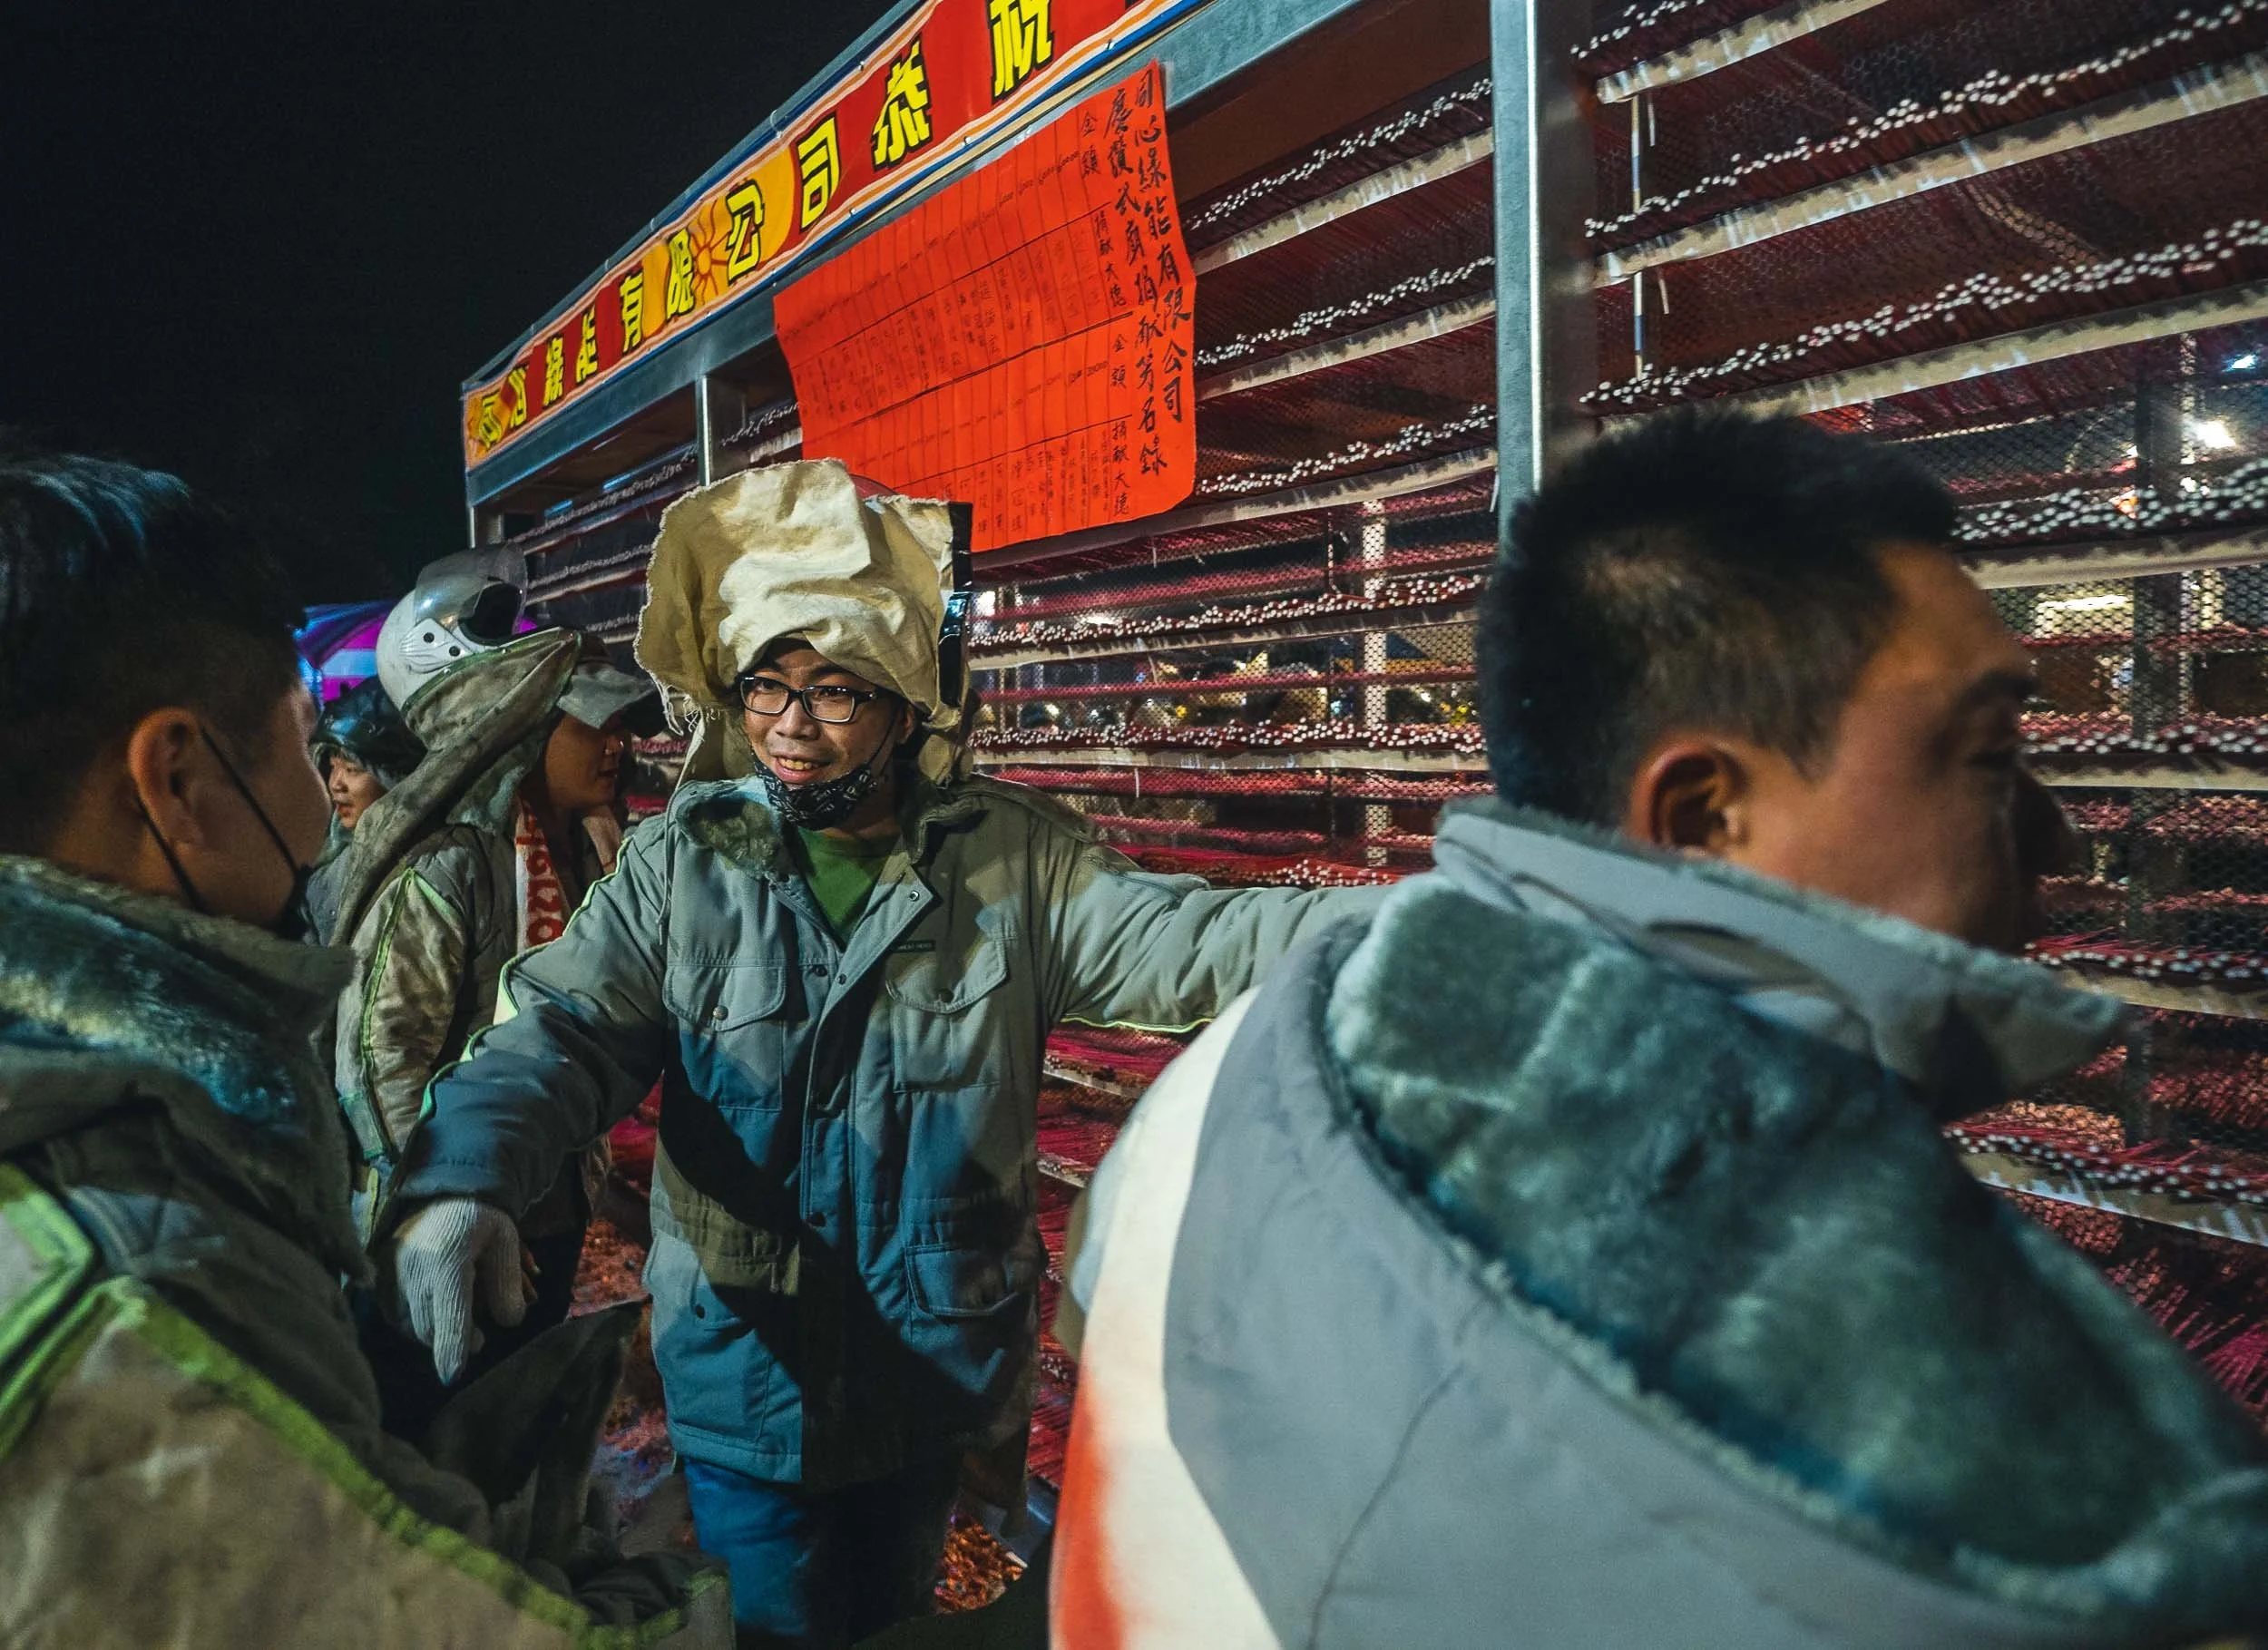
The world’s most dangerous festival
Having seen the preparations, it was time to ensure our own safety with a little bit more seriousness than I had in mind a few hours earlier. It’s not surprising that every year people get injured, suffer burns, or lose their hearing when attending these celebrations. Full body cover, helmet, ear protection, and ensuring there are no gaps where a rouge cracker could enter and explore next to your eardrum, are mandatory. I was still wondering how my camera would fare in this mess, but at the least I had a UV filter to protect the front lens.


Warm Up
As a little introduction you could get yourself draped in chains of crackers and then literally be set on fire. I’d rather watch from a distance. For now that was still an option.
The Main Event
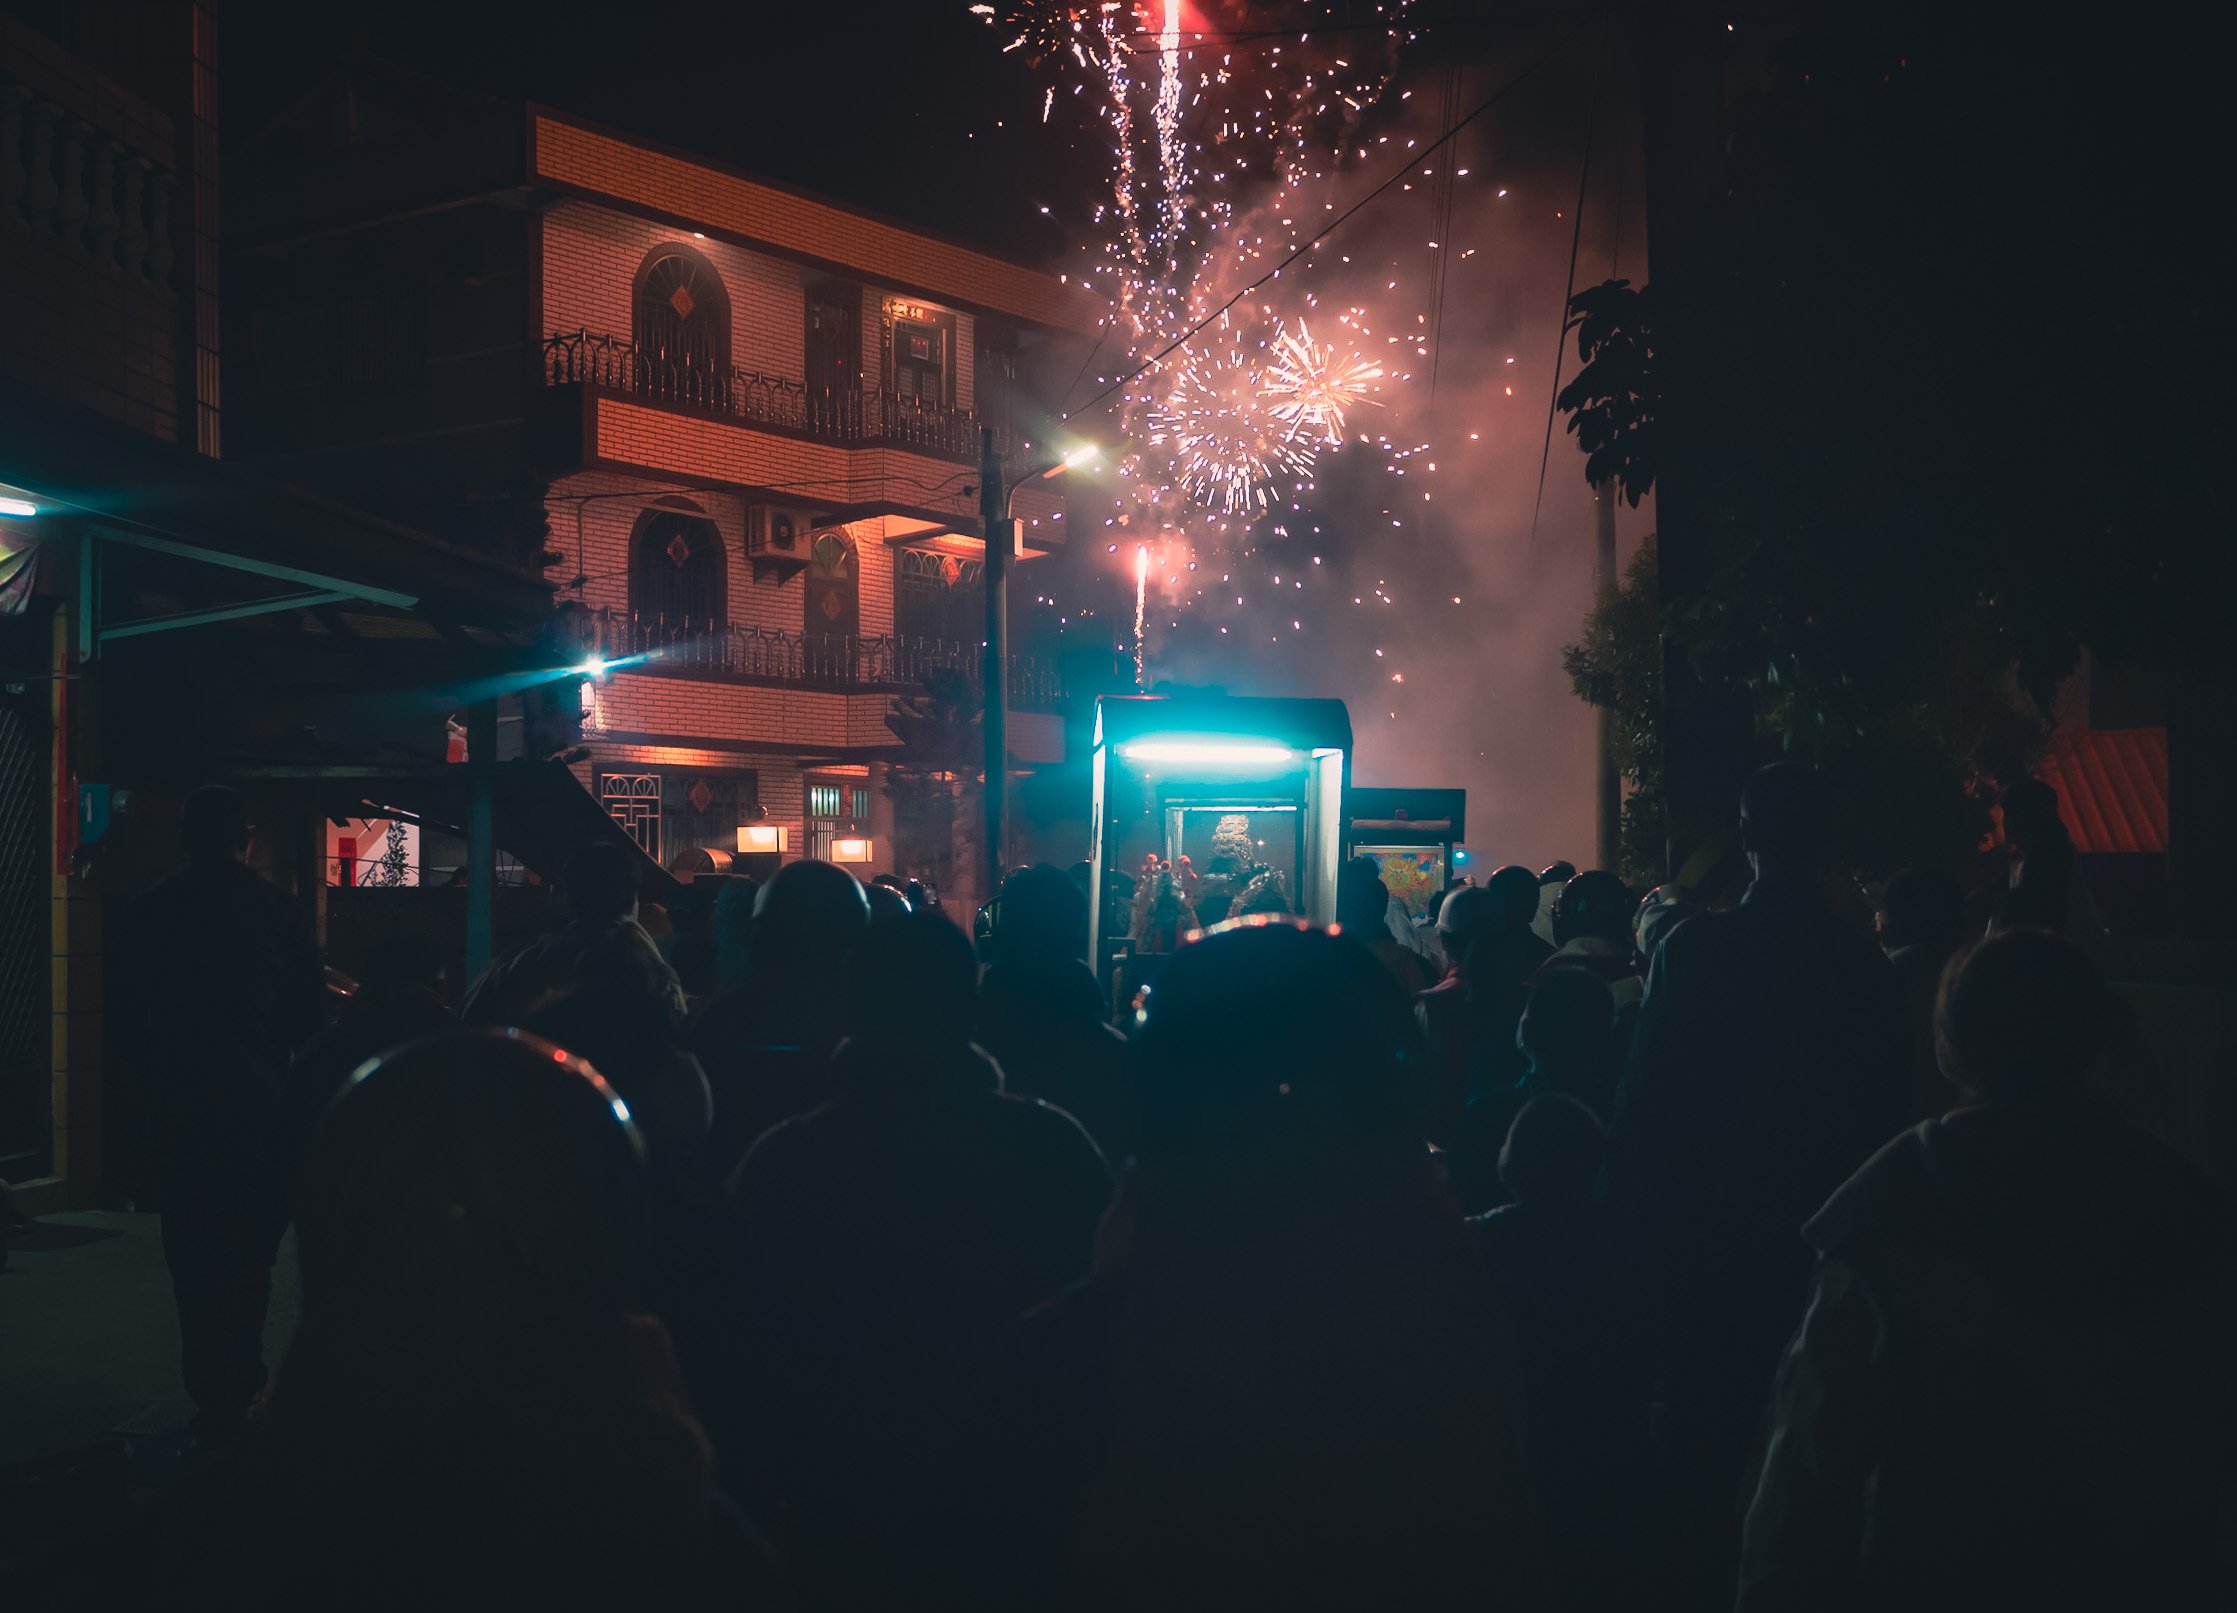
And then it started. The palanquins got in line, the crowds gathered, and we were off - at this point I didn’t quite know what to expect yet…

I soon had a better idea. As the parade started to make its way through the streets, occupant of the nearby houses were throwing chains of crackers onto the carts, dancing and jumping while people ignite them under their feet. In the background, fireworks are shot into the sky and the spectacle turns into a constant stream of noise, smoke, and flashes - and your own attempts to escape the worst of it while you admire the proceedings (and in my case, try to get some photos).

As we moved through the streets with dozens of carts and thousands of people split into a few groups, we occasionally reached a small open space, such as the front yard of a temple, and things came to a halt. This is when I realized it was the moment the big guns would come out - it was time for a beehive.


The Signal
After praying and burning joss paper in front of the deity, the rocket tower is ignited, and the blasting begins. For a few minutes, thousands of bottle rockets shoot out into the crowds from either side. Getting hit is considered a charm of good luck, so the bravest of the onlookers position themselves just in front of the tower, bearing the brunt of the explosives.


The spectacle is a deafening scene of shrieking angry rockets looking for a target, low, high, wide, and far, while the smoke slowly penetrates your helmet and makes your eyes water as you look to escape the crowd into a safer spot.

Take a look at this little clip to get a feeling for how these moments look like in action.
Dark Souls
At times being part of this procession through the streets felt like a mixture of joining a cult, being part of a video game, a war zone, or a post-apocalyptic movie scene. It’s surreal.
The parade of carts with the venerable Guandi moves through the entire town, before the celebrations settled in the town centre, where more beehives are brought out, and more rockets are shot into the sky (you get the theme by now).


Into the Night
Some of the firework displays here eclipsed anything I had ever seen before in size, color, variety, frequency, and noise.

Through the Neighborhood
A pit fire for joss paper was ignited by these onlookers as the procession passed their home.

Side Entertainment
If you needed a break from fireworks, the small public square had a DJ booth and dancing girls to round up the celebrations - don’t ask me how that relates to the traditional cultural background of the festival 😉
Do you think all of this was a little much? Well, I should tell you, this was the “slower” day - the next day is the actual original traditional event date, with more people, bigger beehives, and growing craziness. The main reason I didn’t stay for that was due to the fact it traditionally coincides with Lantern Release Day in the north of Taiwan, which I wanted to see as well. In hindsight, it was probably a good idea to start gradually - but I’m pretty sure I’ll be back for the full extravaganza… It becomes a little addictive after you overcome the first shock (and survive the first bottle rockets hurling towards you).

Clean Up
Water and shovels were always on hand to extinguish the occasional fire that broke out among the leftover unexploded fireworks, street side shrubs, or pieces of clothing.

Saved
Kyle, my trusty companion, was happy to have his protective equipment. Despite that, we still left with some bruises, comparable to a few proper paintball hits.
Time for some Peace and Quiet
We left Yanshui a little after midnight towards the mountain regions of Alishan, feeling relieved to be alive, counting bruises, desperate to clear the smoke from our clothes and bodies, and give our ears and eyes some respite. The next day was going to be a long one, as we made our way straight to the very northern tip of the island for Pingxi’s Sky Lantern Festival.

Before that though, I wanted to enjoy a quiet sunrise among the beautiful tea plantations of the highlands of Alishan, a picturesque area in the centre of Taiwan.


A pleasing contrast to the previous night, the central mountain ranges and eastern coasts (which I didn’t see much of) are very different than the highly populated west side, and full of natural beauty and a calmer life.


Cheery Blossom
The season was upon us, and we discovered the occasional hint of color on our way.
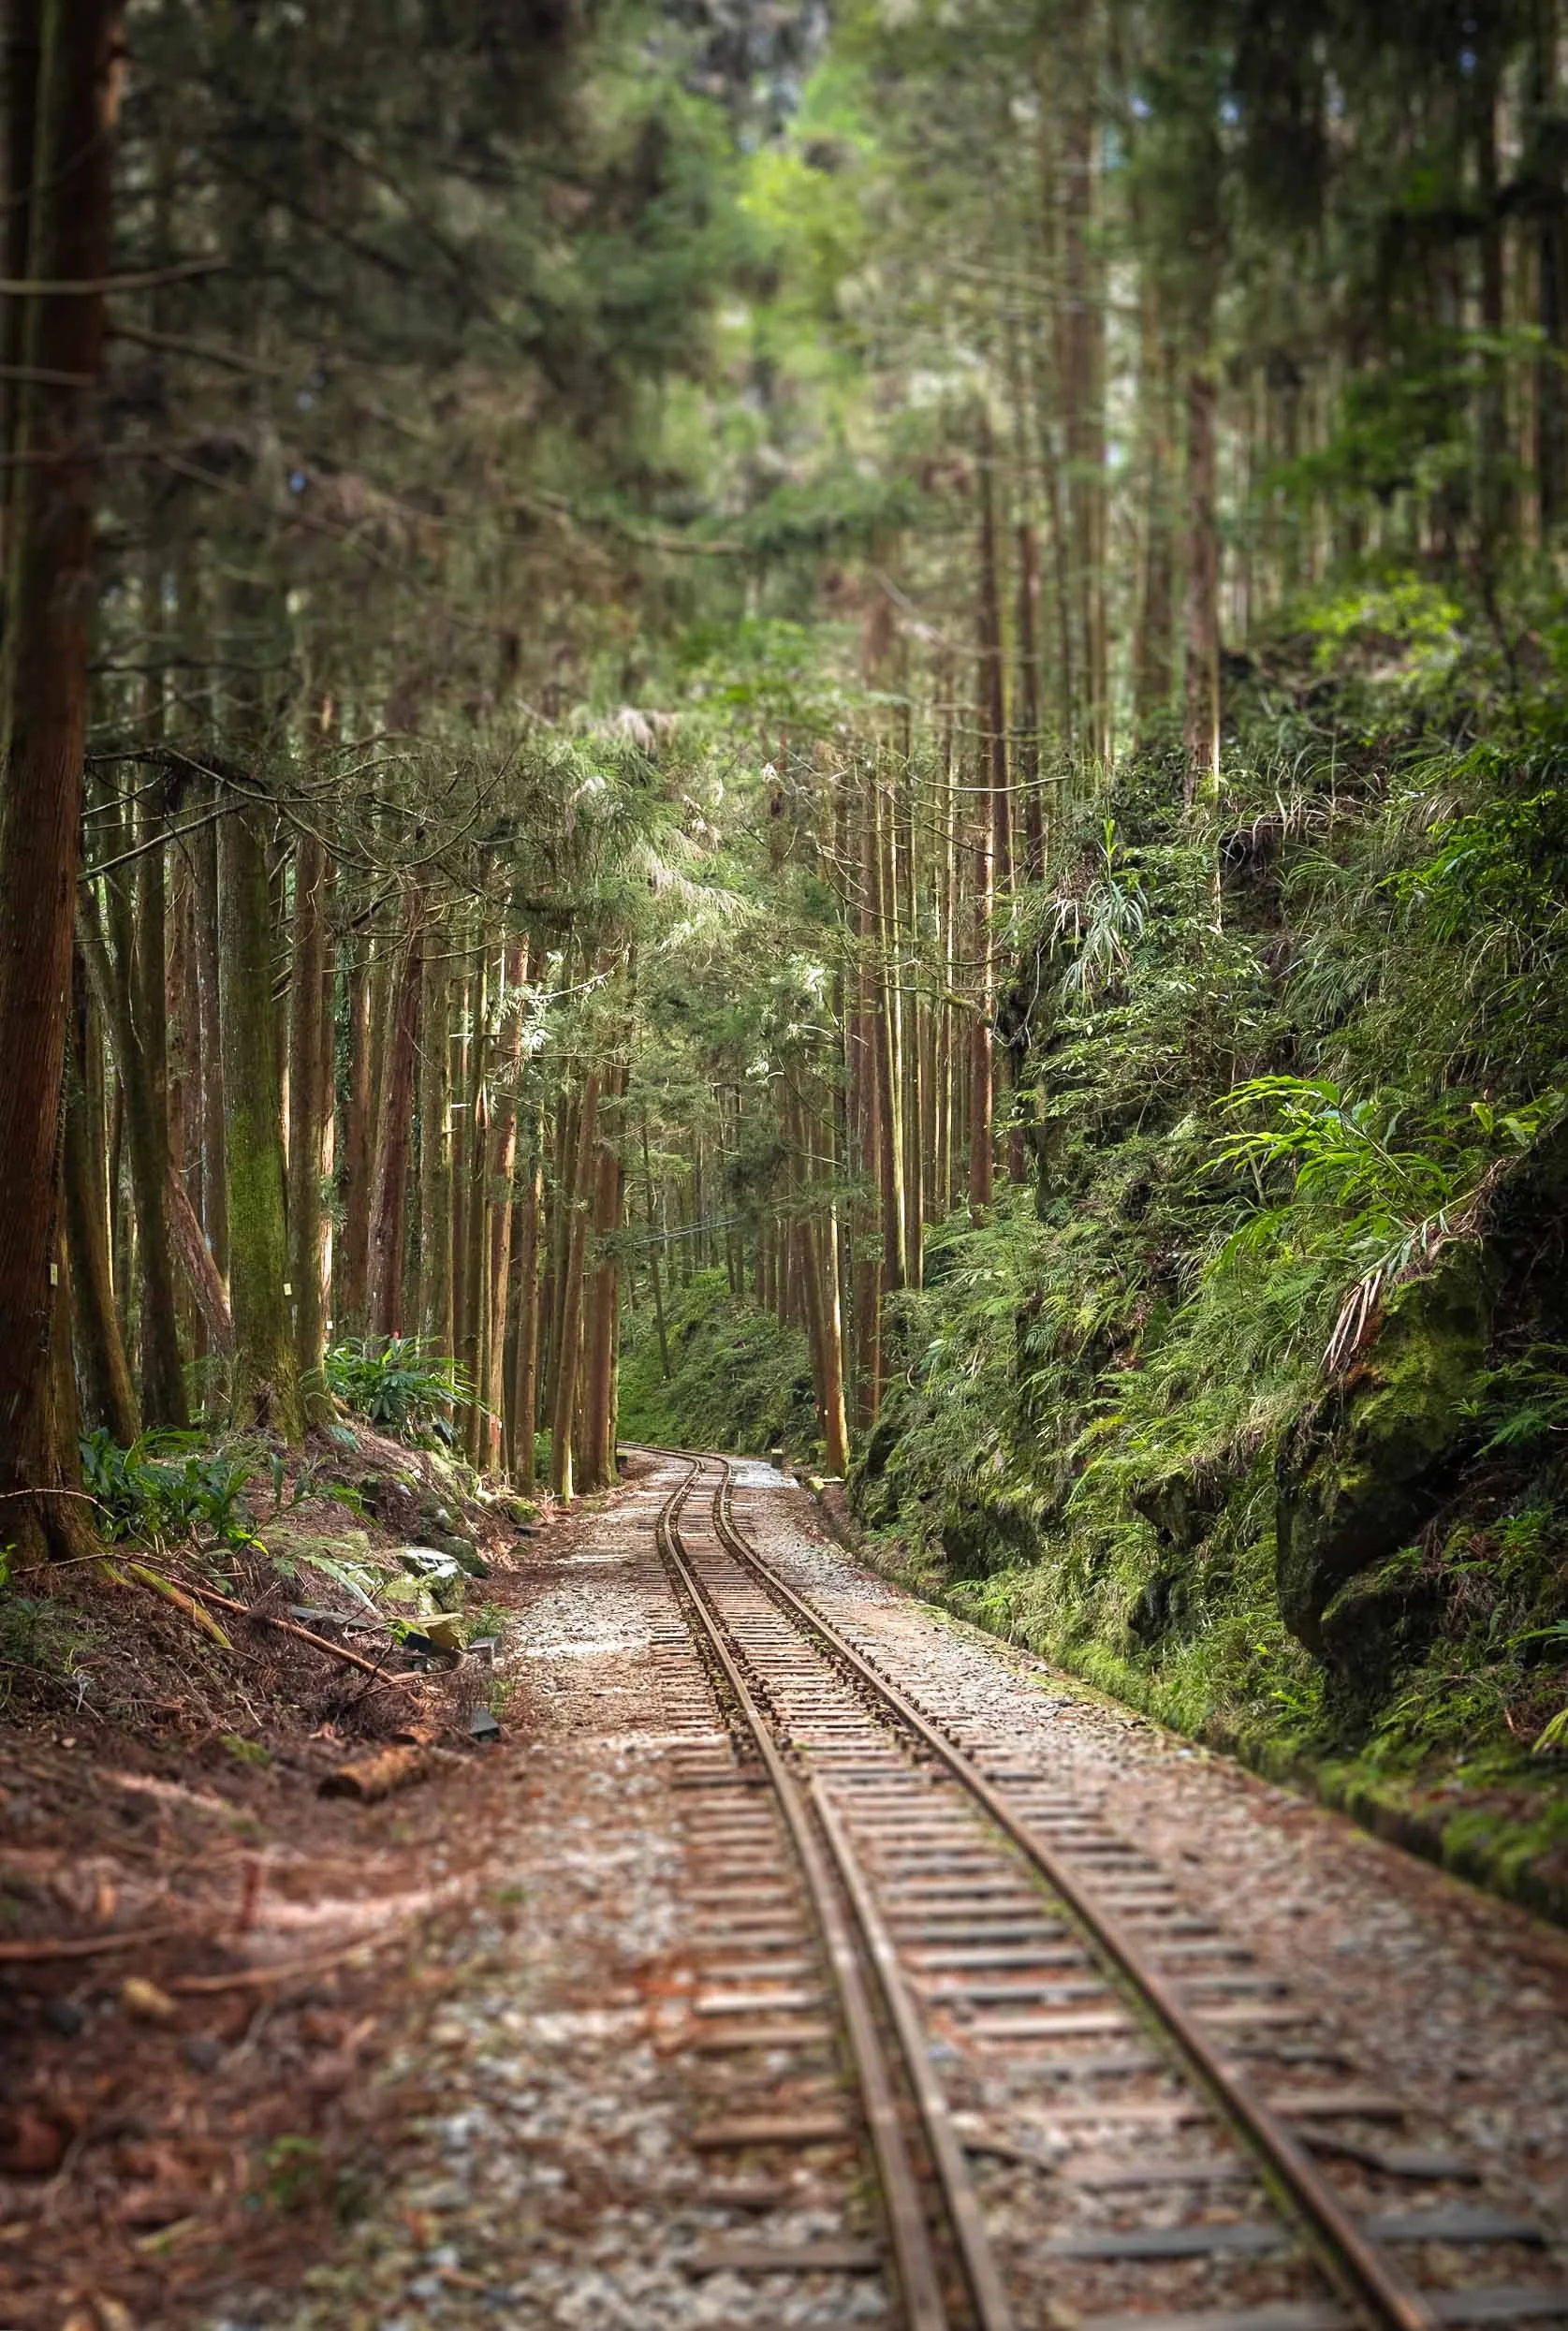
Forest Railway
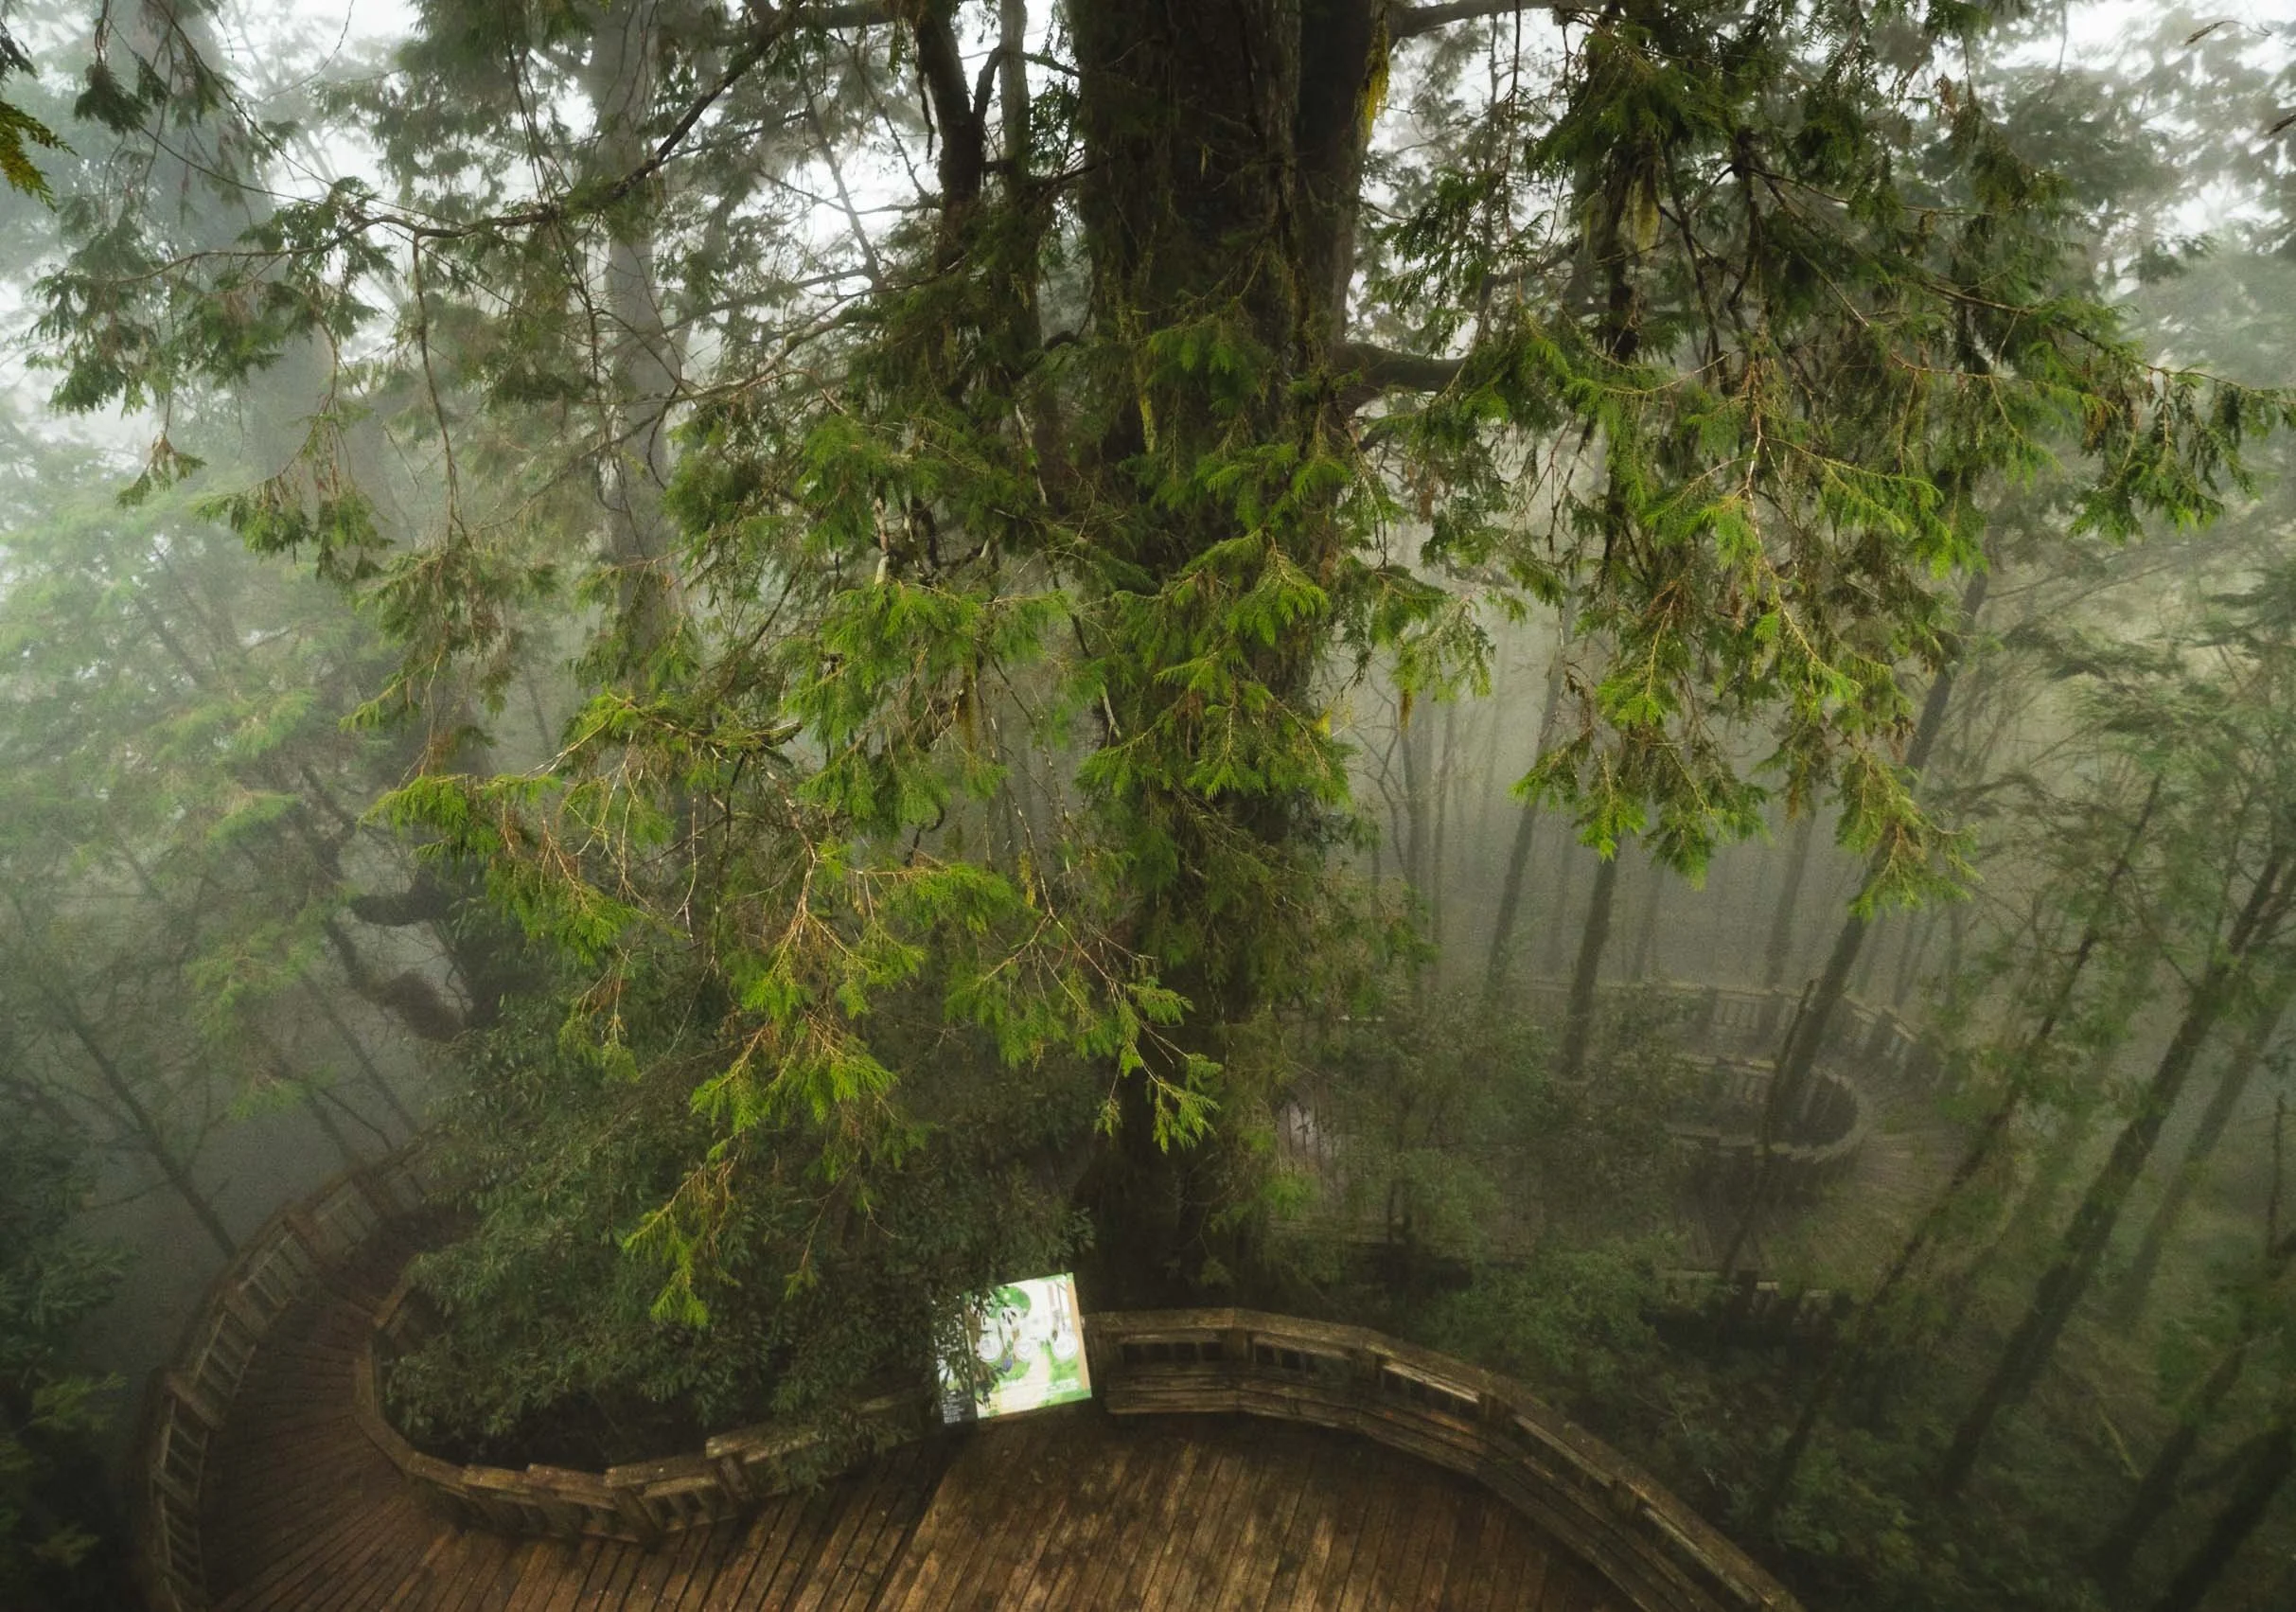
Not far from this area is one of Taiwan’s amazing narrow gauge forest railway tracks. We walked along these tracks near the Erwanping scenic area for a bit, looking for a very special tree…
Namely, this amazing giant cypress, growing around a huge boulder into the sky. I couldn’t find out how old it is, but it must be several hundred years, and is truly a special sight. We spent a few minutes here, and then had to move on quickly, to make it north in time for the lantern festival.


Pingxi
Lantern Festival
.
Taiwan loves lanterns - they’re everywhere - and on one special day of the year many of them get released into the sky at this lantern festival in the small town of Pingxi.

Busy Affair
Although there are several rounds of releases with dozens of lanterns each, and each lantern often with a group of several people, the festival always sells out its permits way in advance, with only a few tickets available on site. This leads to many people buying and releasing their lanterns “unofficially” in the surroundings.

A Good Spot
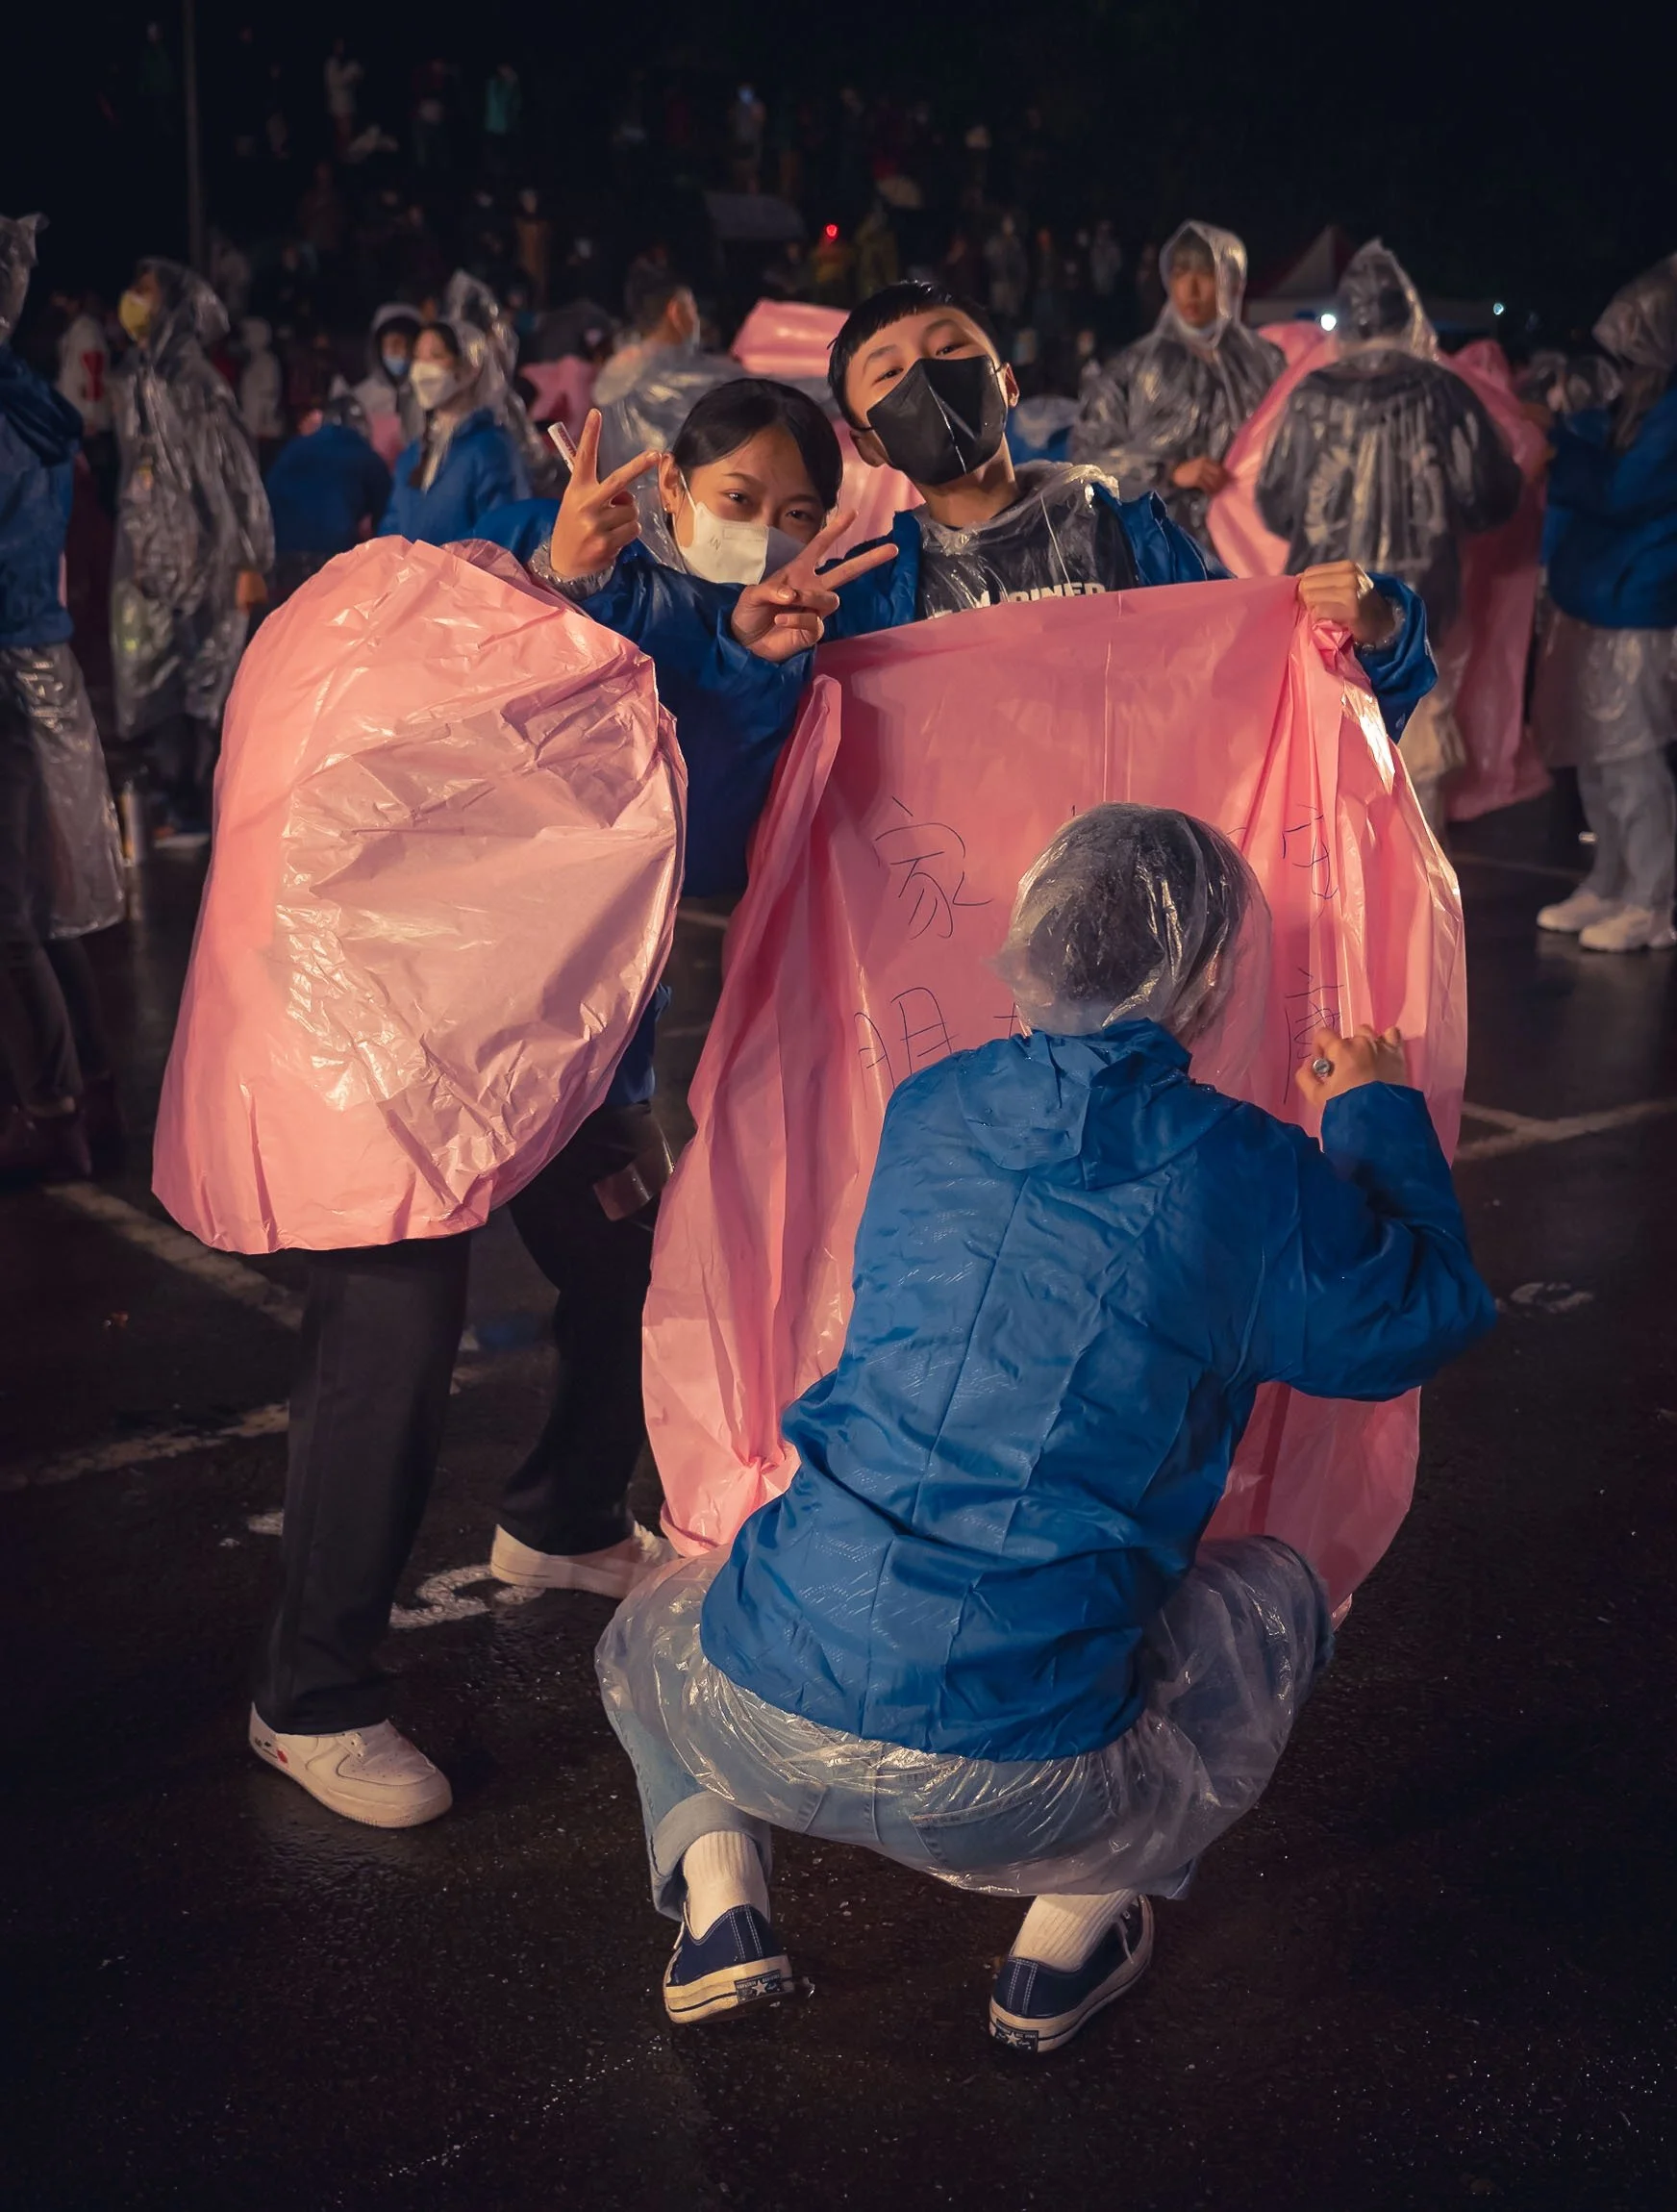
Access to the releases is quite strictly organized by slot numbers, and my last minute plan to go to Taiwan didn’t do me any favors. Visiting the organizer’s office and begging for a way to take photos did help though - being one of the only Westerners I spotted around may also have played a role 📸.
The idea of the festival is for wishes of good luck and prosperity to be written on the lanterns by their respective owners before sending them into the sky.

Singers and other artists perform in between the releases, making it quite an entertaining evening. They get to release the large primary lantern in each round.


Year of the Rabbit
Each group of lanterns uses different colors and follows its own theme, but the evening culminates in the final release, representing that year’s animal in the Chinese zodiac calendar with a huge lantern.
Rain isn’t ideal when releasing lanterns made of thin film meant to fly in the sky based on the buoyant force of hot air, so one or the other didn’t quite make it, and came crashing down in a rain of burning pieces - I almost felt transported back to the Beehive festival …


The Aftermath
The next morning shows the real consequence of the festival, with colorful remains all around the nearby forests. Even though the majority of the lantern material is biodegradable, the frame and other pieces linger in nature for a long time, something the organizers should find a better solution for.


Divine Trees of Qilan
The next morning had one more destination in store before heading to Taipei, and it was the only time I had a chance to visit the eastern coast. The road up the hilly landscapes makes for a motion sickness inducing drive, but the idea of seeing some of the few remaining Taiwan red and yellow cypress giants was worth it. A lot of these trees have been logged during the Japanese occupation, and only very few aged 1000 years or more (which gives them the “Divine” status) remain. Over 50 of them can be found in this area alone.
Shortly after we arrived for the small hike through the tree garden, clouds started to reach us at an altitude of around 1700m, making for a beautiful soft atmosphere. The largest of these trees have sign posts on them and are named after Chinese people of historic significance. They often reach more than 30m into the sky, with diameters as wide as a human is tall. The longest standing tree here is over 2500 years old.


The path is about 2 kilometers long and passes almost all the divine trees. It’s a beautiful forest trail, which we had all to ourselves until a small bus with a guide sporting a megaphone arrived (yep, that happened - so try and avoid it).

The Male Tree
No need to explain this naming methodology any further. Let’s move on.

Tapei
Arrival in Taiwan’s capital city, which, going by municipal boundaries, is actually not its largest with a population of 2.5m. That title goes to New Taipei City, with 4m people, more or less surrounding Taipei itself.


Tapei 101
As a skyscraper geek, visiting the former world’s tallest building was obviously on my list, but the 508m tall tower decided to hide in a blanket of low clouds most days.

Blossoming between the Clouds
As my time in Taipei was slowly coming to an end, I had to try my luck and made my way to the tower on a somewhat overcast day - and ended up having just a few moments in between the clouds.


The view from the bottom shows the curled ruyi figures above the entrance and at each of the stacked repeating sequences, often said to resemble the bamboo stalk (or a stack of Chinese take out food boxes, your pick).

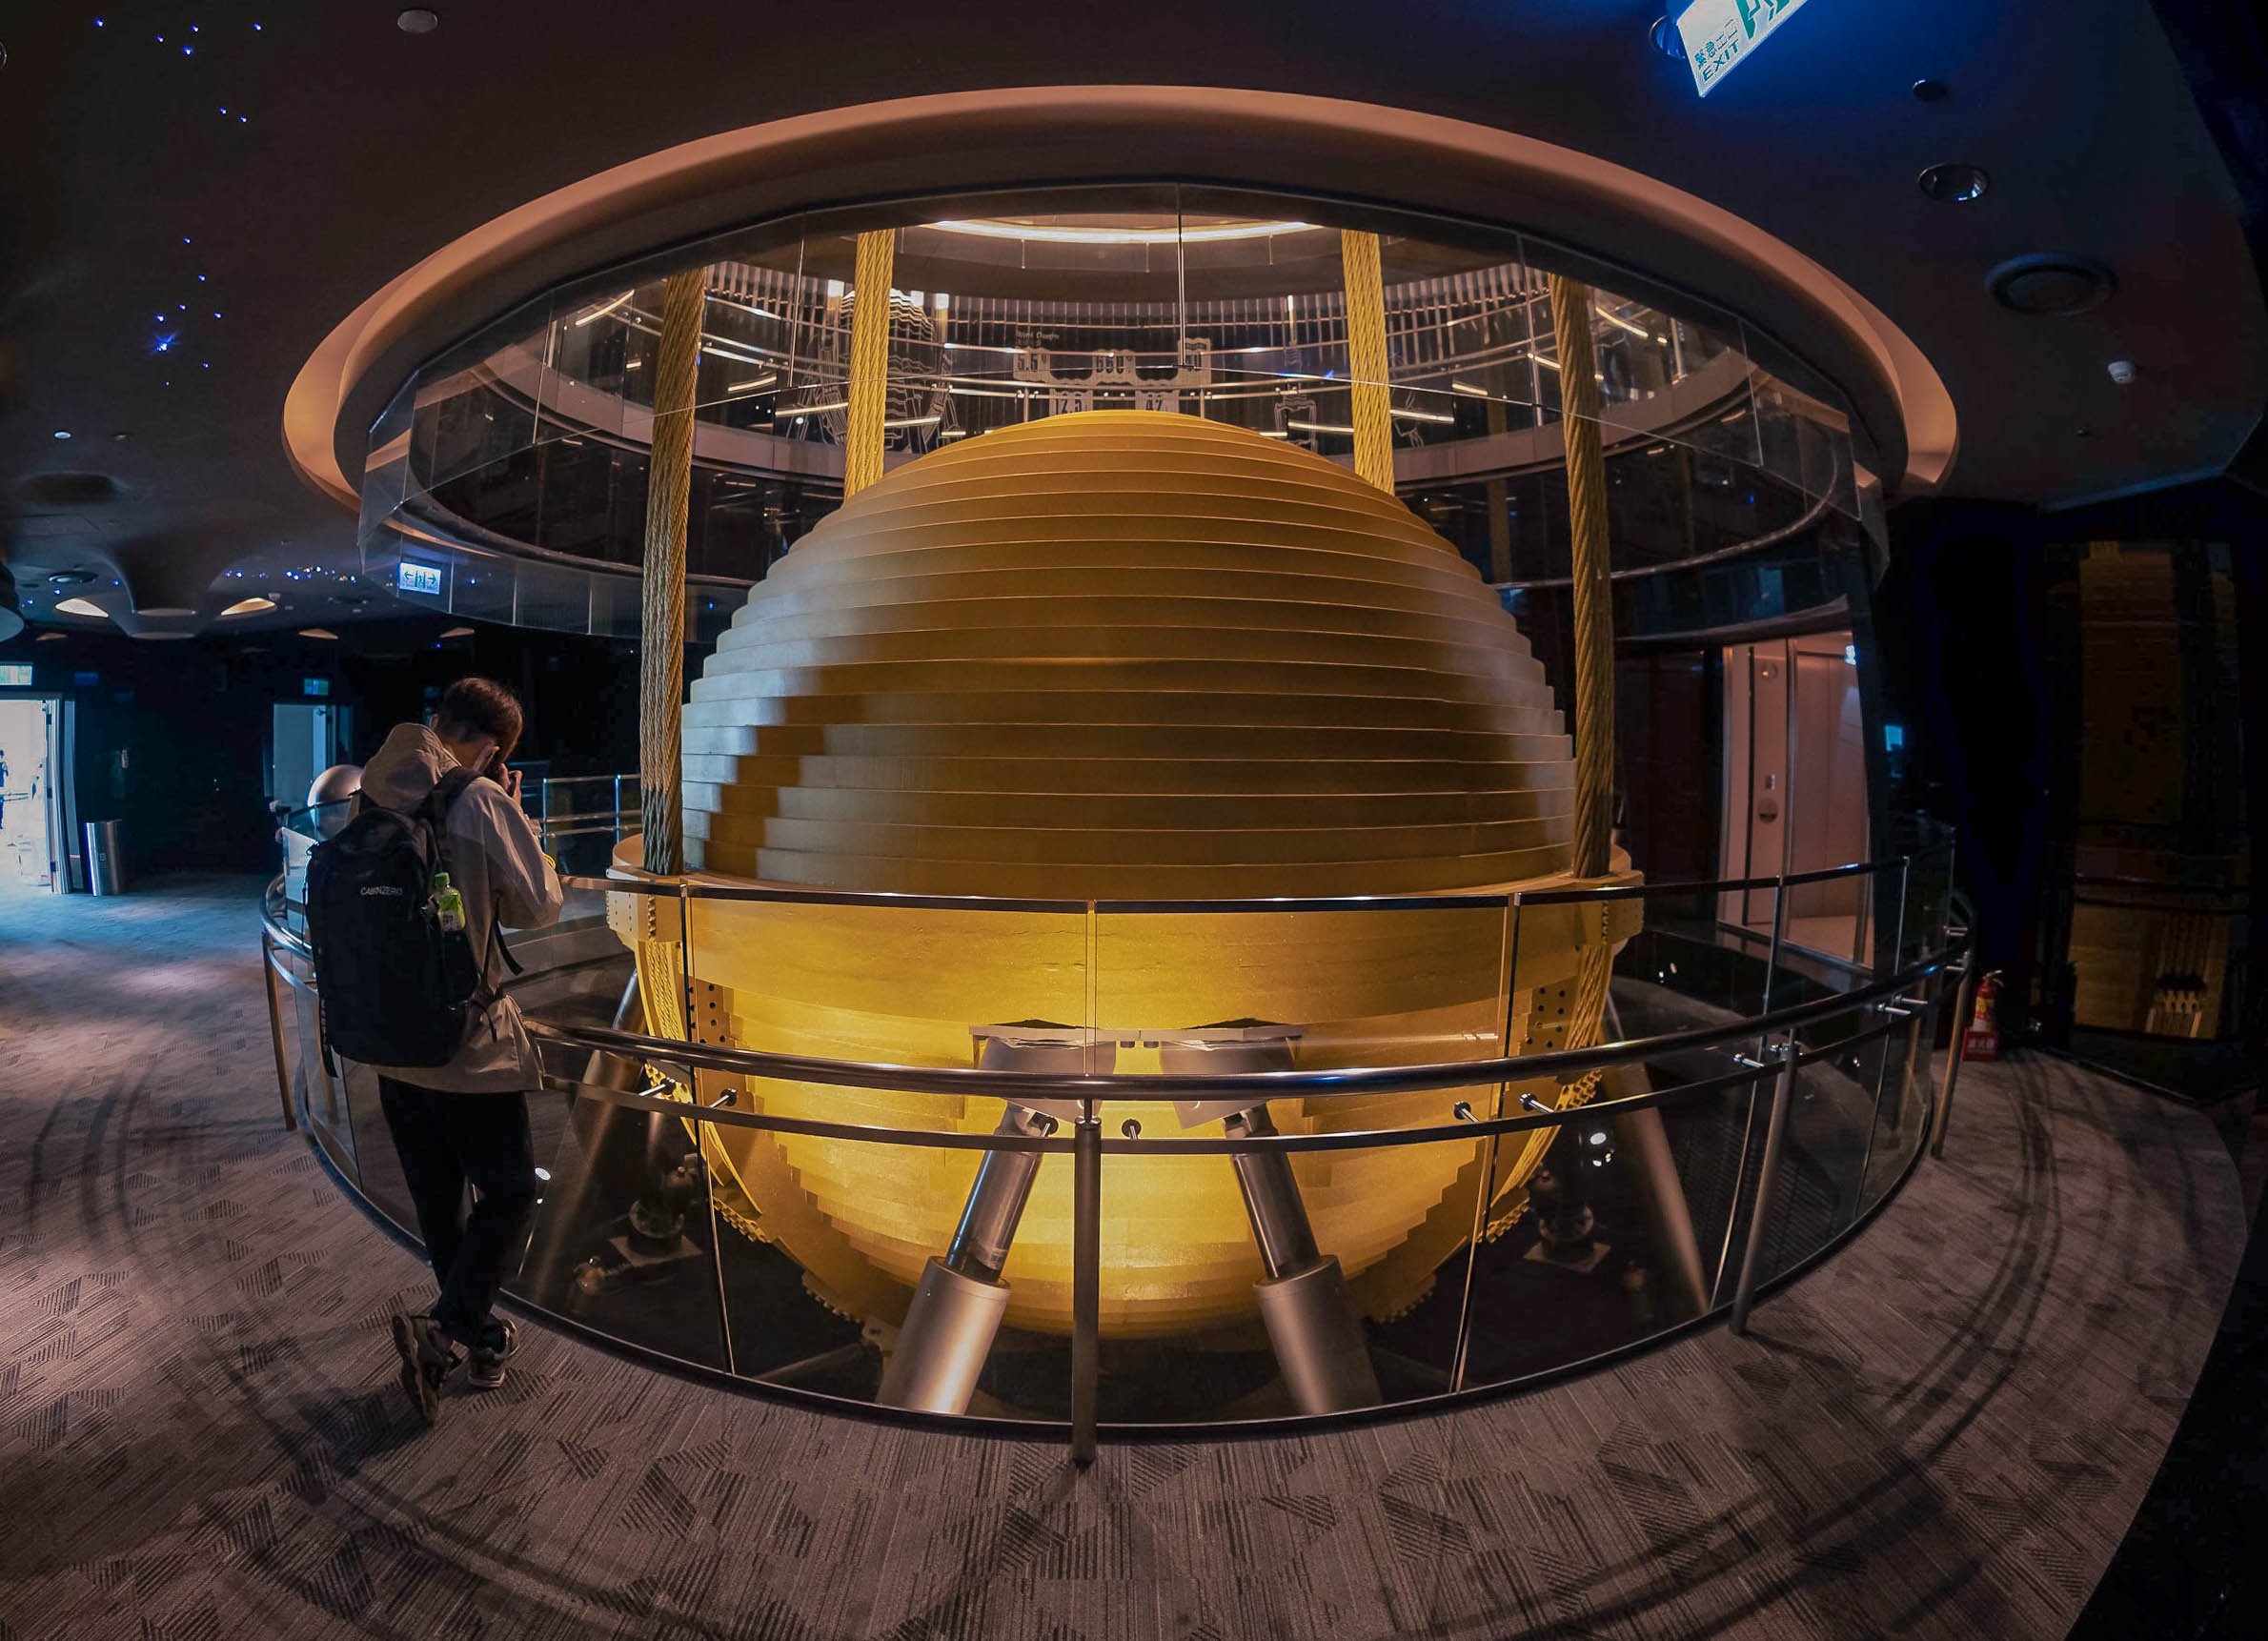
Balance
The most special aspect of Taipei101 is its structural design. The tower literally sits on a major earthquake fault line and in a typhoon zone, so aside from its extremely deep foundation and heavy interior columns, this 660 ton tuned mass damper counters the building’s motion. In 2015 heavy winds caused the damper to sway by a full meter, its largest ever movement. The damper has become a tourist attraction in itself.
While the panoramic photo at the beginning of this section was taken from Fuzhou Shan Park to the south, another nice and easily accessible (through a small hike) viewpoint of the skyline is the Elephant Peak in the lower hills a bit further east of the city centre.


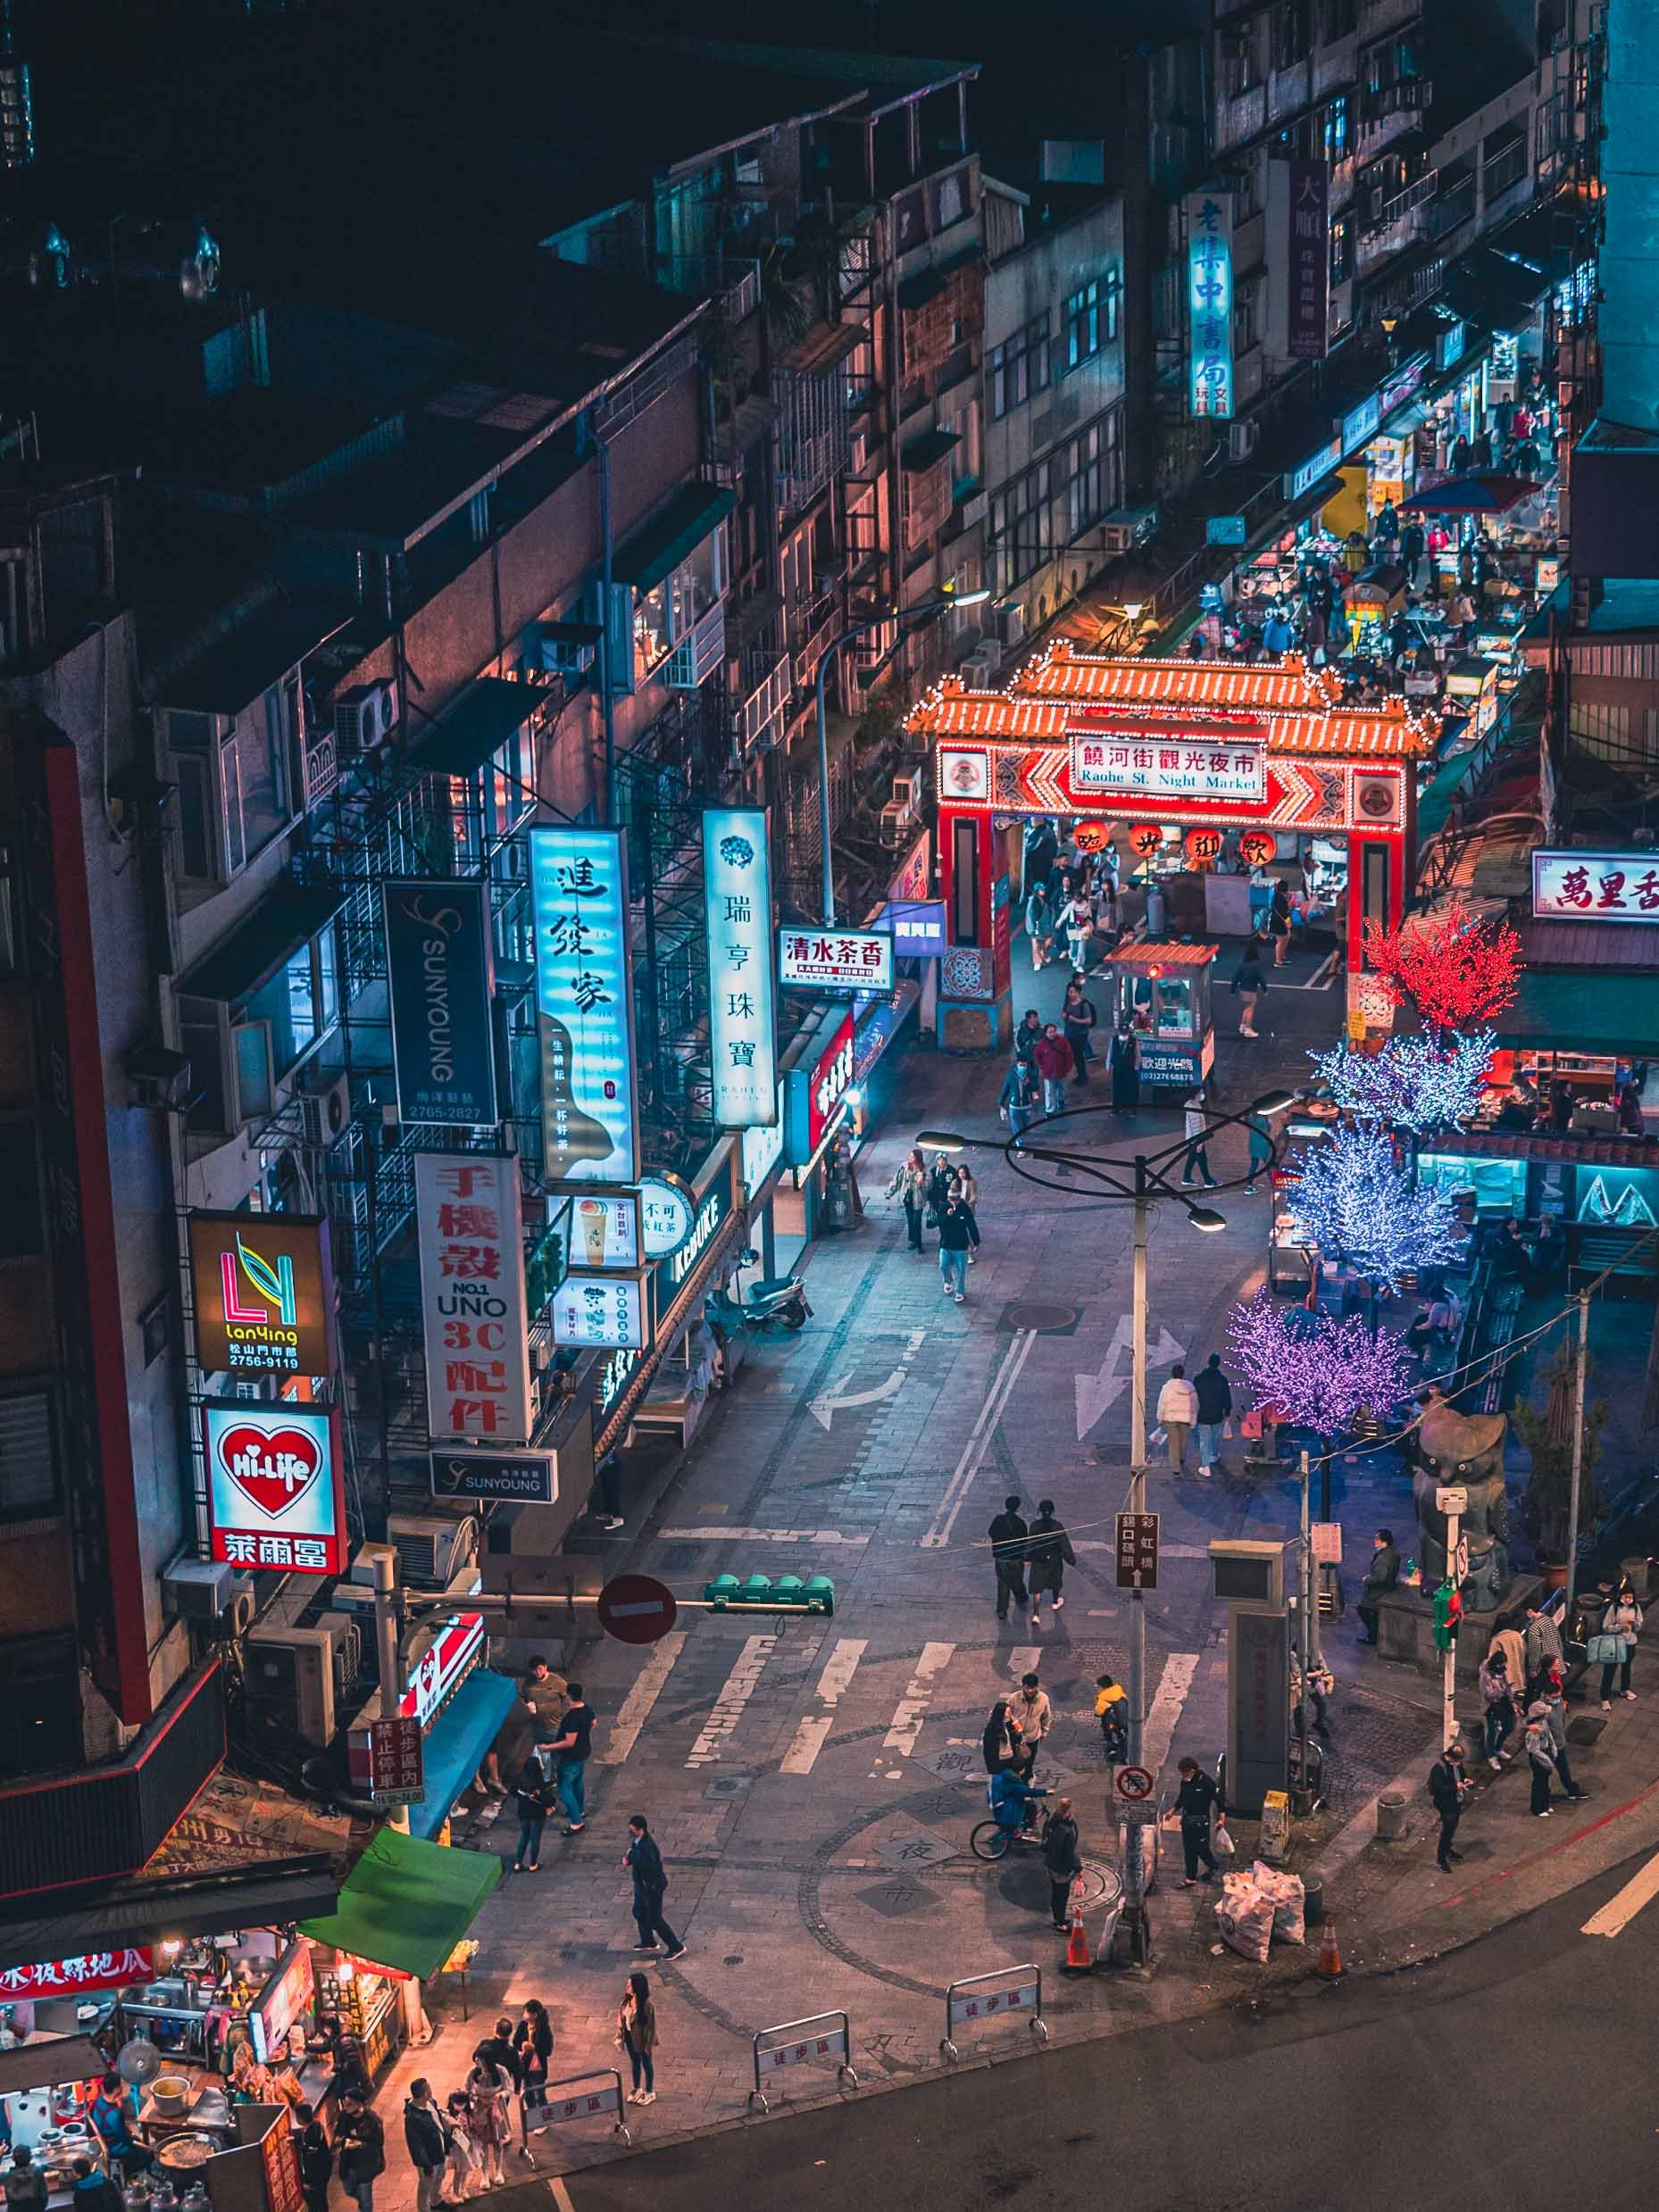
Ciyou Temple
One of my favorite temples in the city was this one at the entrance of the Raohe Night Market, originally built in 1753.


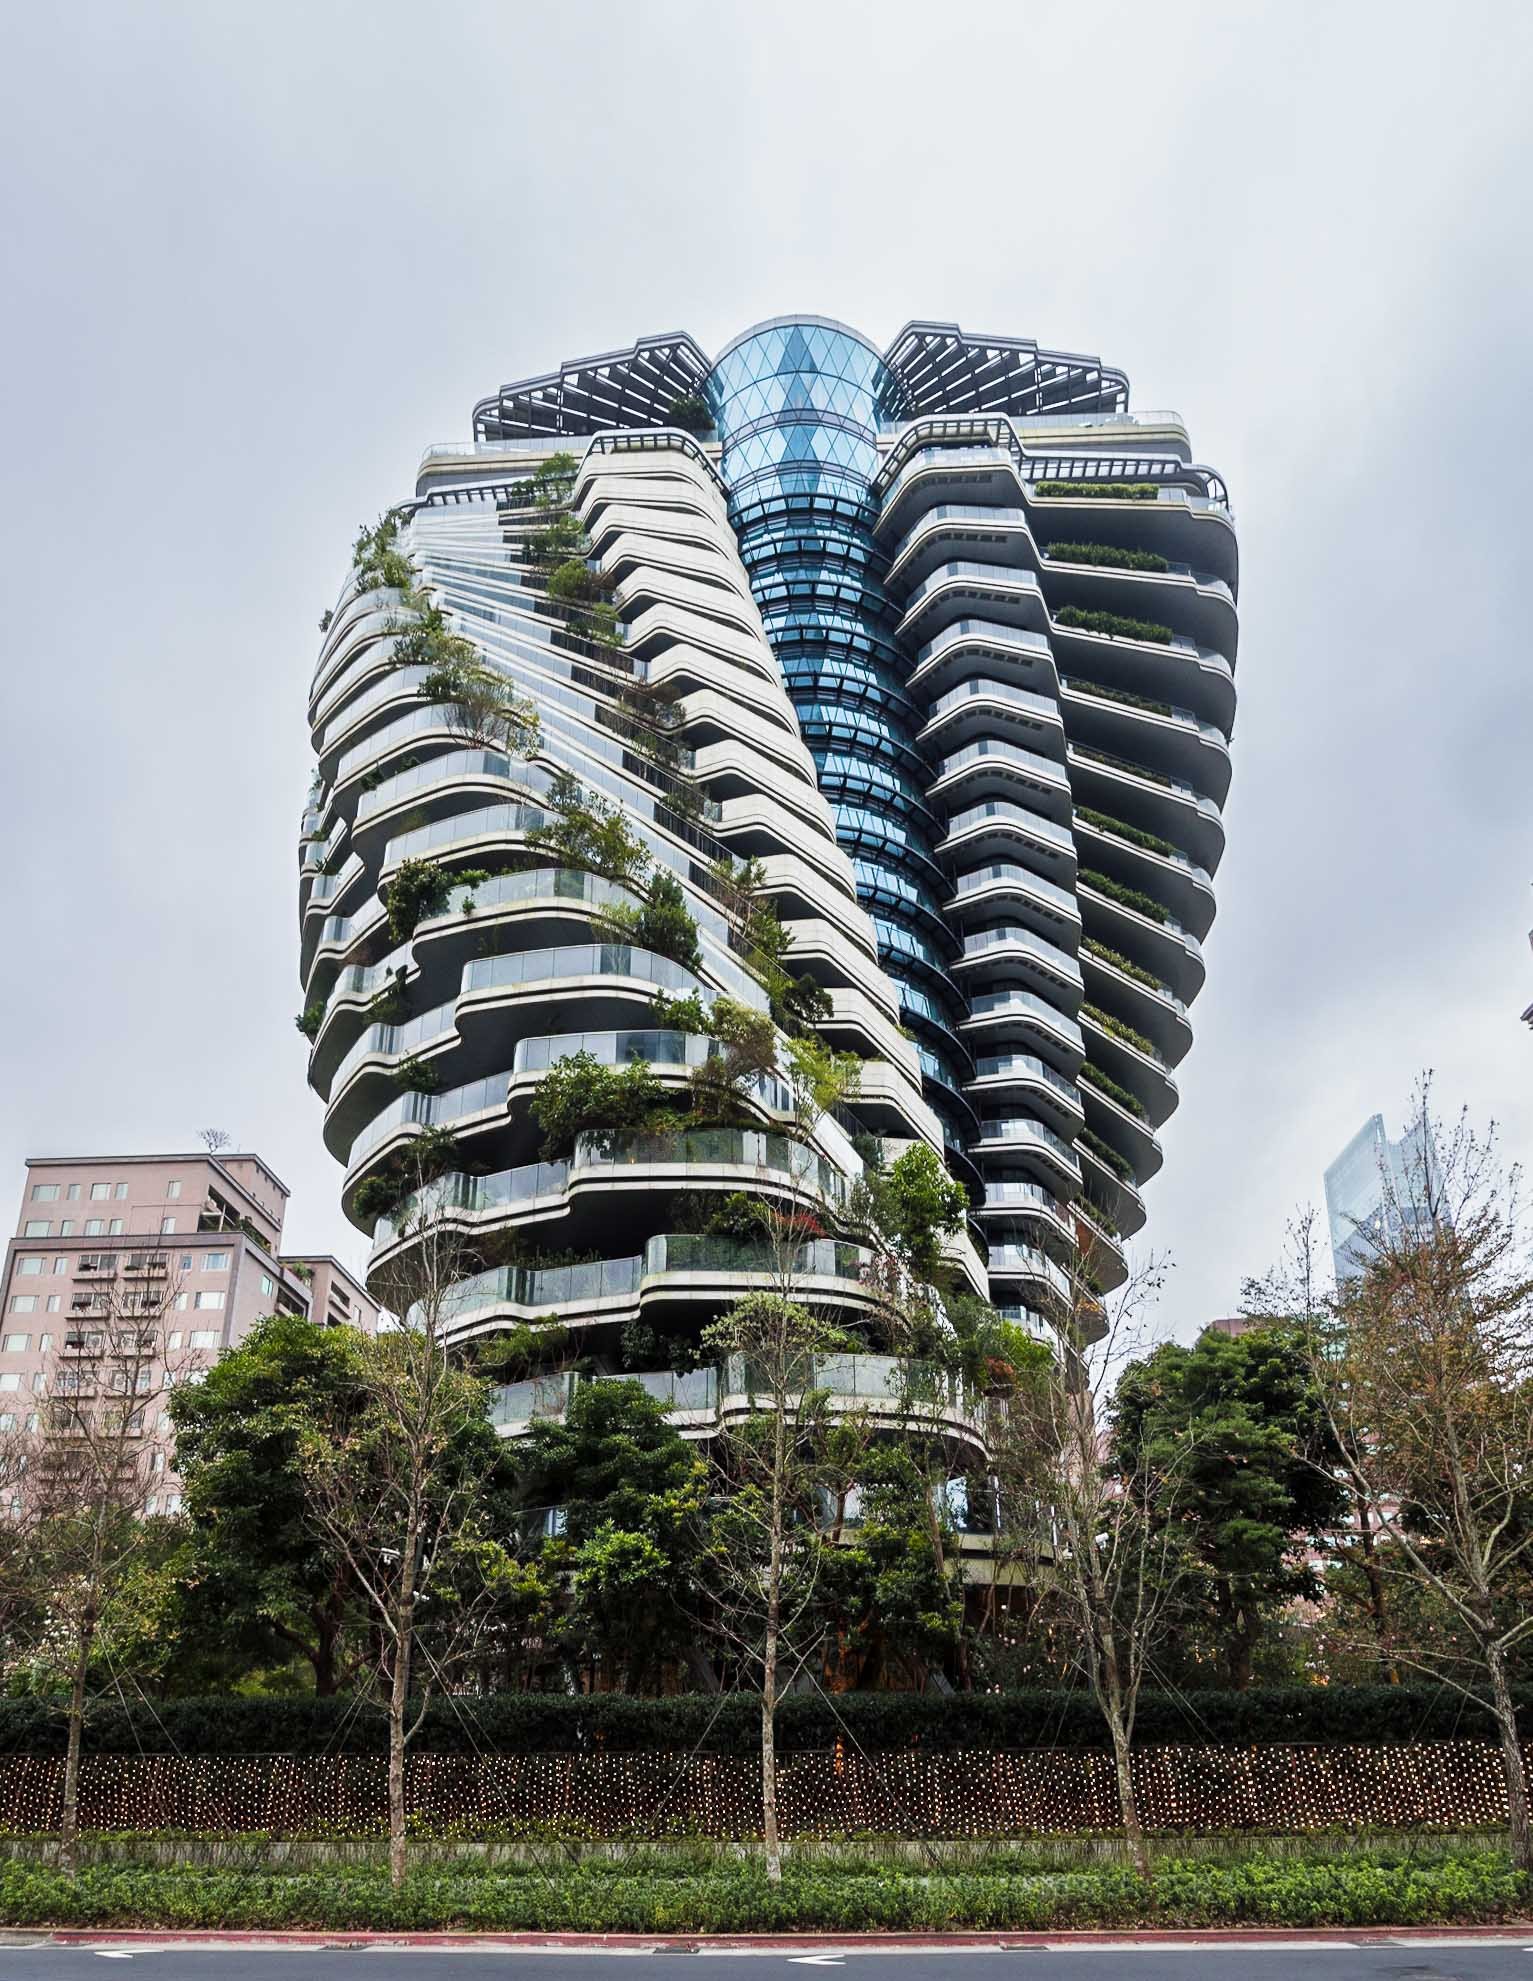
While the temple features a lot of intricate ancient details, another more modern architectural gem can be found in proximity to Taipei 101. The Agora Garden tower resembles the structure of a DNA helix and features 20,000 shrubs and trees.

Taipei is a great city to explore, with many beautiful alleys, neon-lit streets, bustling markets, intricate buddhist and taoist temples, architecture blending the old and the new, and a mix of north-Asian cultures that altogether result in its own heritage and atmosphere.


Northern Sights
I had time for one more rainy day trip, making my way to the very northern coast of the island, passing by the colorful houses of Zhengbin near the port city of Keeling.
My primary target was a visit to the retro-futuristic remains of the Futuro houses at Wanli village. About a dozen of these, together with several Venturo style houses, were once built here. Their story online is inconsistent, but most likely this happened in the 1980s, before they were abandoned some 10 years later.


The original style was developed by Finnish architect Matti Suuronen, but the whimsical flying saucers never quite became the reality of the future. Nevertheless I could have spent hours here, but the pouring rain got the better of me quite quickly.

Futuro
The state of the houses is a far cry from the techno-utopian promise they once carried, although I did spot one or two examples that were in a more habitable state - in fact, one looked like it was restored and occupied.

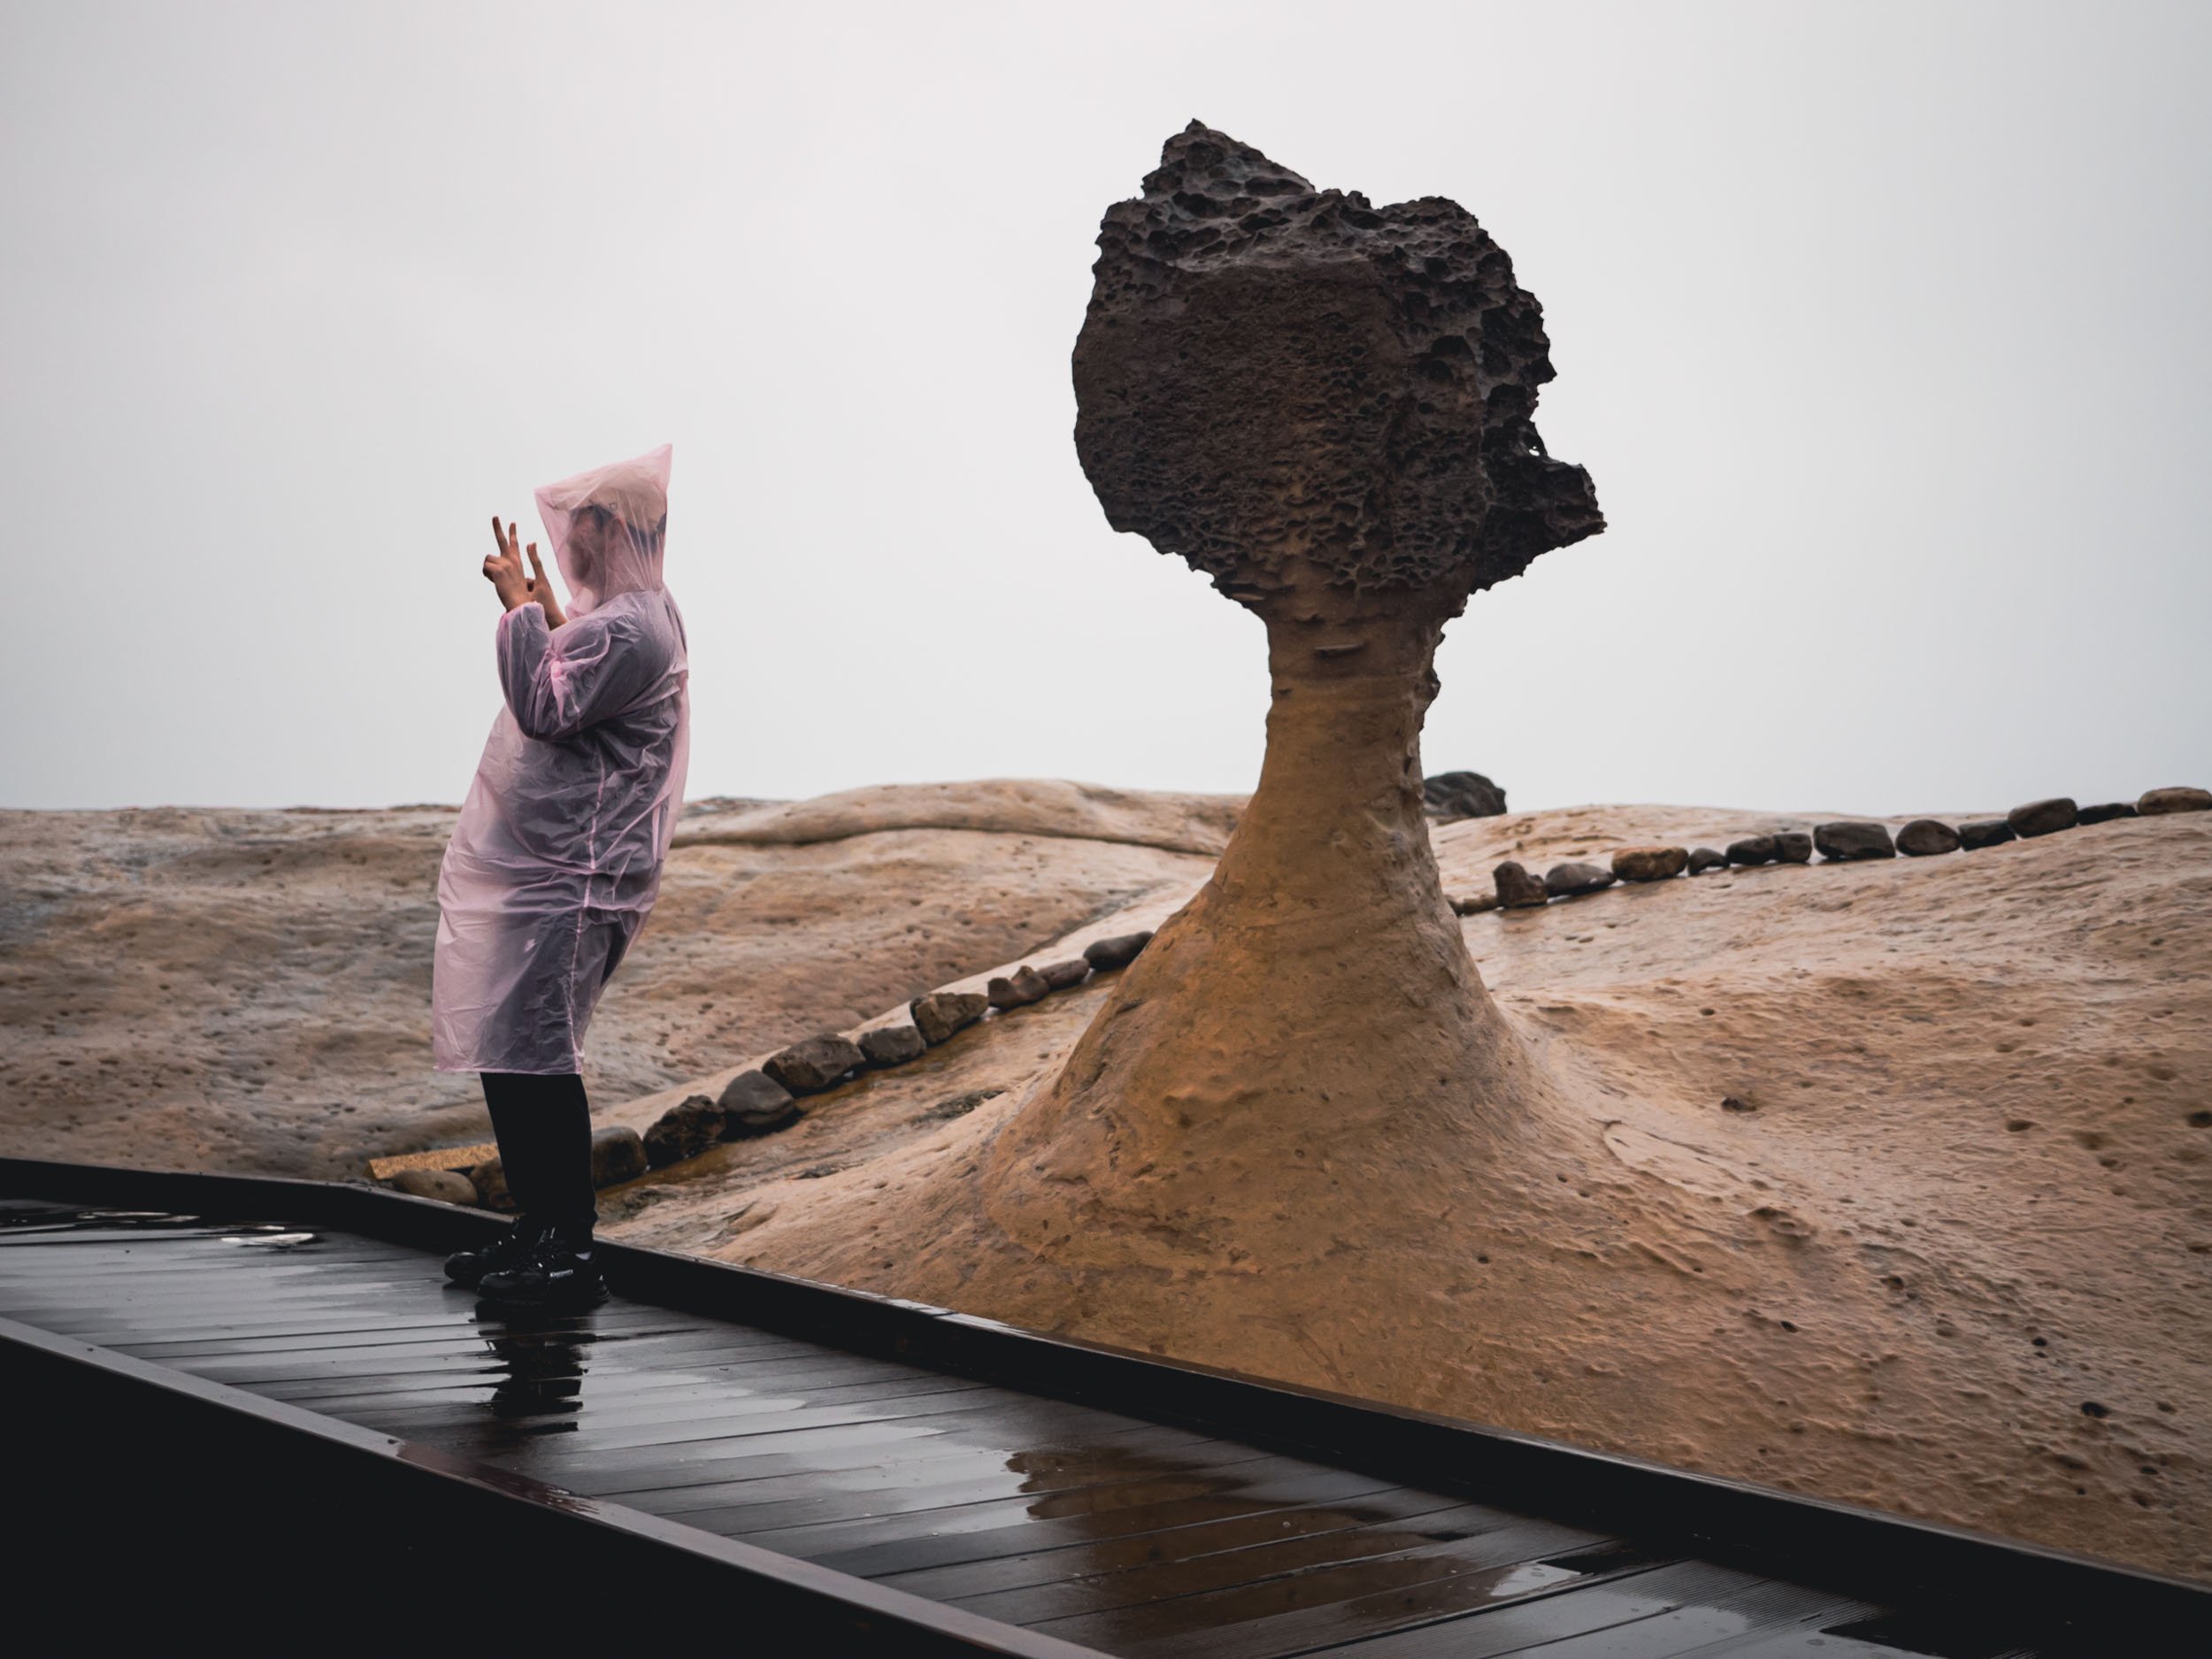
Yehliu Geopark
The last destination for the trip was this mile long cape stretching into the East China See, which features a curious assembly of hoodoo style rock formations that have slowly emerged through limestone erosion.


Nature has done some great work here, creating everything from oddly shaped holes in the coastline to a flip-flop style shoe outcrop, as well as beautiful colored patterns in the sandstone, and a human sized formation that is said to resemble a woman’s head: the famous “Queens Head’, standing like a sentinel with the dozens of tourists wanting to take their photo next to it.


Until Next Time
I think my story in Taiwan isn’t quite over yet - exploring the east coast and another visit to the Yanshui Beehive Festival are still buzzing in the back of my head.
Subscribe to my newsletter to get notified and don’t miss out on more Wonders of the Globe.
Other Recent Posts:


Java’s Volcano Heaven - Indonesia Part 2
The world's most populous island is full of amazing places - some of which I managed to visit.
Java is - unbeknownst to many - the world's most populous island and - maybe more well known - full of amazing places. I spent around 10 days here during my time in Indonesia (see also my blogs on Flores Island & Komodo, and subscribe for more upcoming ones, including a trip to the Orangutan’s of Borneo) and was visited some of the sights this home to over 150 million people has to offer.
Start here for a few aerial impressions, and read on to learn (and see) more about each of those incredible spots, and a few more…
I came to Java by car ferry from Bali, and had a short night before a 3am alarm to make it to the starting point of the trail that takes you up an amazing volcano formation, on the very eastern edge of the looooong island.

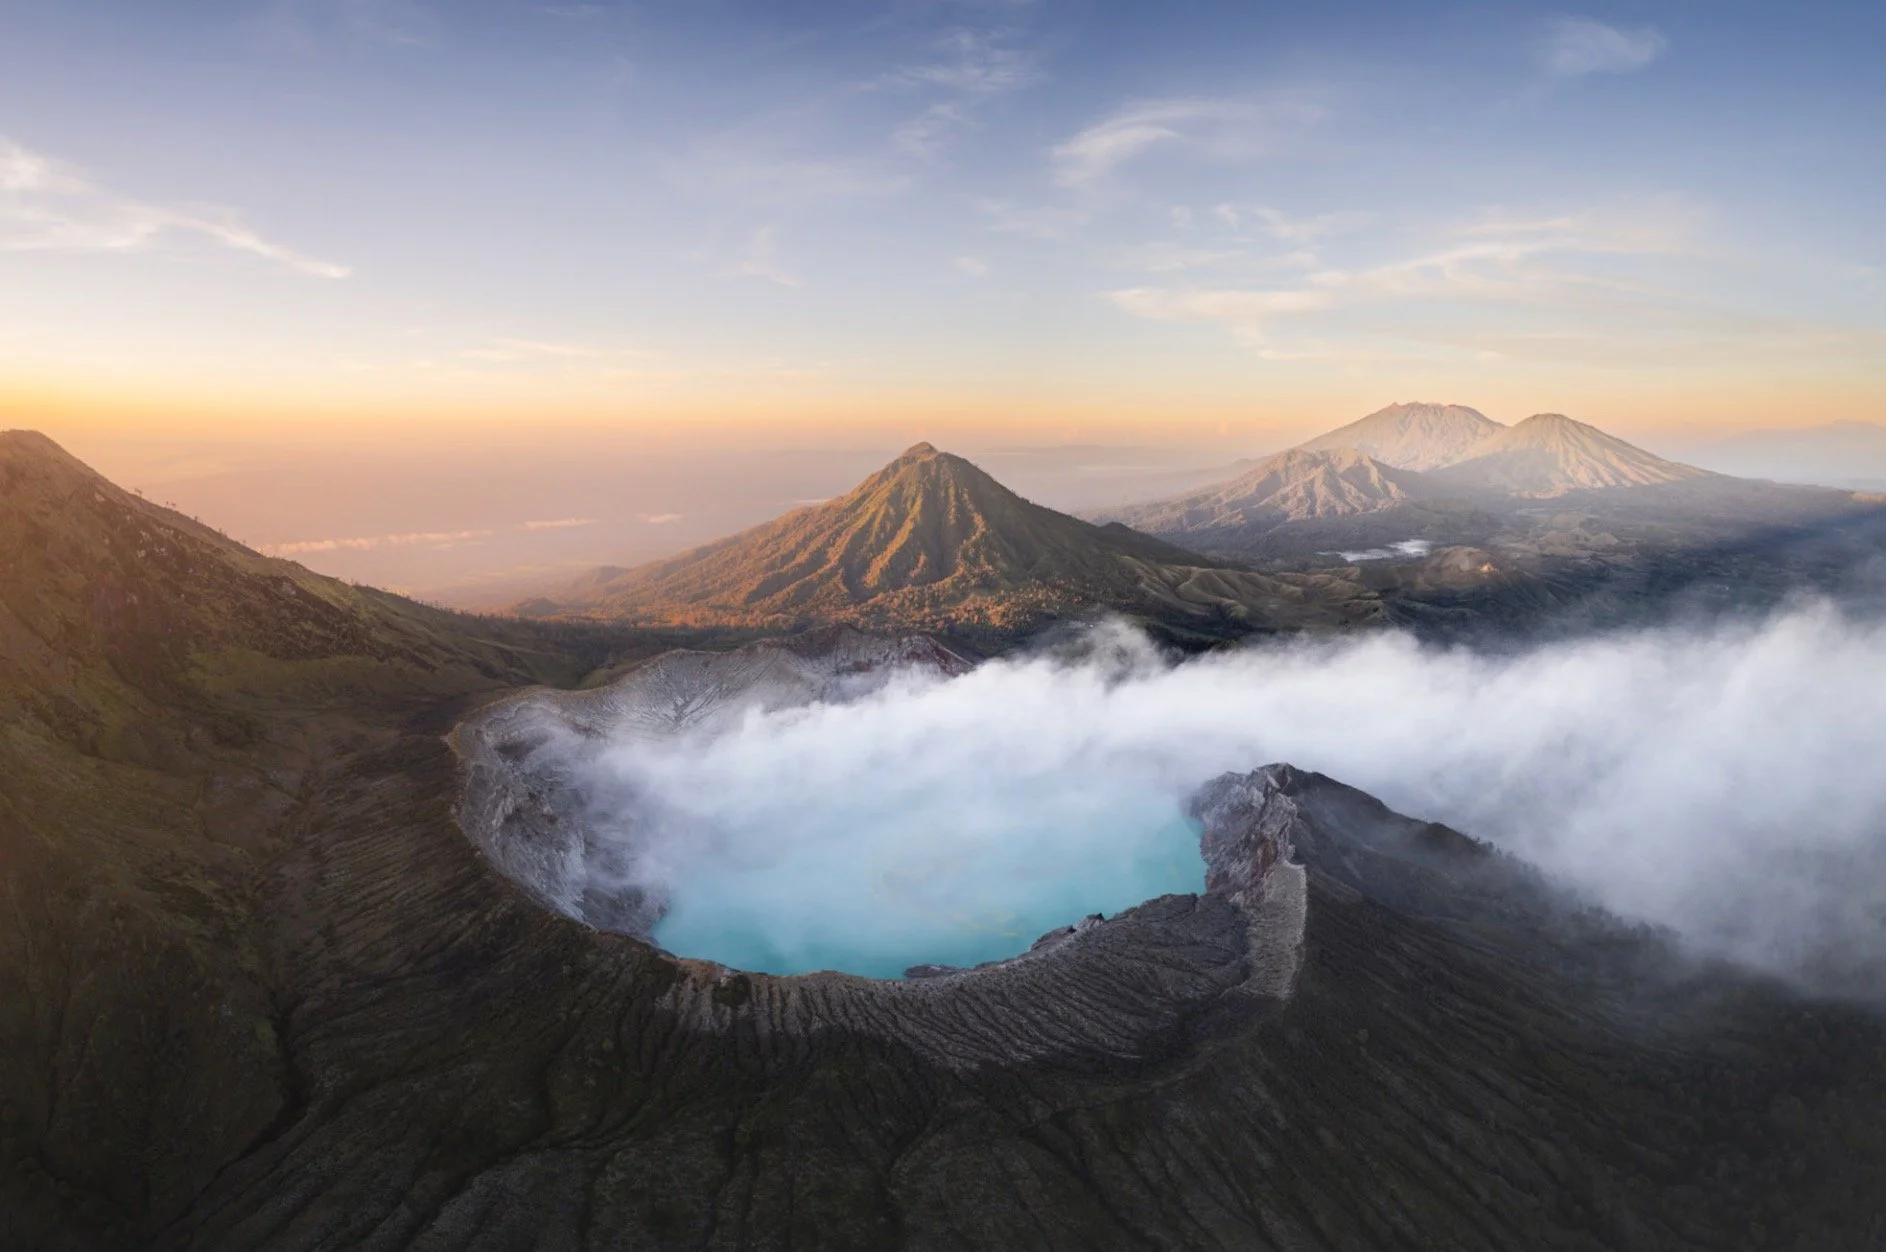
The Ijen Volcano Complex
Blue fire and an acidic lake await

This may be unsurprising to some of you, but I was the first tourist that day to complete the 2h hike and still got to witness a bit of starry night above the smoke filled caldera. After a few minutes though I started the 45min hike down into the dark crater to find the infamous blue fire and see the acidic lake up close.
The way down is not that simple if you arrive before blue hour, because it’s completely dark in the crater, there is hardly a recognizable path, and you scramble over rocks and slippery steep sections. The photo below was taken after I had already arrived at the bottom and the sky slowly developed a purple hue. You’ll notice a few flash lights on the edge at the top just starting to make their way down - arriving early has the benefit of a few undisturbed moments to take in the bizarre scenery, before the very small space at the bottom of the lake gets a little crowded.


Equipped
This last part of the adventure also requires you to wear a proper gas mask, as the sulfuric gases make it almost impossible to breathe otherwise once you get close to the lake - trust me, I tried.

Blue Flames
Ijen volcano is famous for its blue fire - one of only two places in the world where such a phenomenon occurs permanently. The blue flames originate from sulfuric gas that escapes from the cracks at very high temperatures. A rumor told me that the blue fire isn’t very active these days, so better check before you go (and if it is, go soon to witness it in case it’s too late some day).


The same gas is actually channeled through pipes at this spot to support sulfur mining, which has happened here for many decades. The yellow bricks that develop after the molten sulfur hardens are then transported by workers up the crater and down the mountain. While - from what I heard - this work is paid comparatively well, it’s also dangerous and very strenuous. The laborers fill the baskets with 70kg or more of hardened sulfur, and then complete the entire journey to deliver it at the foot of the mountain to get paid. Most of them do it twice a day.


The workers and various researches sometimes cross the crater lake that developed here in these kind of self-made barrages - a dangerous affair, given that the lake is considered the largest highly acidic crater lake in the world, with a ph of <0.5.


When you arrive in the darkness it’s actually difficult to understand the scenery around you and how this otherworldly environment really looks - only as I walked back up was it bright enough to grasp the scale of the crater, the lake, and the amount of smoke escaping from the cracks and pipes where the sulfur is mined. Look closely and you see the small barrage from above at the shore of the lake.
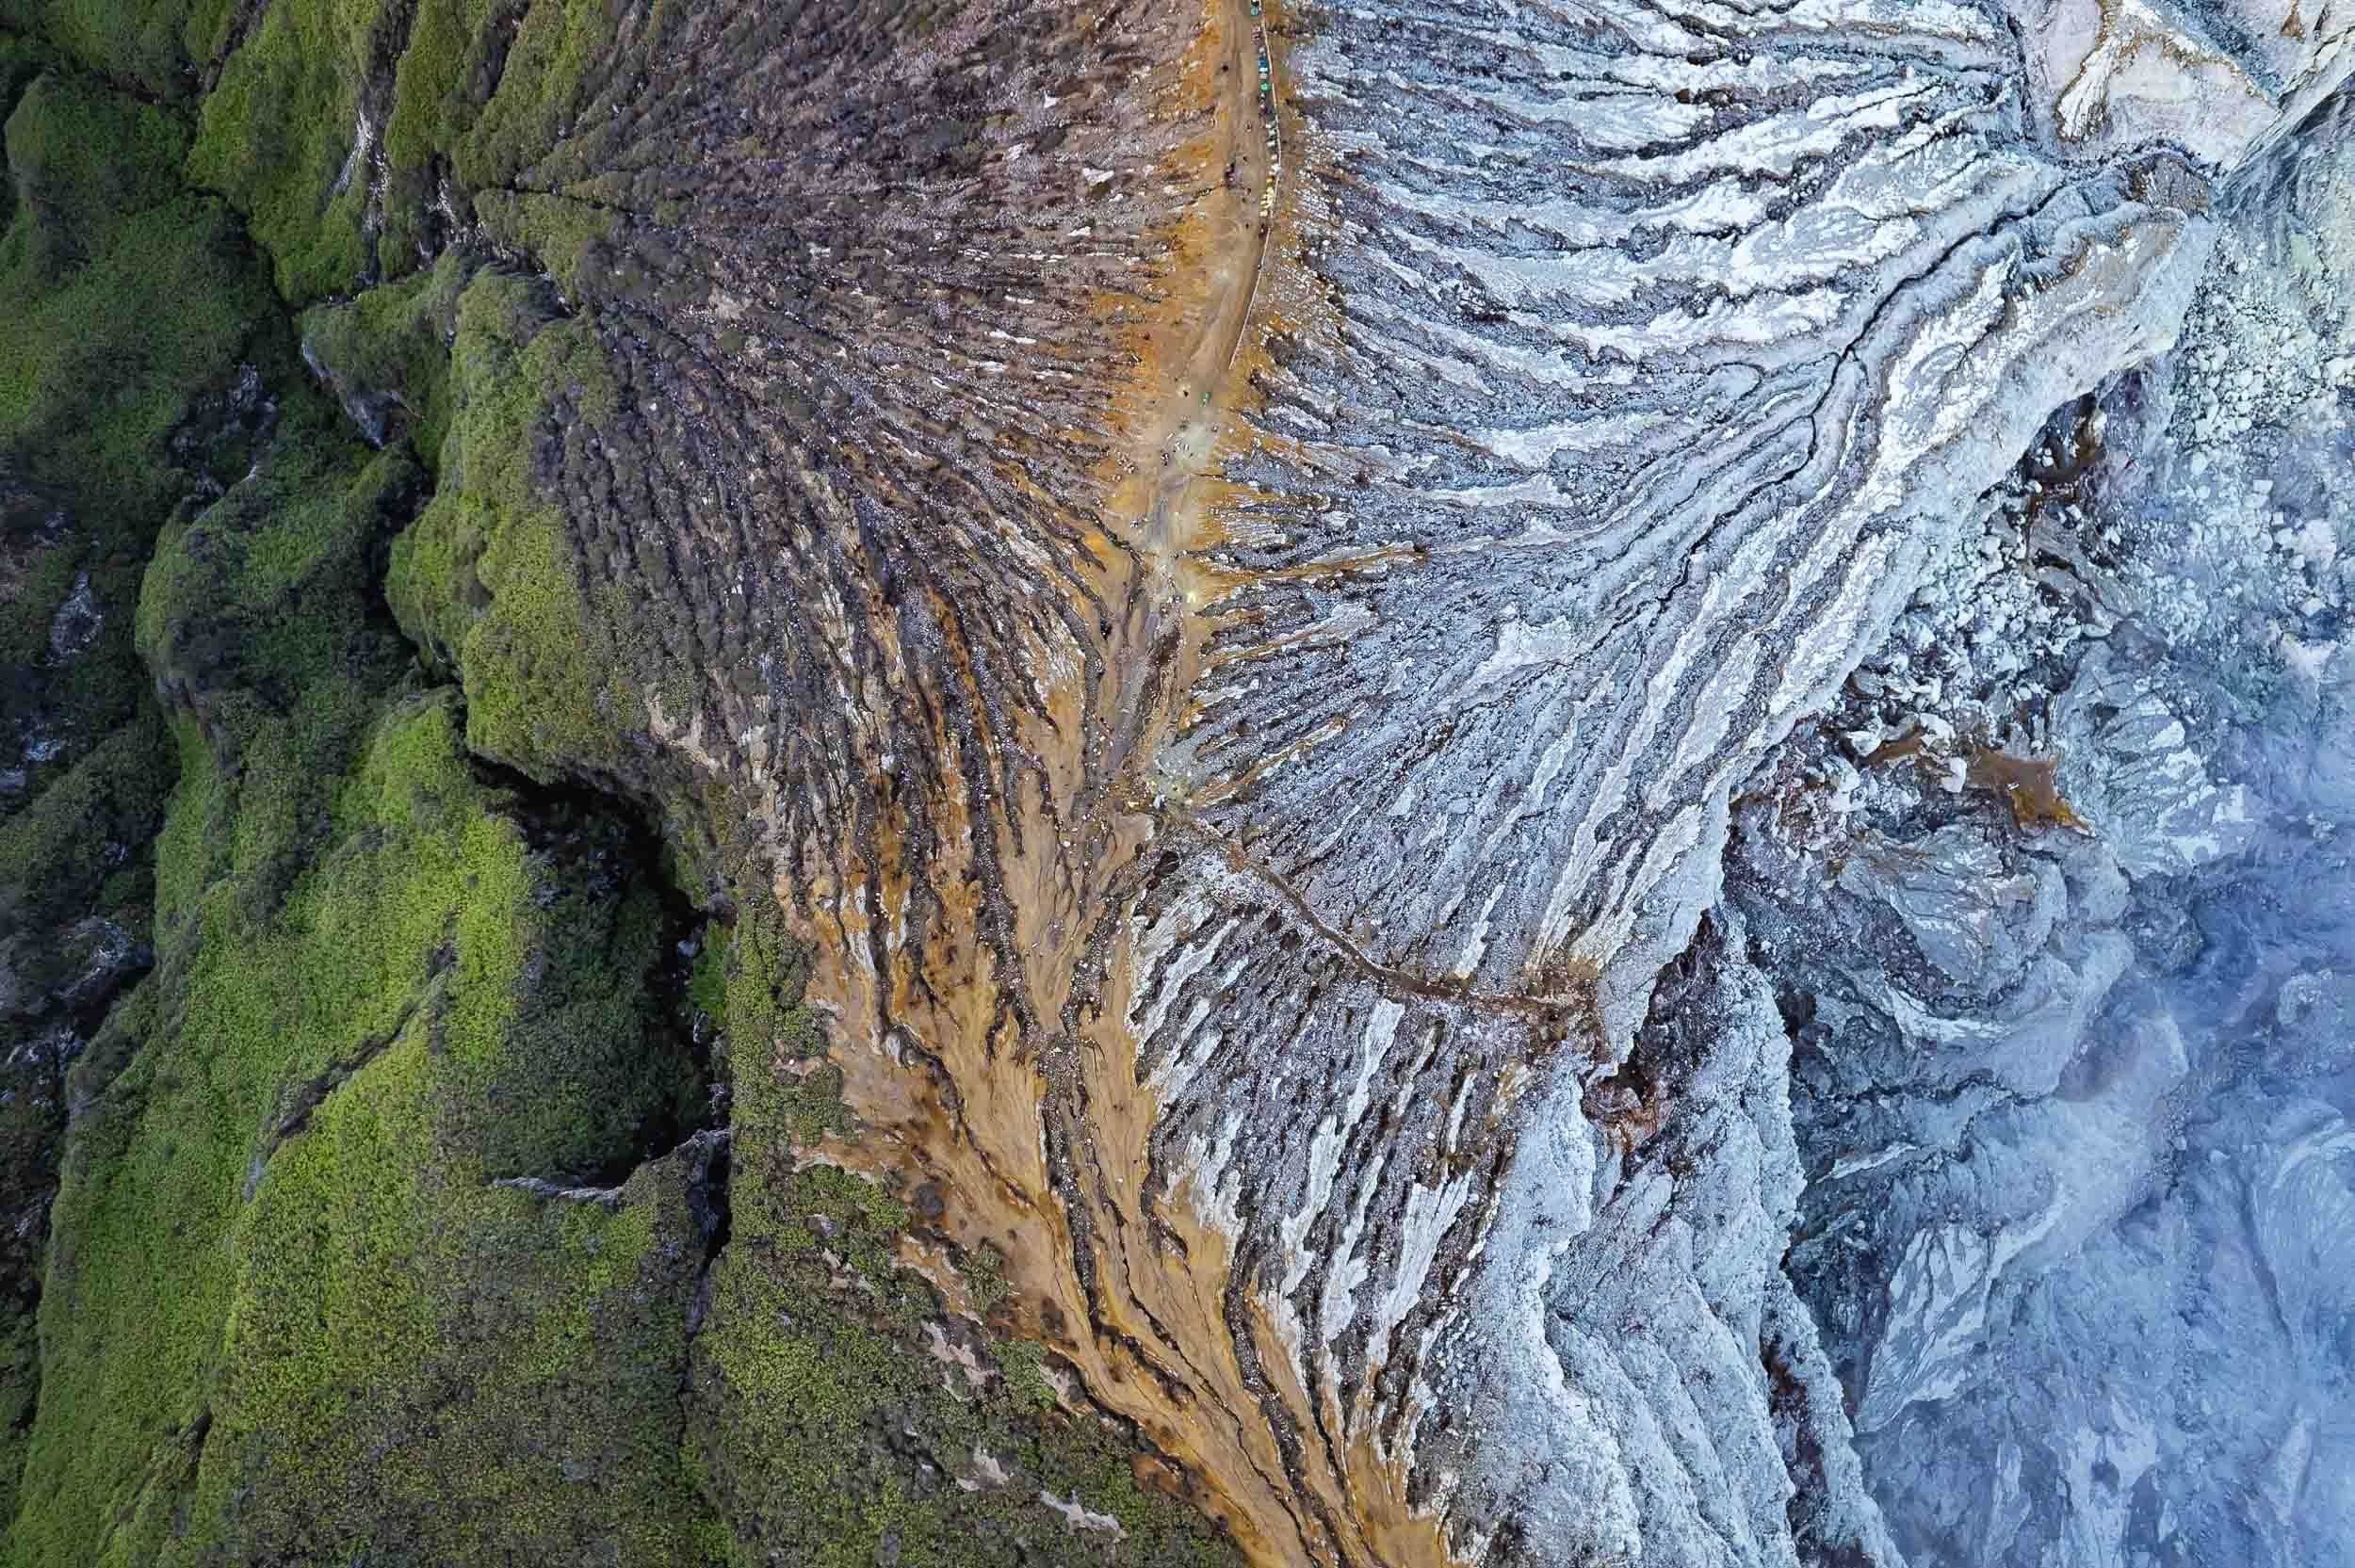
Abstract
Once I made it back up the sun had come out and I had a moment to fly the drone, capturing this abstract top down view of the crater’s edge, with the mountain on the left and the path towards the lake on the right. The small colorful dots at the top centre are the carts of the workers. Look closely and you’ll see some yellow spots, showing the sulfur rocks they had carried up already.

Shadow
Our home star was still low, so the nearby Merapi volcano, part of the Geopark Ijen is situated in, cast its huge shadow over us.

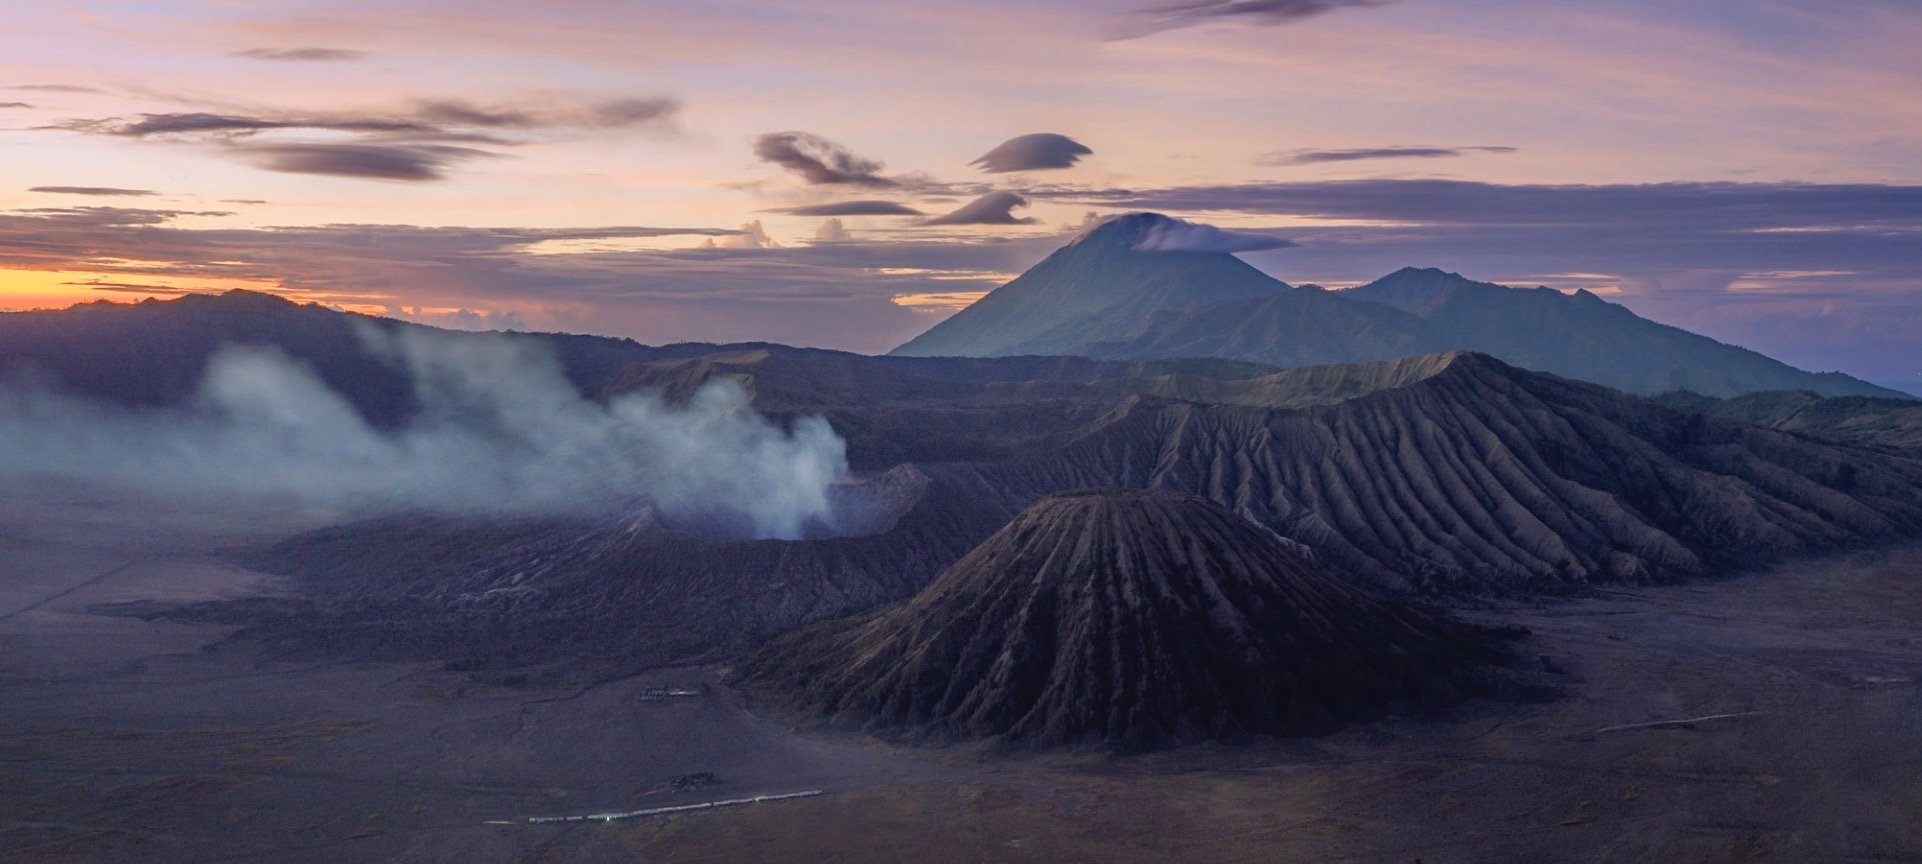
Bromo
Another volcanic wonder.
Straight after climbing down from Ijen a long drive westwards took me to Java’s most famous volcanic landscape: The National Park of Bromo Tengger Semeru. I arrived just after this beautiful sunset, and would go explore this area the next morning before sunrise.

Volcano-ception
This place is home to five volcanos (four of which are active) that have developed inside the caldera of another huge ancient volcano, with another volcano - Semeru - towering above them in the distance. Yup.
While I wasn’t lucky enough to experience the beautiful sight of the ancient caldera filled with a layer of fog (it wasn’t the right season), the conditions up there are always incredible, making for some very atmospheric photos around sunrise.


Semeru in Action
The tallest of the volcanoes in this area at over 3600m had just started to erupt in December 2022 a few days before I was there, and huge ash clouds developed from its crater in the distance that morning. If by now you are thinking “there are a lot of volcanoes here”, you are right - the entire island of Java is of volcanic origin, and there are no less than 45 active ones.

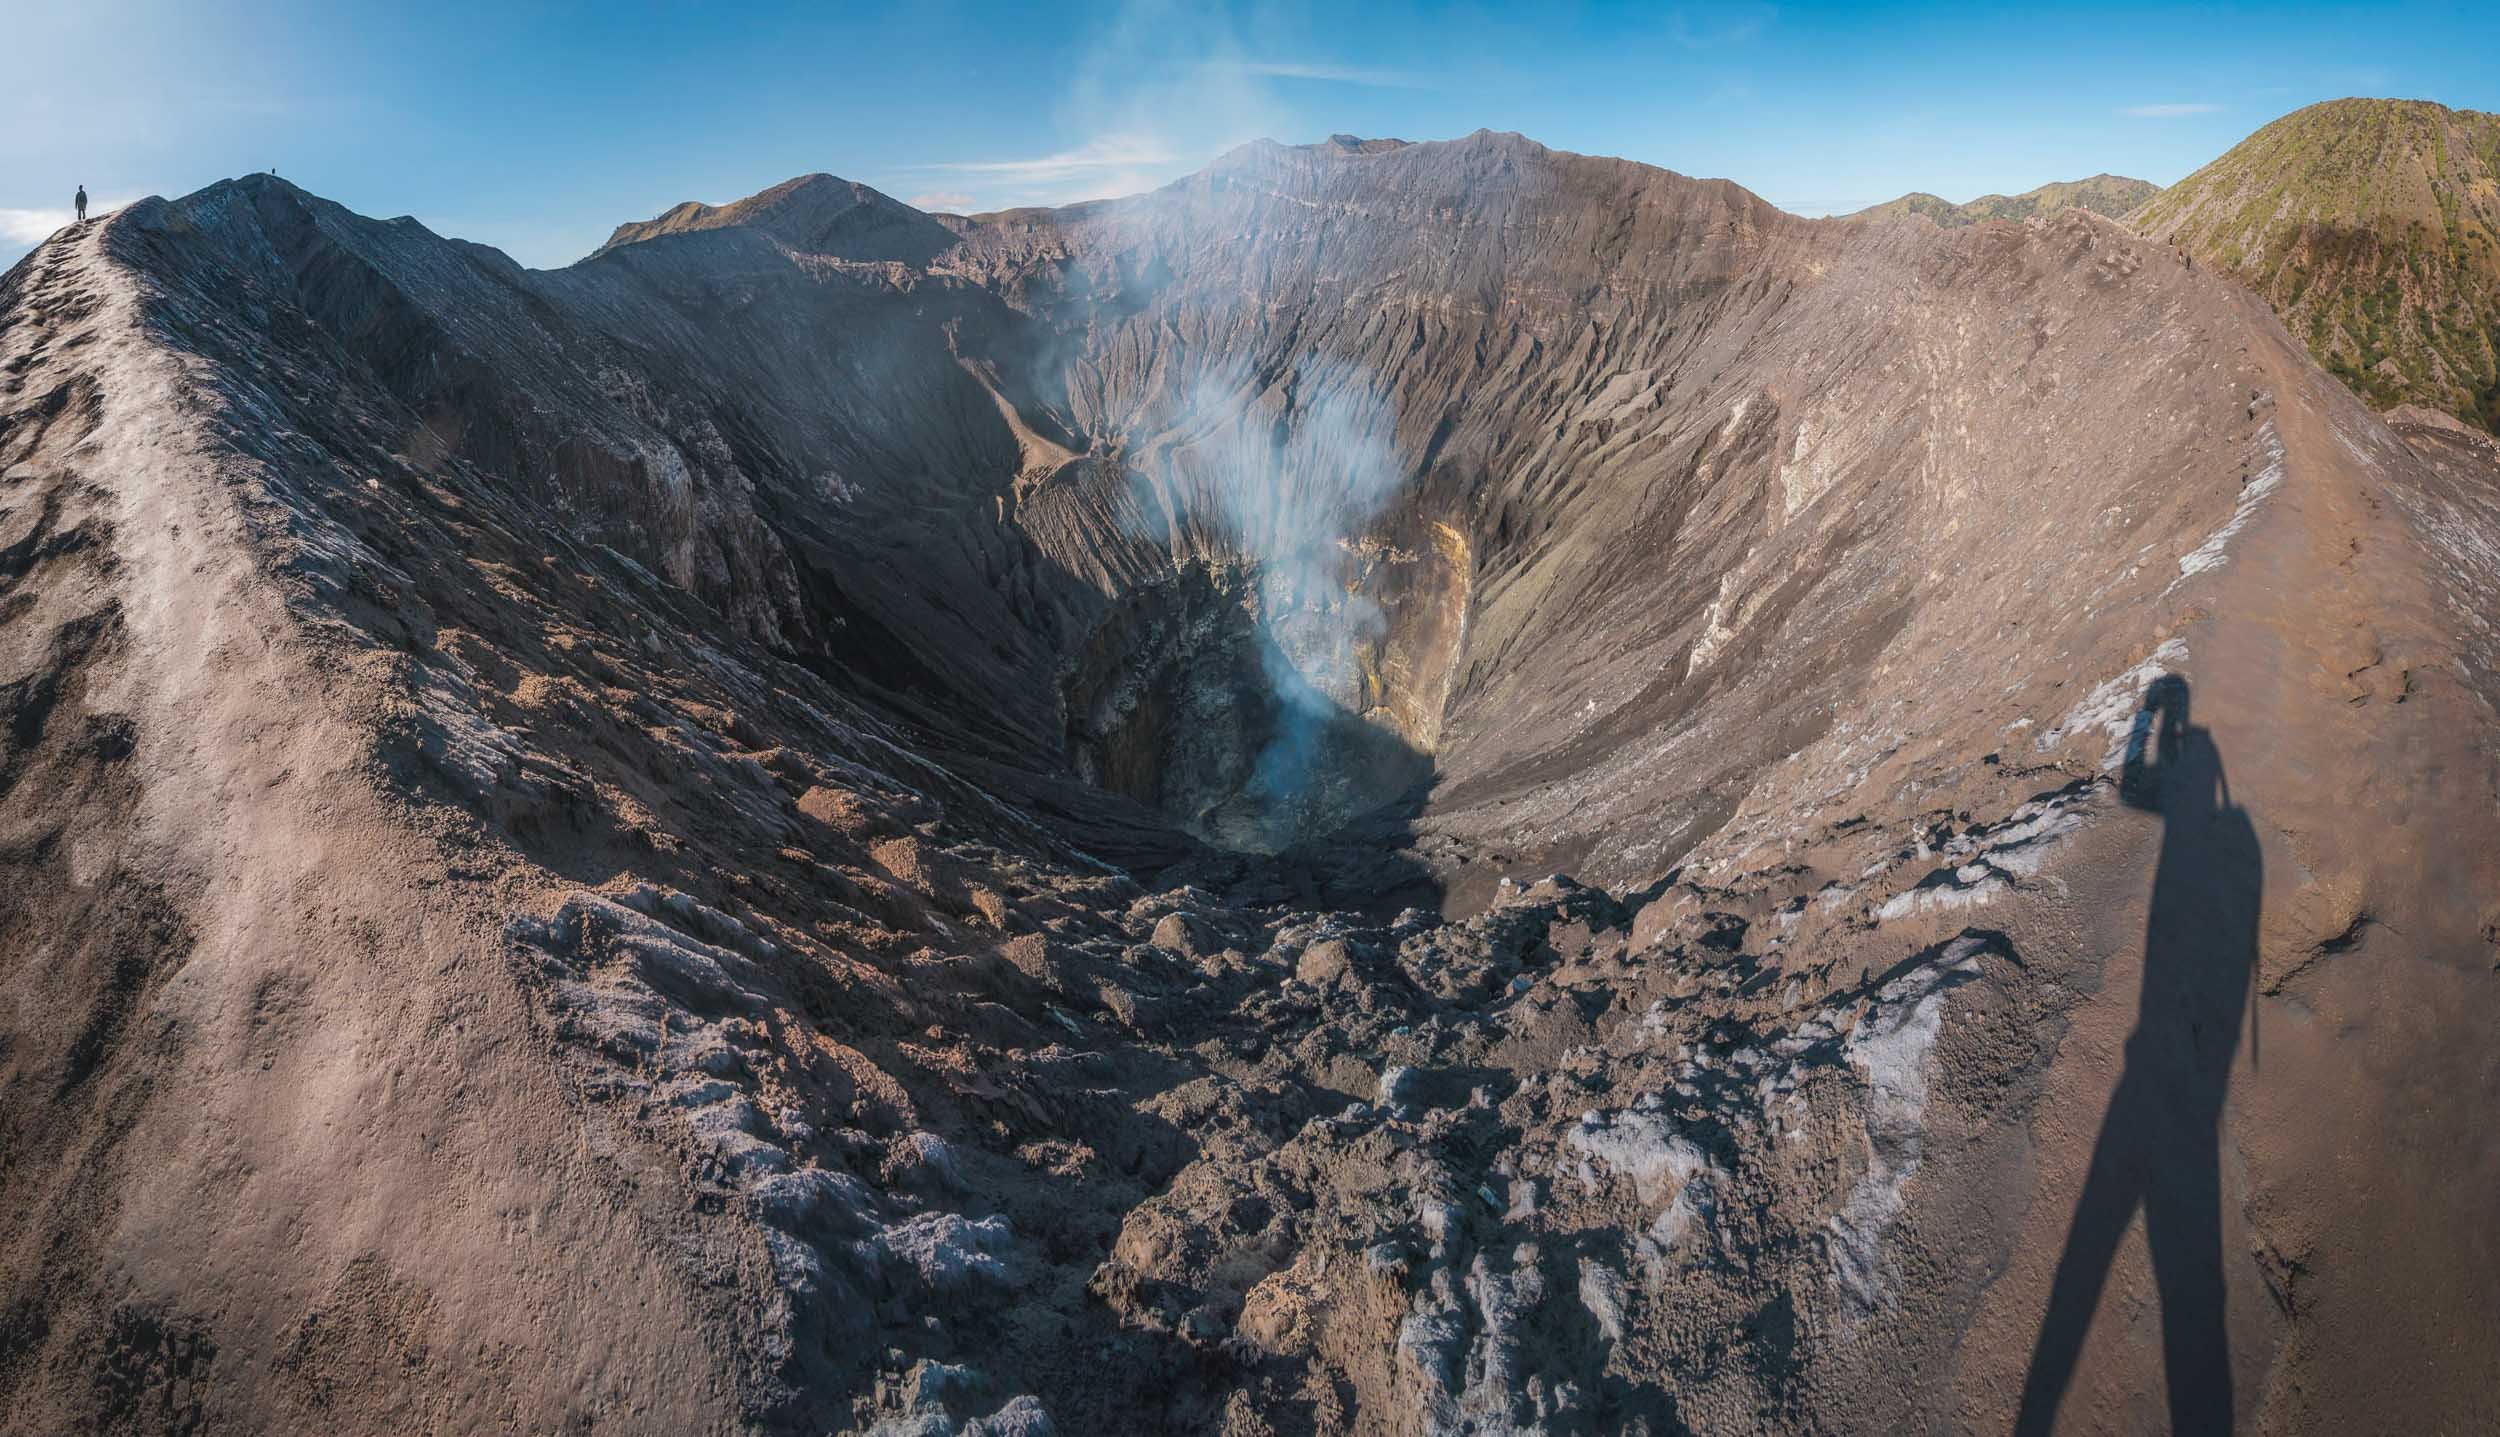
While Semeru is about 20km further south, Bromo is the most active of the volcanoes inside the actual caldera, and depending on the wind conditions you’ll need to watch out for the smoke and gases that emit from the crater - access to Bromo closes regularly due to safety concerns.


It is a relatively easy climb up a few hundred stairs (visible on the right photo in the corner on the bottom right) once you make it through the so-called “Sea of Sand” - the sand filled caldera - in one of the dozens of modified Jeeps the locals use to transport tourists. It can get busy here, but as always, arriving early and taking an extra little hike along the crater rim will bring you some peace and quiet - can you spot me (and my shadow) in the left photo?


The base of Bromo is also home to a rather interesting Hindu temple built in 2000, visible on the bottom in this photo - who thought it would be a good idea put a temple there I wonder? The Tengger people in this area are one of the last remaining Hindus in Java, which is overwhelmingly muslim. There is a small offering installed at the edge of the crater to please their sacred mountain.

Two of the aforementioned Jeeps making their way through the Sea of Sands in the distance, with the rugged slopes of Bromo in the foreground, seen from the crater’s edge.

For a touch of color after all that brown and grey around the volcano these four wonderful ladies posed happily in the sand canyon as I was leaving.

A Splash
Speaking of colours, I then made my way to the city of Malang, which is home to an interesting set of villages, namely Kampung Tridi (left), Warna Warni (top), and Biru Arema (bottom right), which have turned their districts into a little paradise of colours.

Pioneers
As the story goes, Kampung Warna Warni was the original of the colorful villages in Indonesia. While one might dismiss it as a tourism stunt, the idea actually came from a few students who wanted to revitalize this community, which had fallen into disarray, poverty, and pollution, alongside the nearby river. In 2015 they partnered with a local painting company and the resulting work didn’t just bring in tourists (who pay a small entrance fee) but also revitalized the surrounding community and created a social obligation to beautify and maintain the environment. It became a successful role model for the village across the river, and another one across the bridge, as well as a few others in the country.

Kampung Tridi is connected to Warna-Warni by a small footbridge. Both of the village are full of small whimsical details, murals, and friendly locals.


It’s an interesting thought to imagine how the world would look if all our cities were so colorful, considering the sea of brown and grey surrounding these villages. I happened to get another glimpse at the colorful roofs when I left Malang by train (excellent way to travel in Java!) on my way westwards towards the Special Administrative Region of Yogyakarta.


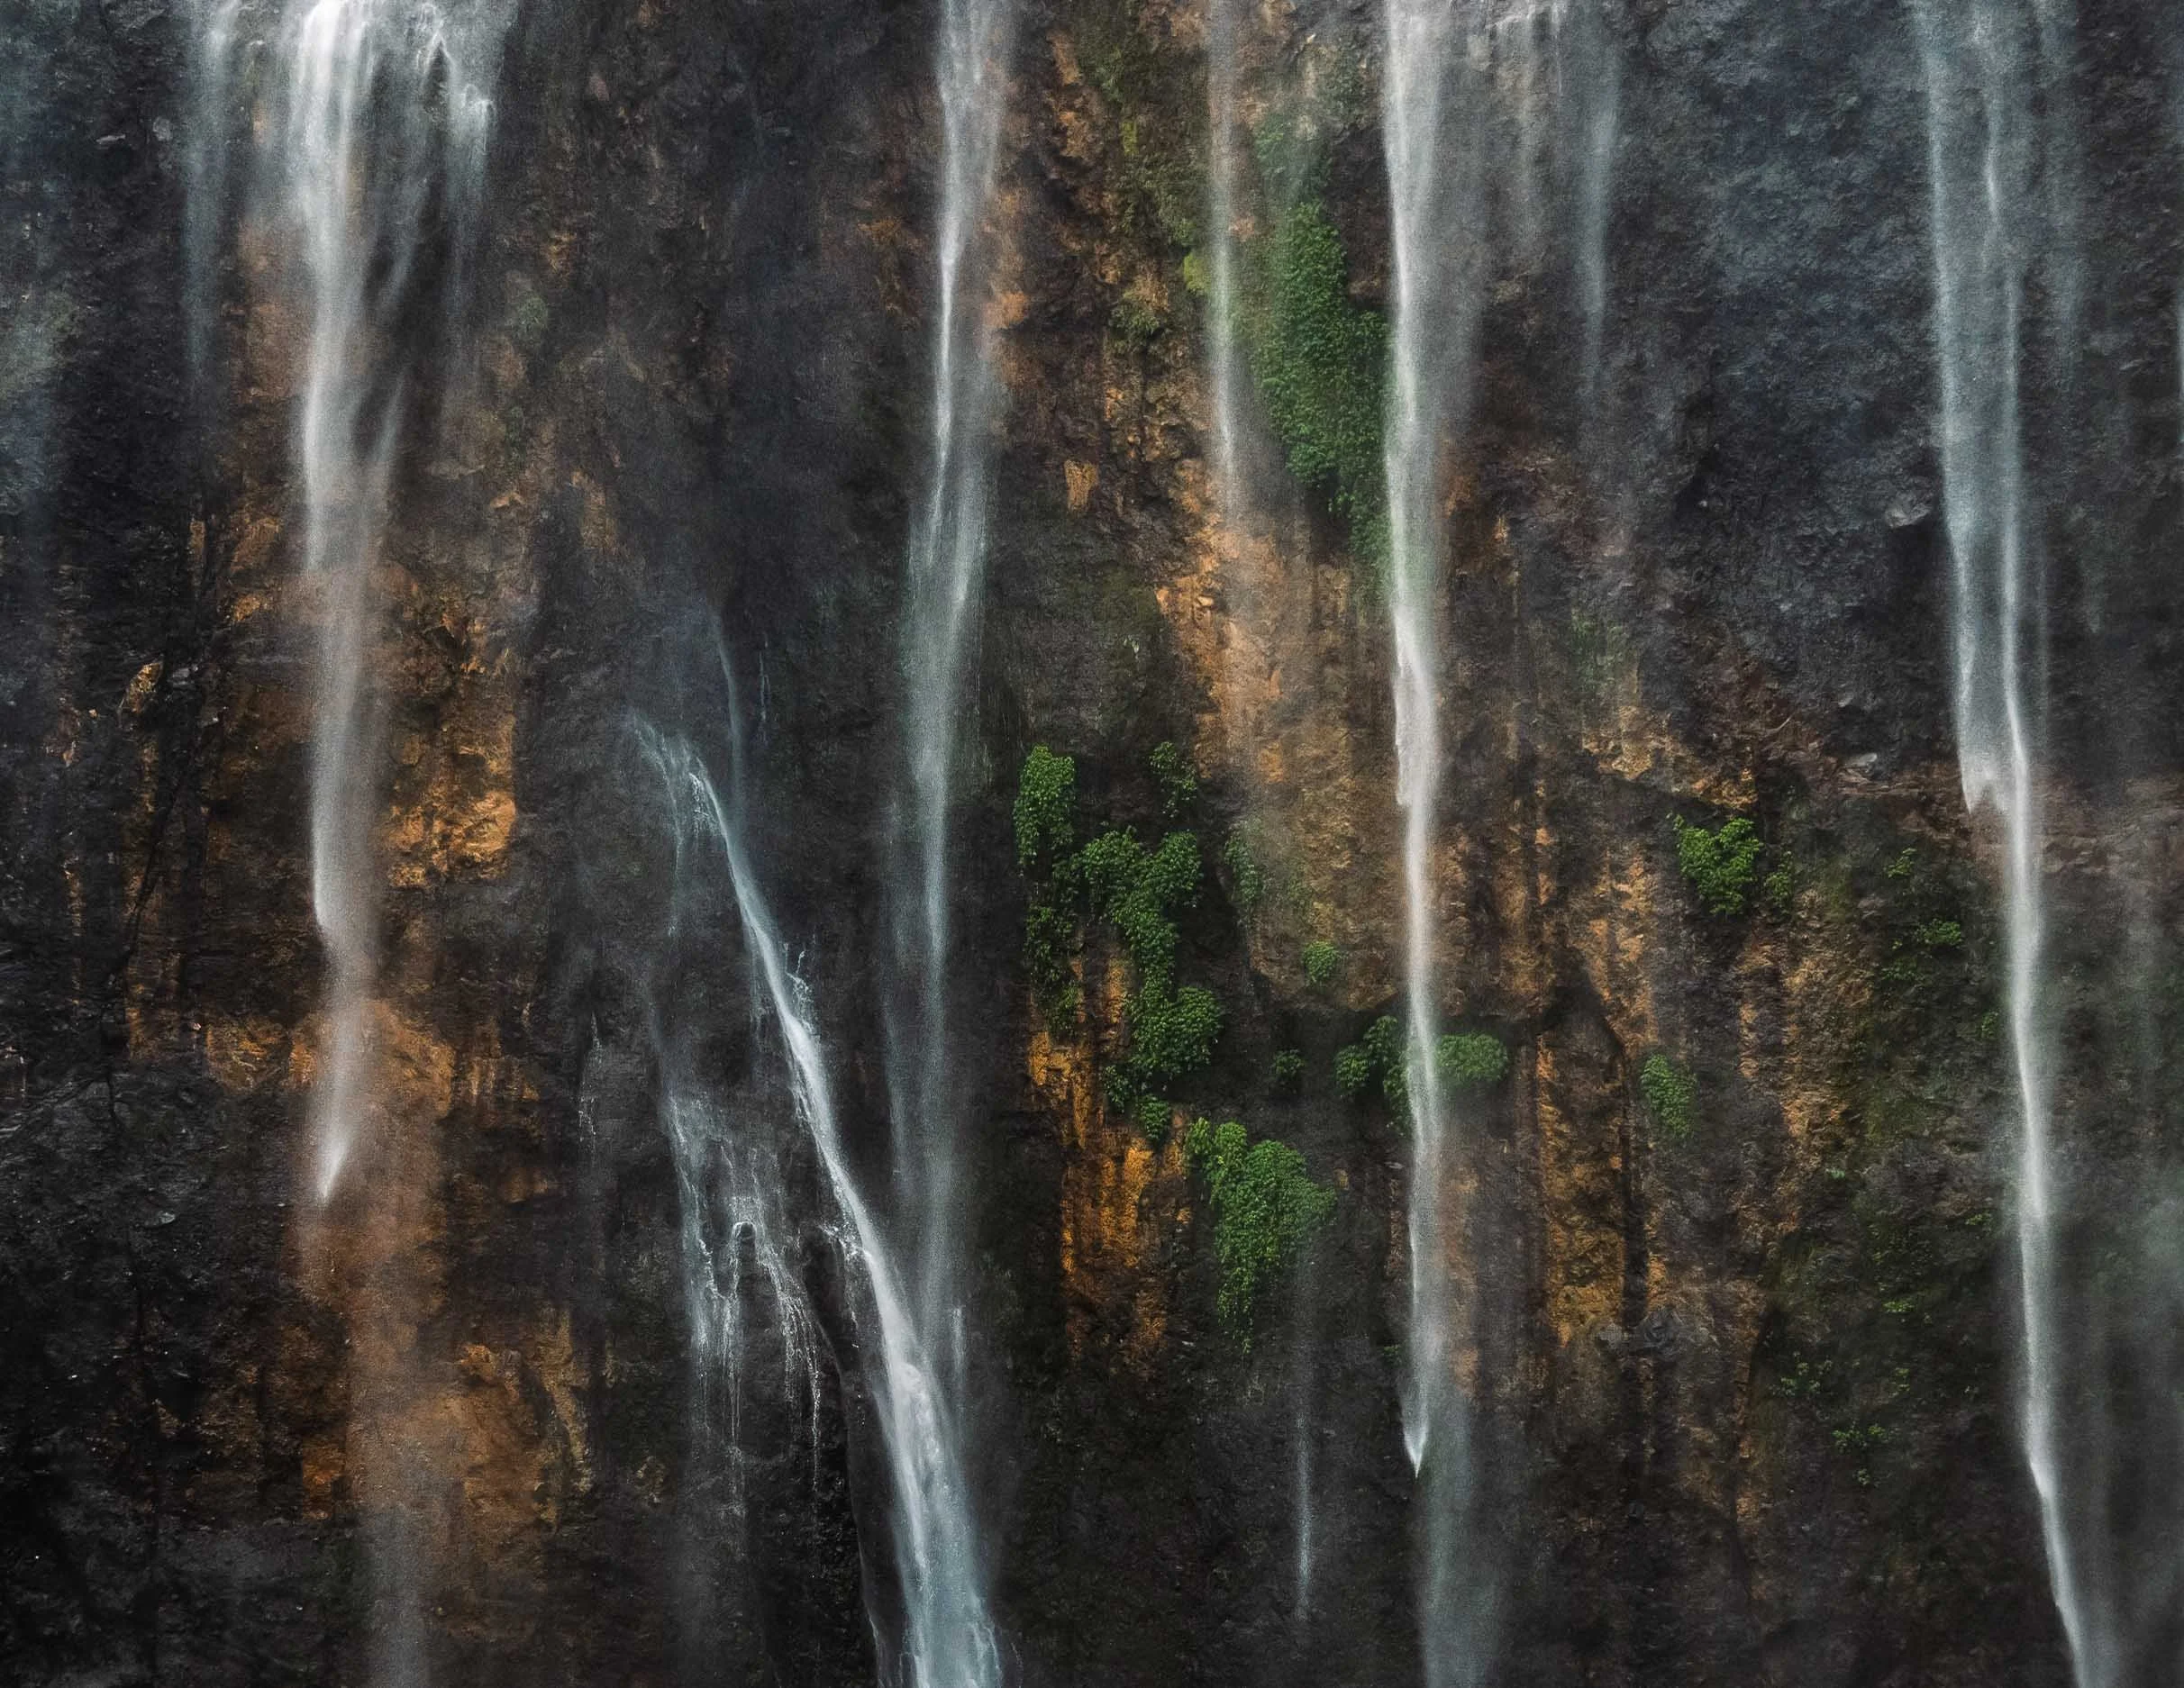
Tumpak Sewu
Before moving on though I got to experience what is probably the most incredible waterfall I’ve ever been to, about 3 hours south east of Malang. The active Semeru volcano mentioned earlier providing a beautiful backdrop.
The way down to the falls is a tough affair - it takes at least 30 minutes over muddy semi-paths, climbing long rope assisted vertical ladders, stepping on metal brackets fixed into the side of the canyon, crossing the river by jumping from stone to stone, and then being totally soaked by the waterfall’s wind induced layer of rains and fog at the bottom. But the views are worth it (I still thought so after the way up, but was less convinced then). Pro tip: It seems the descent on the eastern side is a little easier than the one I took, but who wants that?

My guide posing in the rain for scale here.


The views from above are equally amazing though, even more so with a drone, but the viewing platform on the side of the canyon also provides some nice angles and opportunities to set up a tripod for long exposures.


The conditions changed quite a bit during the few hours I spent here, depending on the wind direction and the flow of the river. On top of that, as the sun moves across the horizon, the angle of the omnipresent rainbows shift as well, creating ever so slightly different compositions. A place you could come back to many times. An extra bonus - I was there on a regular weekday morning (not even that early) with almost no people - a very different picture compared to some of the (comparably boring) waterfalls in Bali.

What’s in a Name
Tumpak Sewu loosely translated means "a thousand waterfalls" in the Javanese language - an apt description.
What a place. Just missing some dinosaurs!


Back in Malang I took the aforementioned train onwards to the west into Central Java, more specifically the Special Region of Yogyakarta. A kind of unique autonomous province of Indonesia, the Sultanate has a few distinct administrative powers owing to its former status is an independent kingdom before it joined the Indonesian independence movement after the Second World War.

Prambanan
Three religious sights were on my mind for this part of the island, starting with the 9th century Prambanan temple, the largest Hindu temple in ancient Java and the second largest in the world. It’s dedicated to the Hindu trinity of God as the Creator (Brahma), the Preserver (Vishnu) and the Destroyer (Shiva). My hopes for some good photos were slightly destroyed by the weather, as I only had a few minutes before the pouring rain kicked in.


UNESCO World Heritage Site
The temple and its many beautiful reliefs have been inscribed since 1991. The pattern of lion in niche flanked by kalpataru trees is one of the most common panels in the temple.
The temple compound lay more or less abandoned for over 1000 years and lost a lot of its individual temples - there were 240 in total - as people used the stones for other construction or collected them. Only in the 1930s an effort to properly reconstruct it started, which is ongoing until today. An earthquake caused significant damage in 2006, and various volcano eruptions pose a constant danger to the site.


Standing Out
I once again had the chance to add a dash of color when I came across another group of four ladies that were happily swinging their umbrellas to pose for me.

Last Moments
The rain took over shortly after, and although I’m not one to shy away from some water, this storm was a bit too much for my camera to handle, and marked the end of my time here.

Borobudur
Next on my list was the world’s largest Buddhist temple, another UNESCO World Heritage Site and situated a bit further north near the city of Magelang.
Just like Prambanan, Borobudur was also lost to civilization and abandoned for hundreds of years in the jungle under volcanic ash. It was in fairly poor condition when re-discovered, to the extent that it was suggested to simply transfer the remains into a museum and rebuild them there. Followed by decades of looting the temple was finally restored in the early 20th century, but deteriorated quickly again, necessitating a more permanent in-depth restoration in the late 1970s.

It’s rather difficult to get nice photos of the temple from a distance, owing to the thick and high vegetation around it, and while beautiful drone shots exist, getting a permit proved difficult, and I tend to avoid breaking the local rules, especially around religious sites.
On top of that, climbing the temple was not allowed, owing to several restoration and cleaning projects. This used to be possible in the past, and from what I know, was allowed again shortly after my visit.

Procession
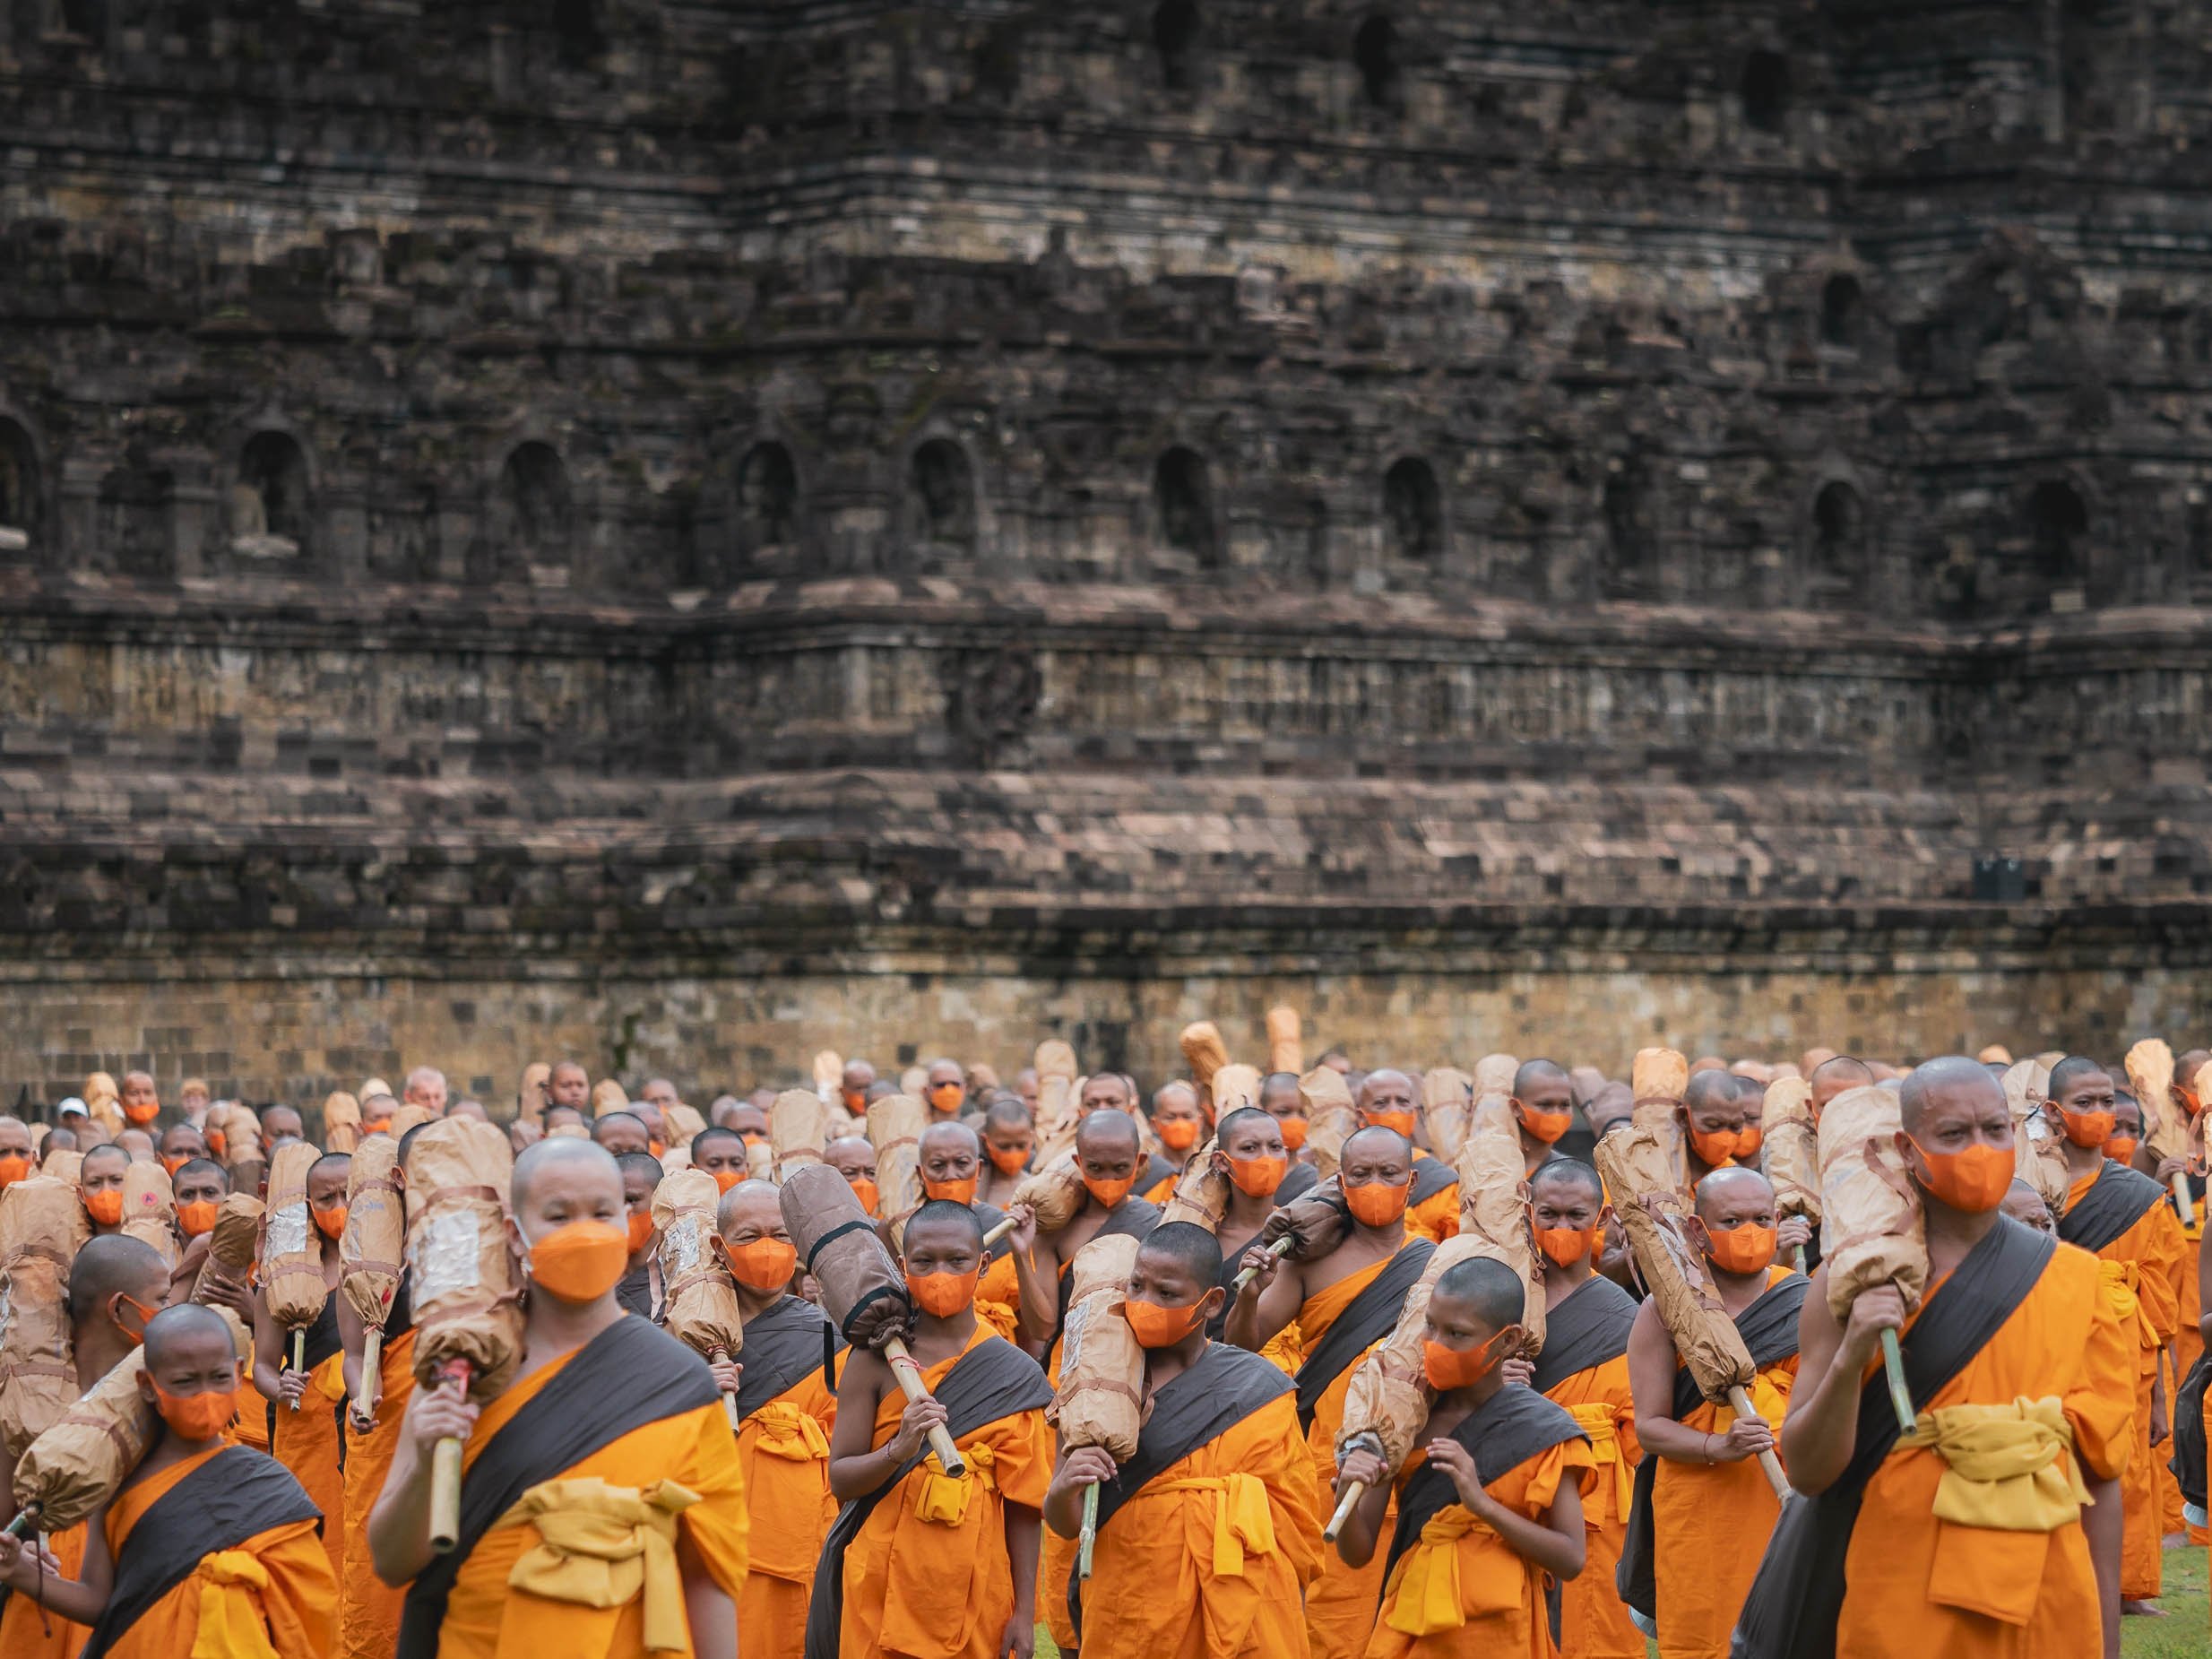
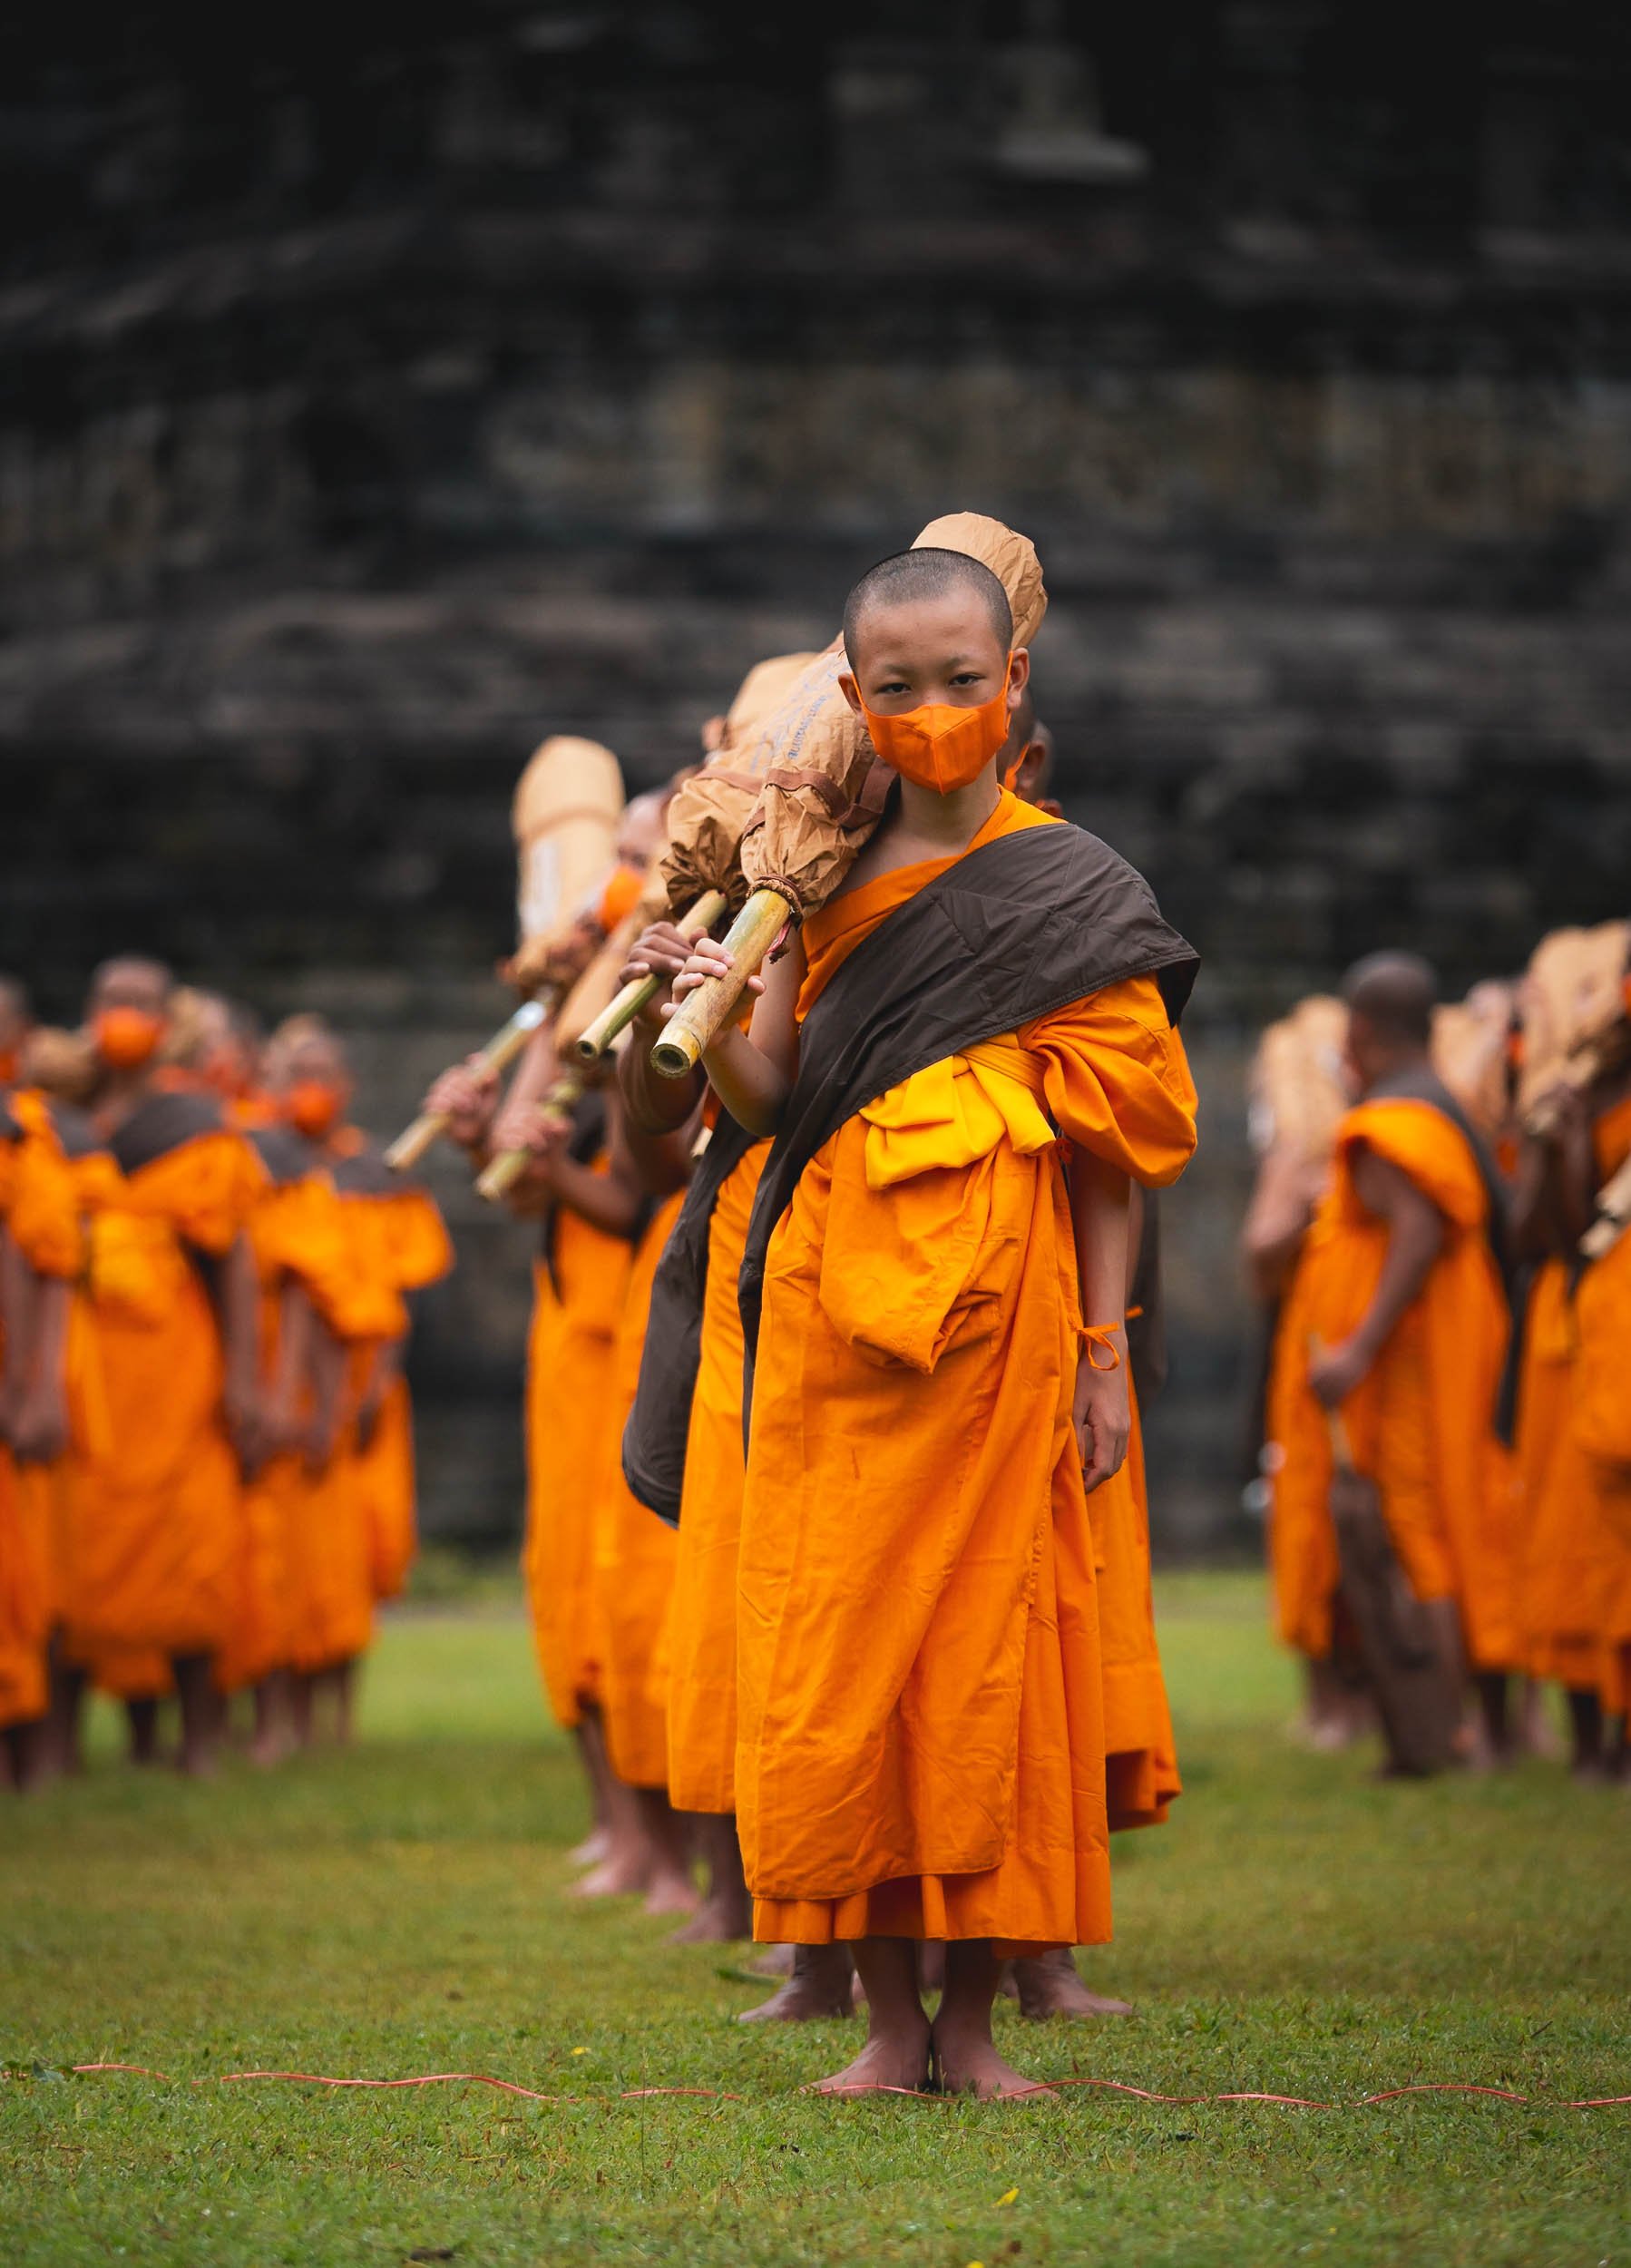
Despite those disappointments, I did get lucky with something else: Shortly after my arrival early morning, a procession of Buddhist monks made their way to the temple as part of their ordination ceremony. It made for a pretty extraordinary sight with the traditional buddhist dresses of 100s of pilgrims contrasting the temple.
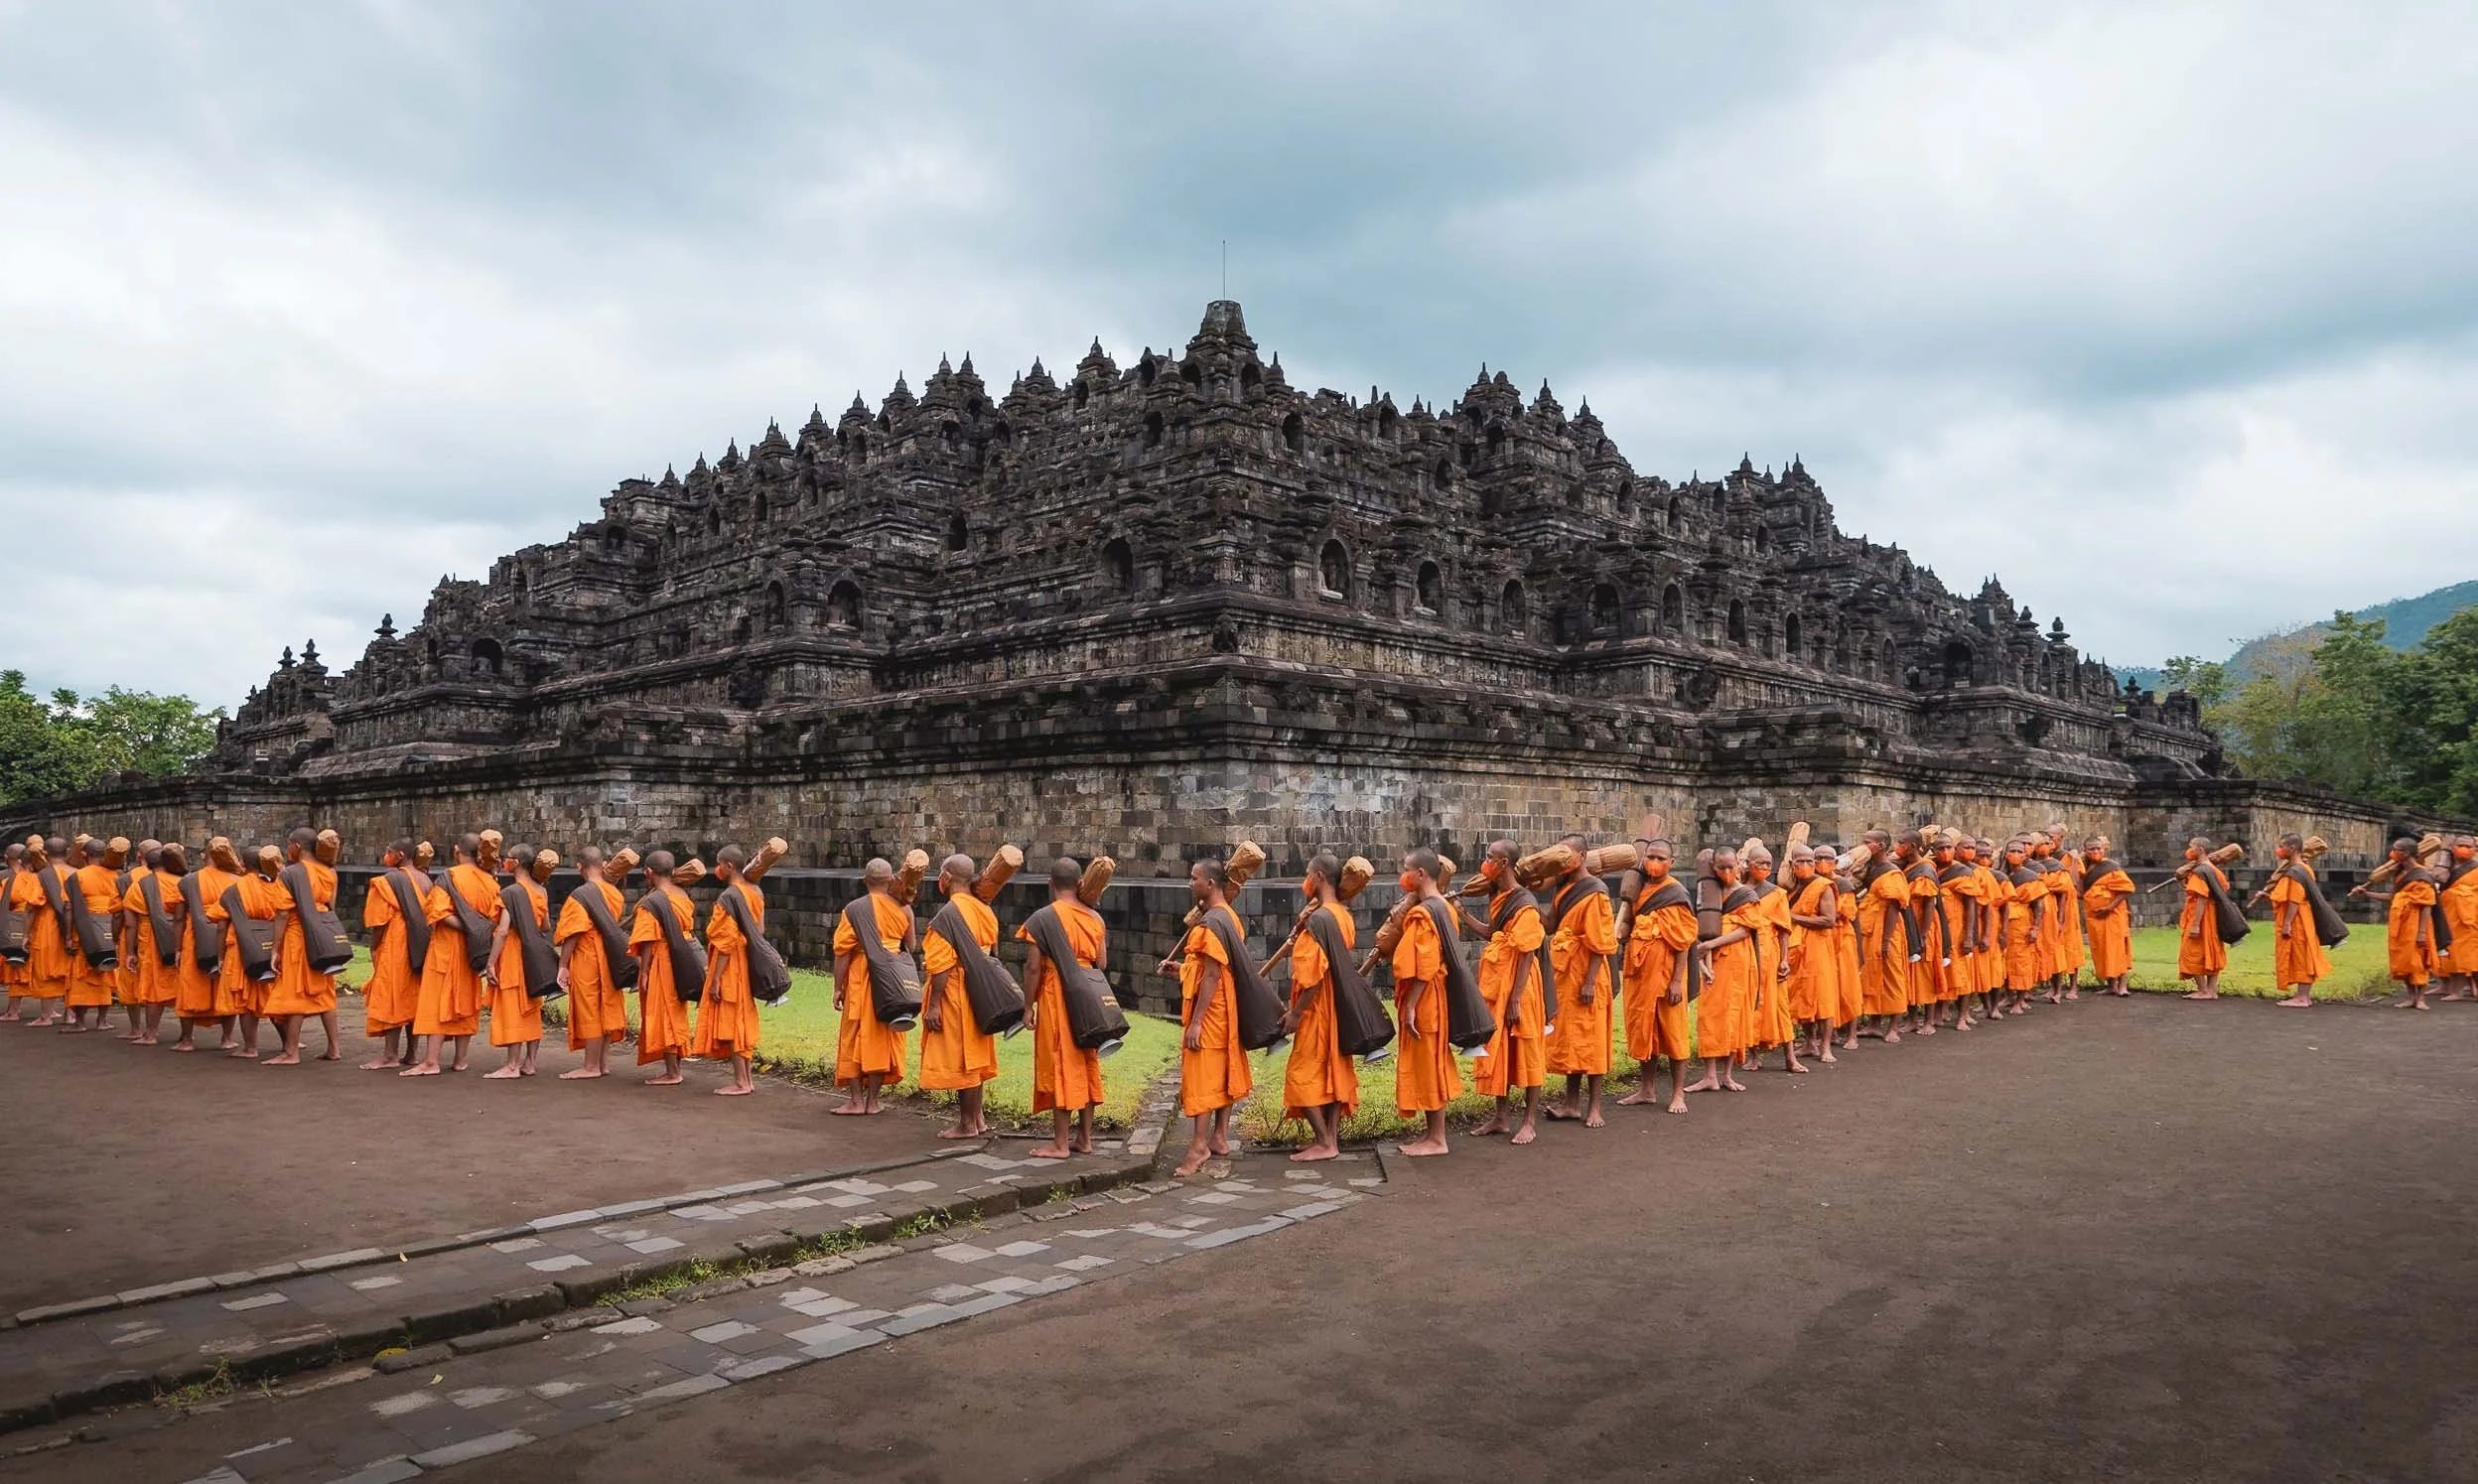
Borobudur’s architecture consists of six square and three circular pyramid layers with originally 504 buddha statues. Its design is closely aligned with Buddhist beliefs and cosmology.

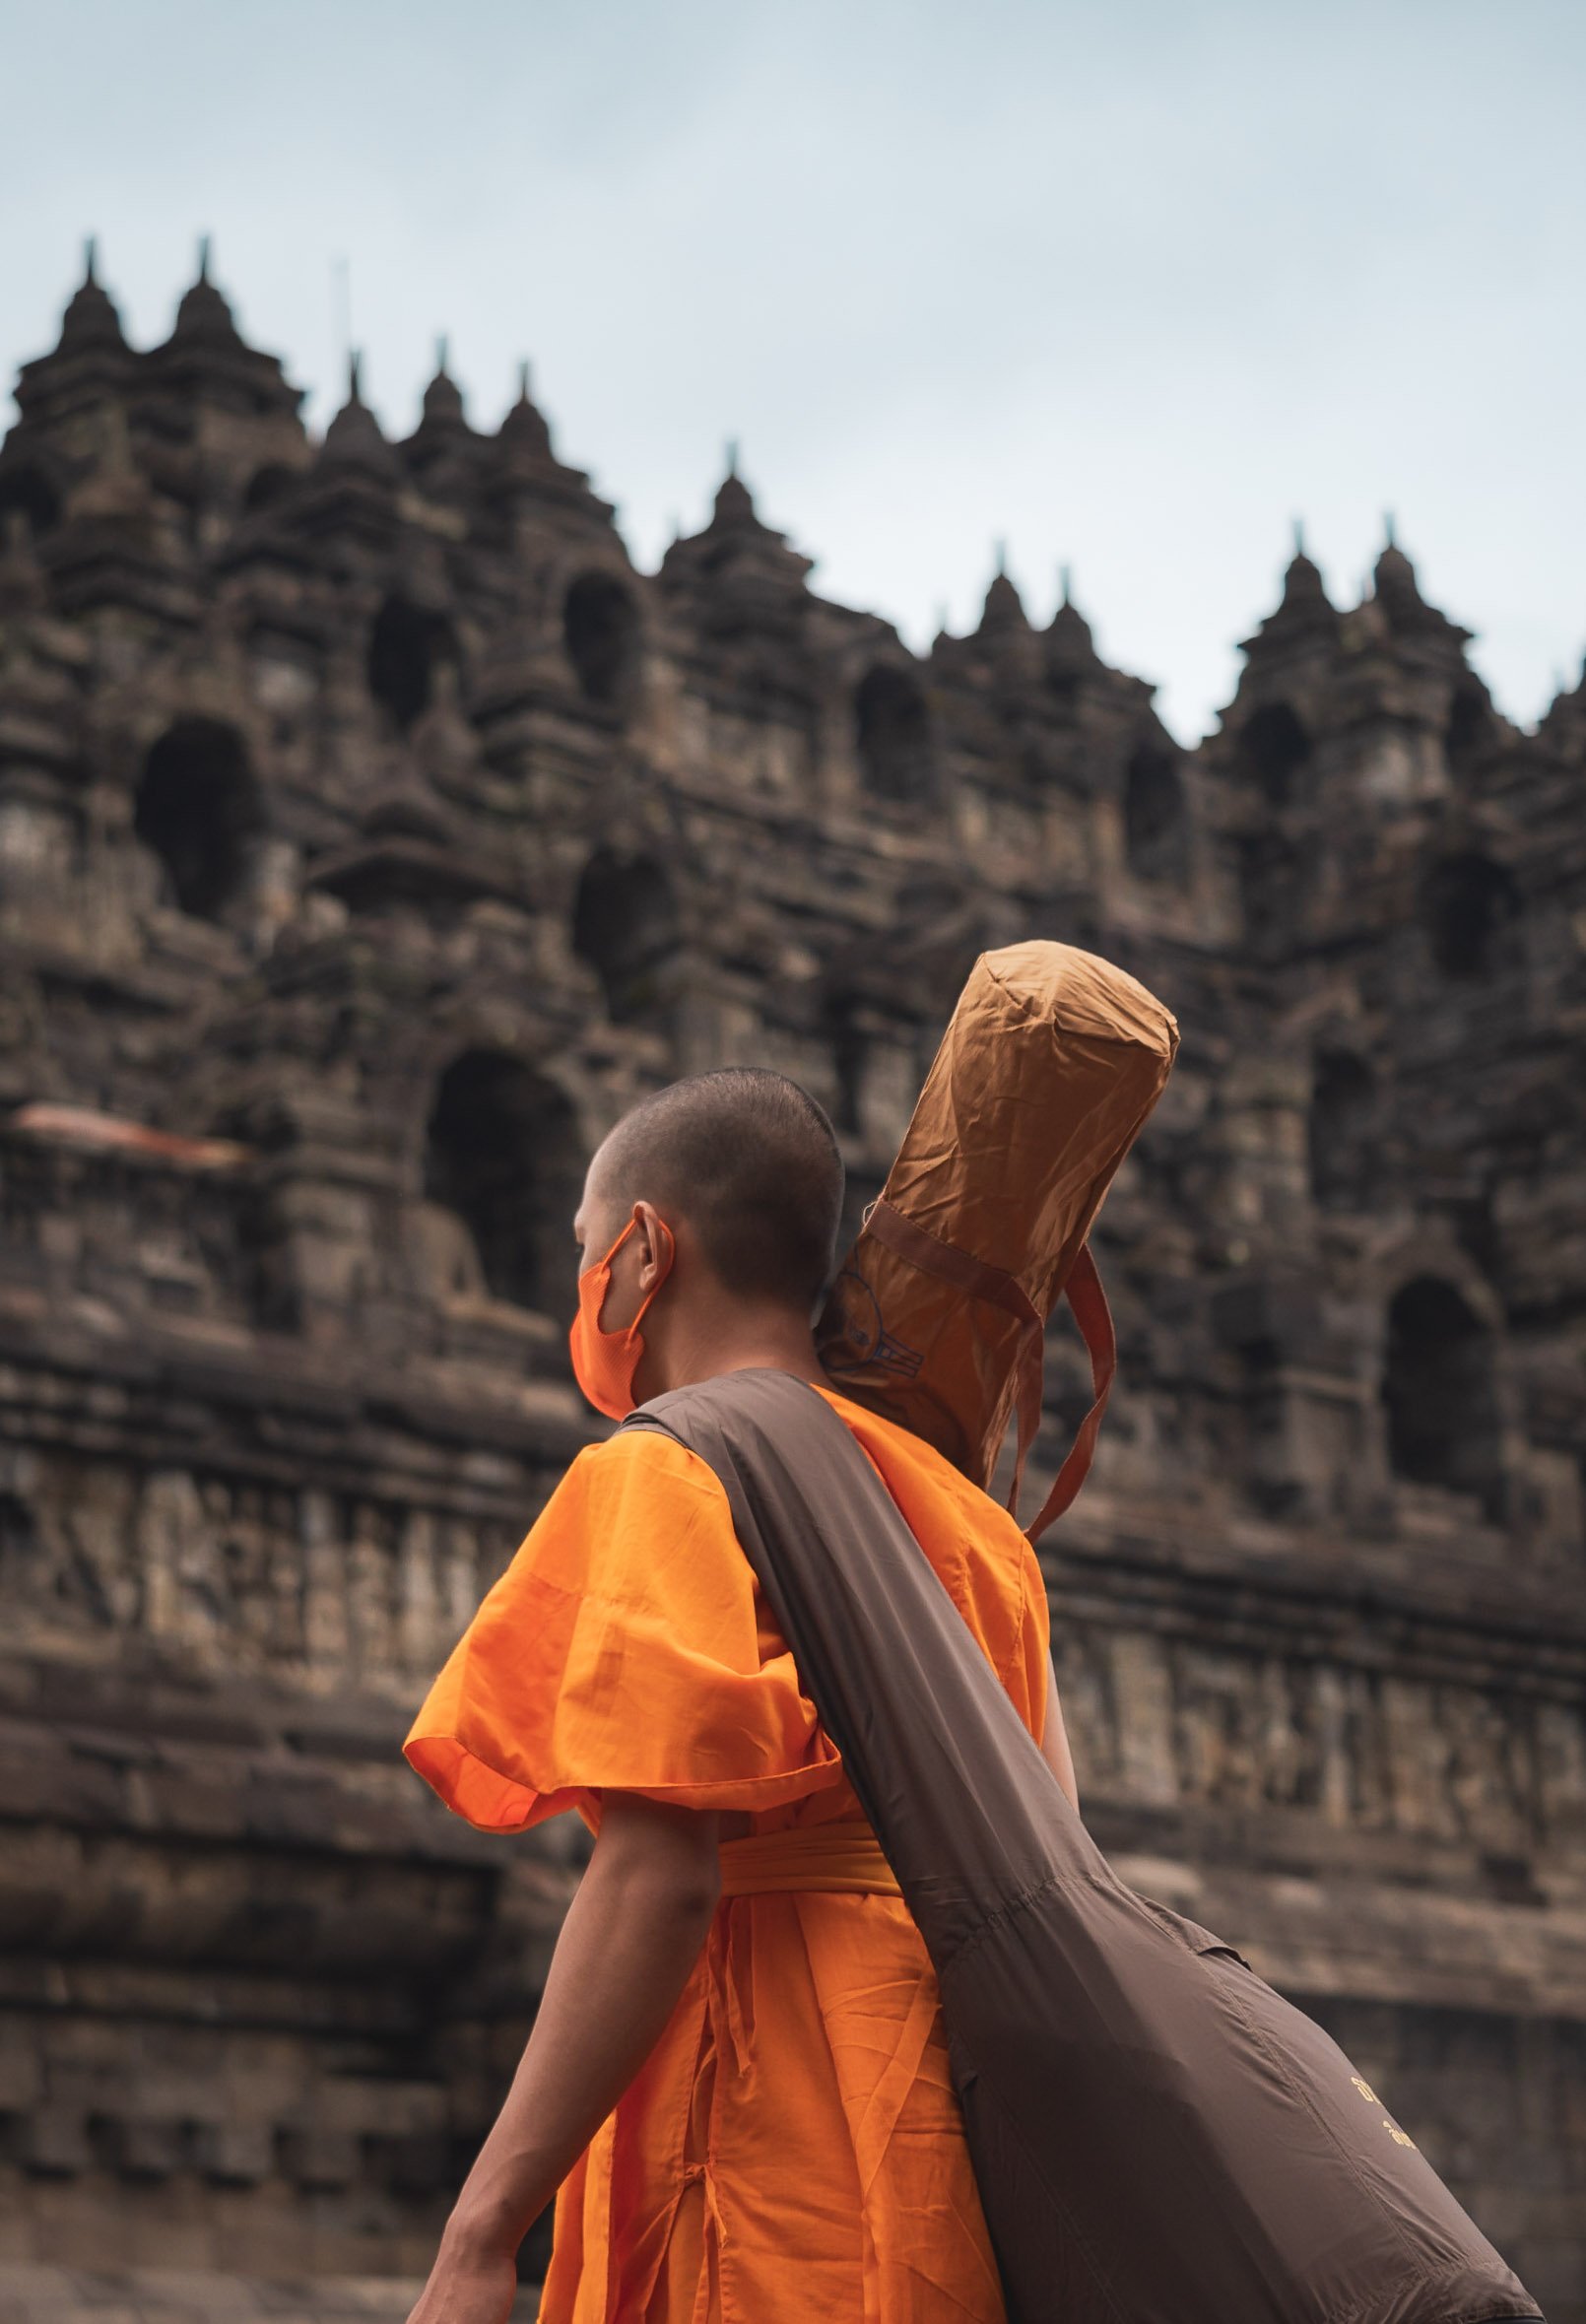

Climbing to the Top
The monks of course were allowed to take the steps up the temple, seen here from the mouth of the Chicken Church I visited later (yes, you read that right, just continue below…)

Gereja Ayam
That brings us to the last of the temple trio on my route - and while the above is its official name, calling it the Chicken Church is just inevitable, although the real design intent was to resemble a dove with a crown as a symbol of peace and coexistence.
The story of this poultry shaped religious institution goes back to a dream of a man called Daniel Alamsjah, whose divine visions made it his mission to establish a cross-cultural sanctuary for anybody seeking some spiritual guidance. The mission proved difficult, first due to protests by the locals who assumed he wanted to build a Christian church in a muslim neighborhood, then the complexity of permits, the need for money, and his general lack of experience with building projects.
It took 20 years until his idea become an avian inspired reality. Then international media attention and the shooting of a famous Indonesian movie started to draw in more tourists and he could charge a small entrance fees and complete his dream, including a visitor cafe (the food quality of which is luckily in stark contrast to its location at the butt of the chicken rear of the building).

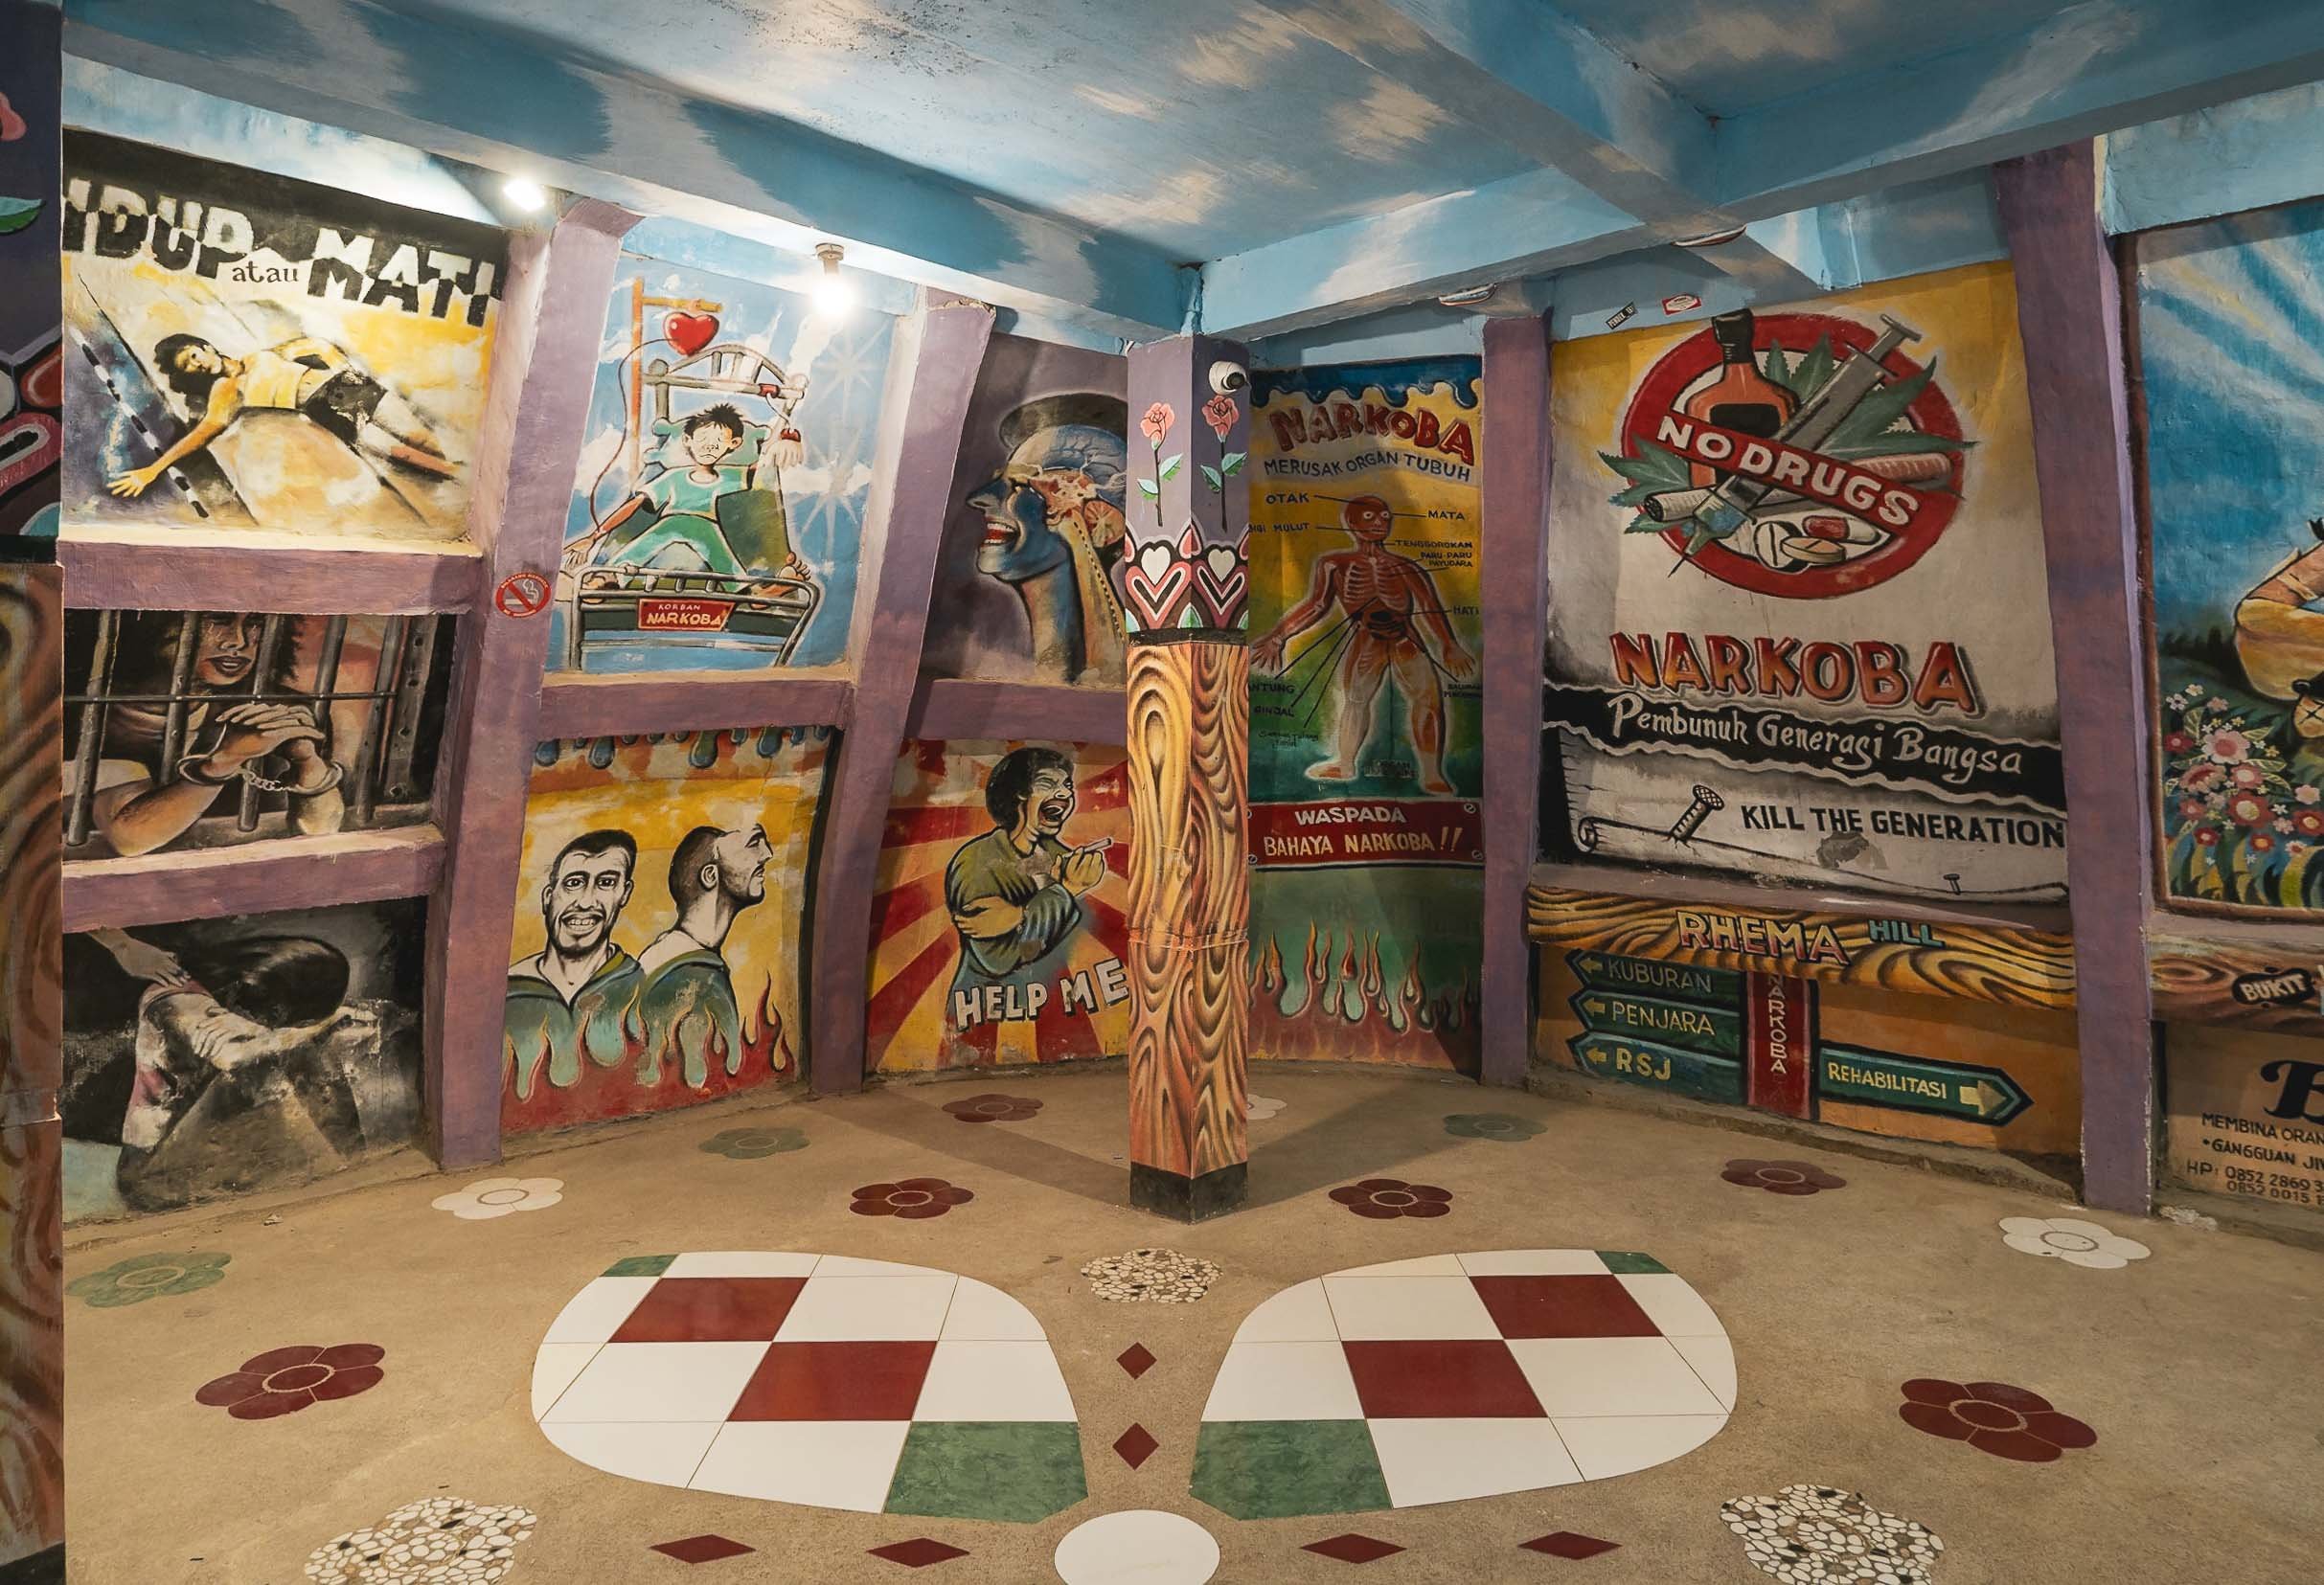
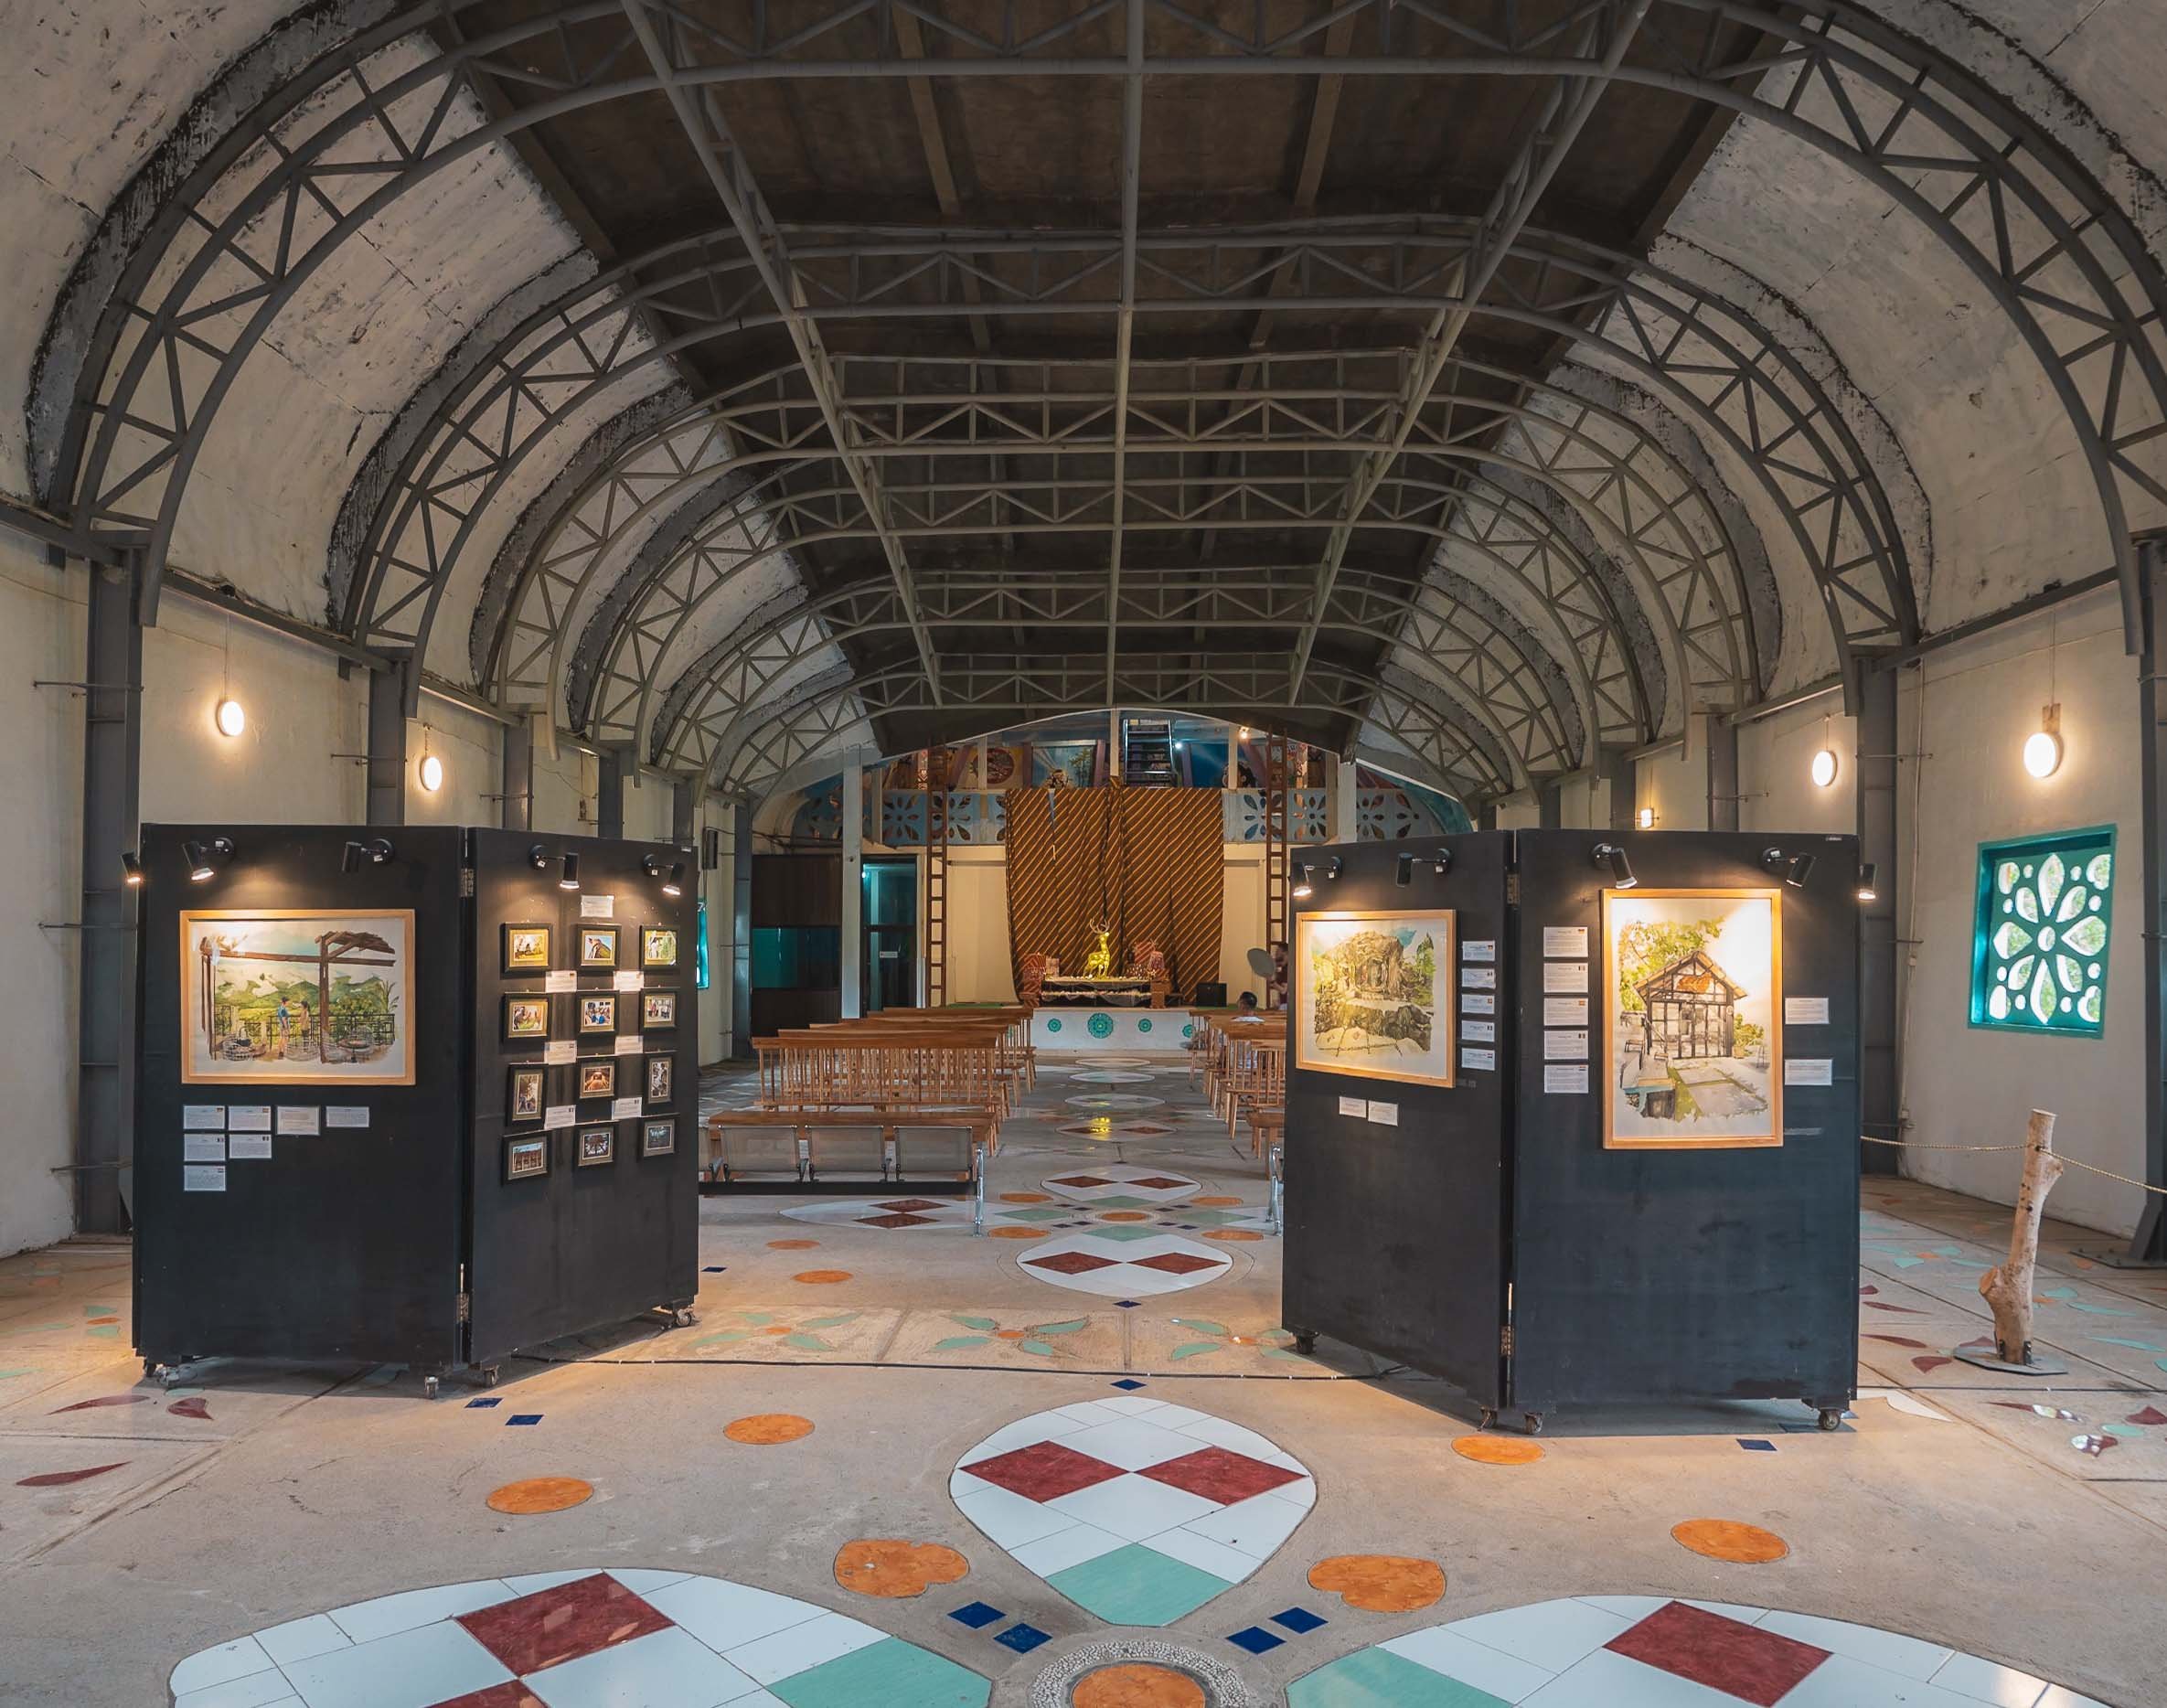
From the Chicken’s Mouth
The interior is fully built up from basement to the top with various exhibits and prayer rooms, and you can climb inside the head for a view down the hill. If look really closely you can see a small hint of Borobudur on the middle right - this is where the above photo of the temple was taken from.
Once I had found my spiritual home here, I concluded my time in Java with a night in Semarang, where I got to just briefly glimpse at some of its remaining colonial Dutch architecture, before making my way to Borneo via a short flight over the Java Sea.

The Capital
While I didn’t end up in Jakarta on this part of the trip, I had a short layover a few weeks later. I didn’t find the time (and energy) to take a lot more photos of the city then, other than some snaps from the pool level of my hotel - including them for sake of completeness 😉

Indonesia is incredible, and the amount of natural and cultural variety is enormous - I spent more than 6 weeks here, literally on the road every day, and definitely want to come back.
Subscribe to my newsletter to get notified and don’t miss out on more Wonders of the Globe.
Other Recent Posts:
Pacific Island Wonders - Palau
Prepare to see some of the most intense blue and green colours your eyes have ever feasted on in this post! The unknown Republic of Palau in the Pacific about 700km eastwards from the coast of the Philippines is truly home to some of the most beautiful island formations I’ve ever seen…
Prepare to see some of the most intense blue and green colours your eyes have ever feasted on in this post! The unknown Republic of Palau in the Pacific about 700km eastwards from the coast of the Philippines is truly home to some of the most beautiful island formations I’ve ever seen, but it also has an interesting colonial history and a few obscure sights - read on!
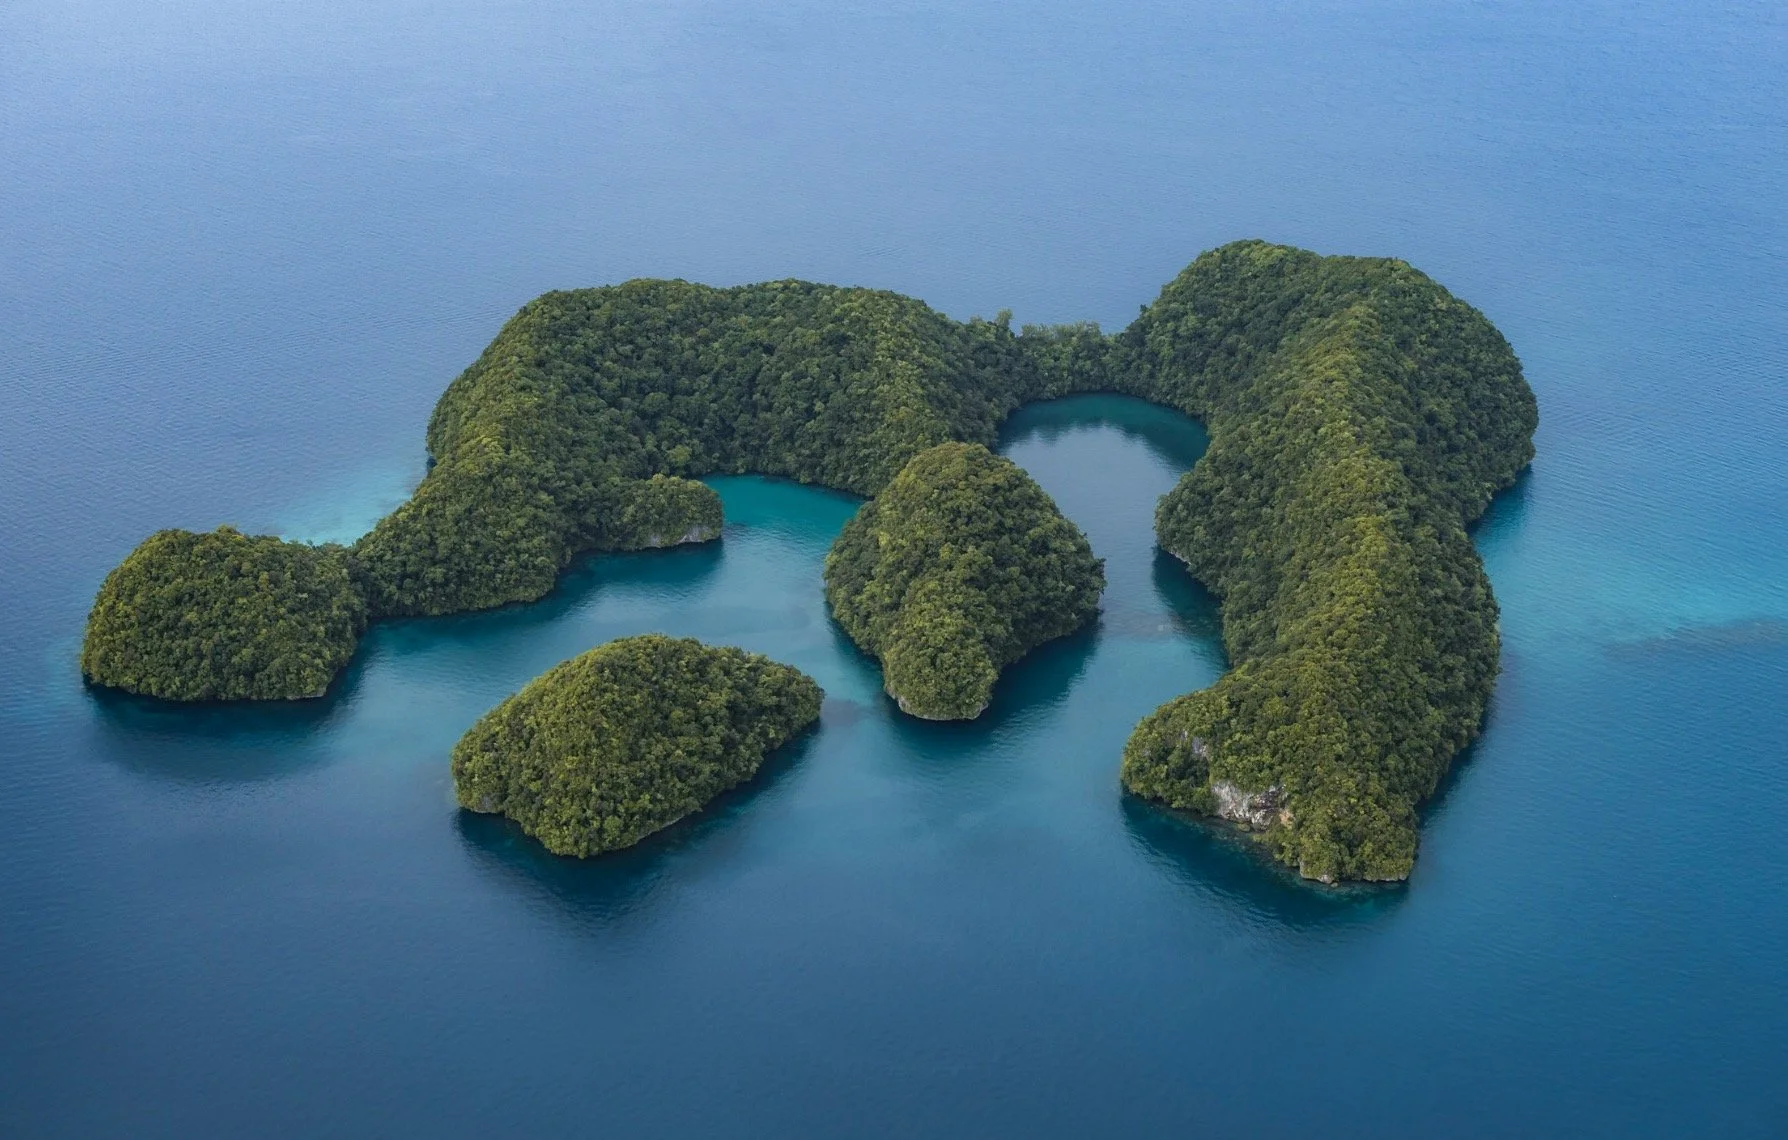
Start here - a short clip of some of the most beautiful locations of the Rock Islands in the southern lagoon of the country , starting with the nature reserve of Ngerukewid… more on that below!
What I came for
My hero shot, and what I wanted to document during this trip: The incredible islands of Ngerukewid are definitely one of the most beautiful island formations I’ve ever seen and have been declared a nature reserve as far back as 1956, owing to their amazing biodiversity.


15min after the shot!
Getting this photo was one of the main reasons I visited the tiny hardly known island nation in the Pacific, and making it happen proved to be challenging: Difficult and fluctuating weather conditions, having to charter a boat, getting close enough to the reserve boundaries, flying my drone in strong winds and waves, and landing it on the boat‘s sunroof. Of course, I had to get a drone permit as well.
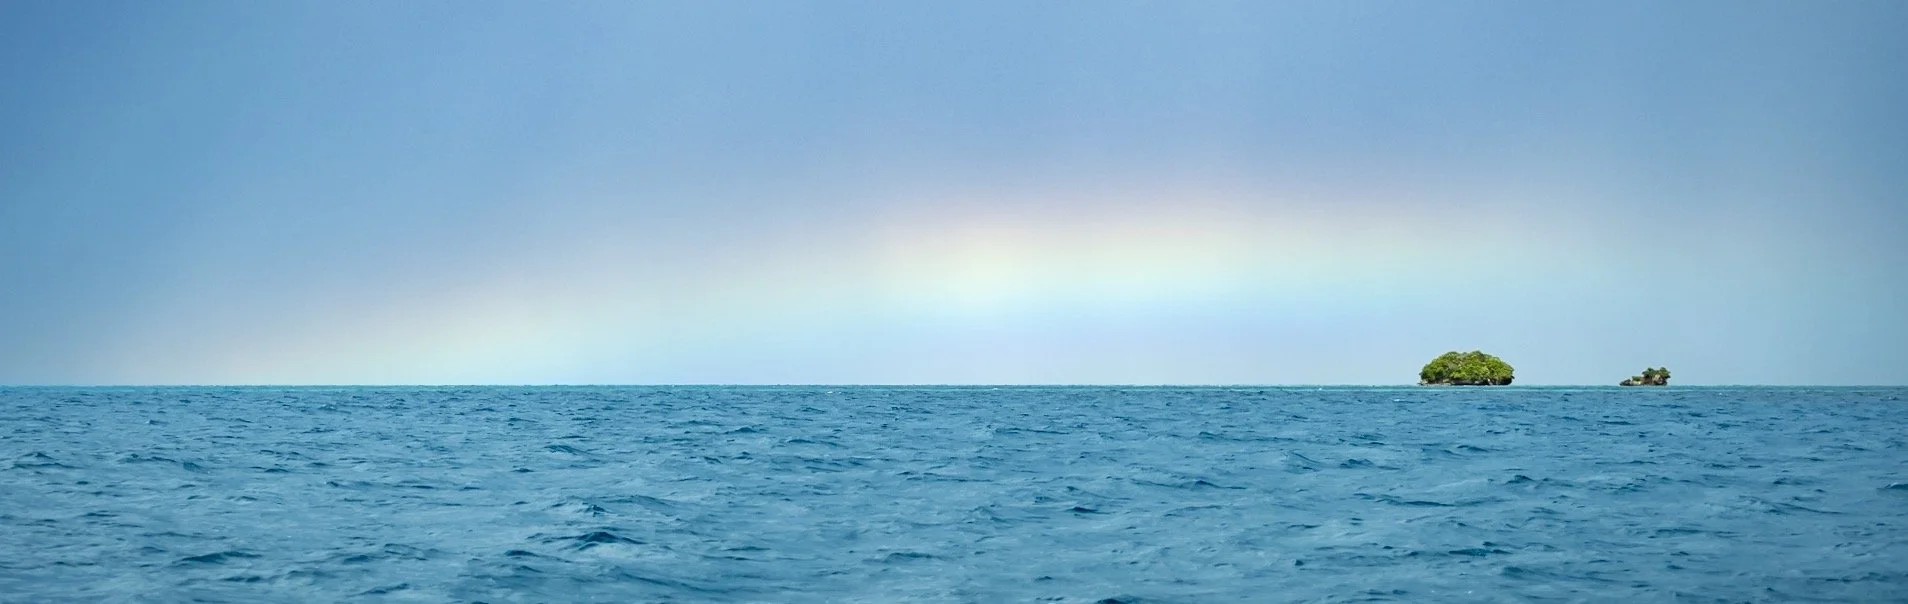
The rain clouds you see in the distance in the final result caught up on us shortly after, and the captain and myself looked for shelter of the waves and rain on a small nearby beach.
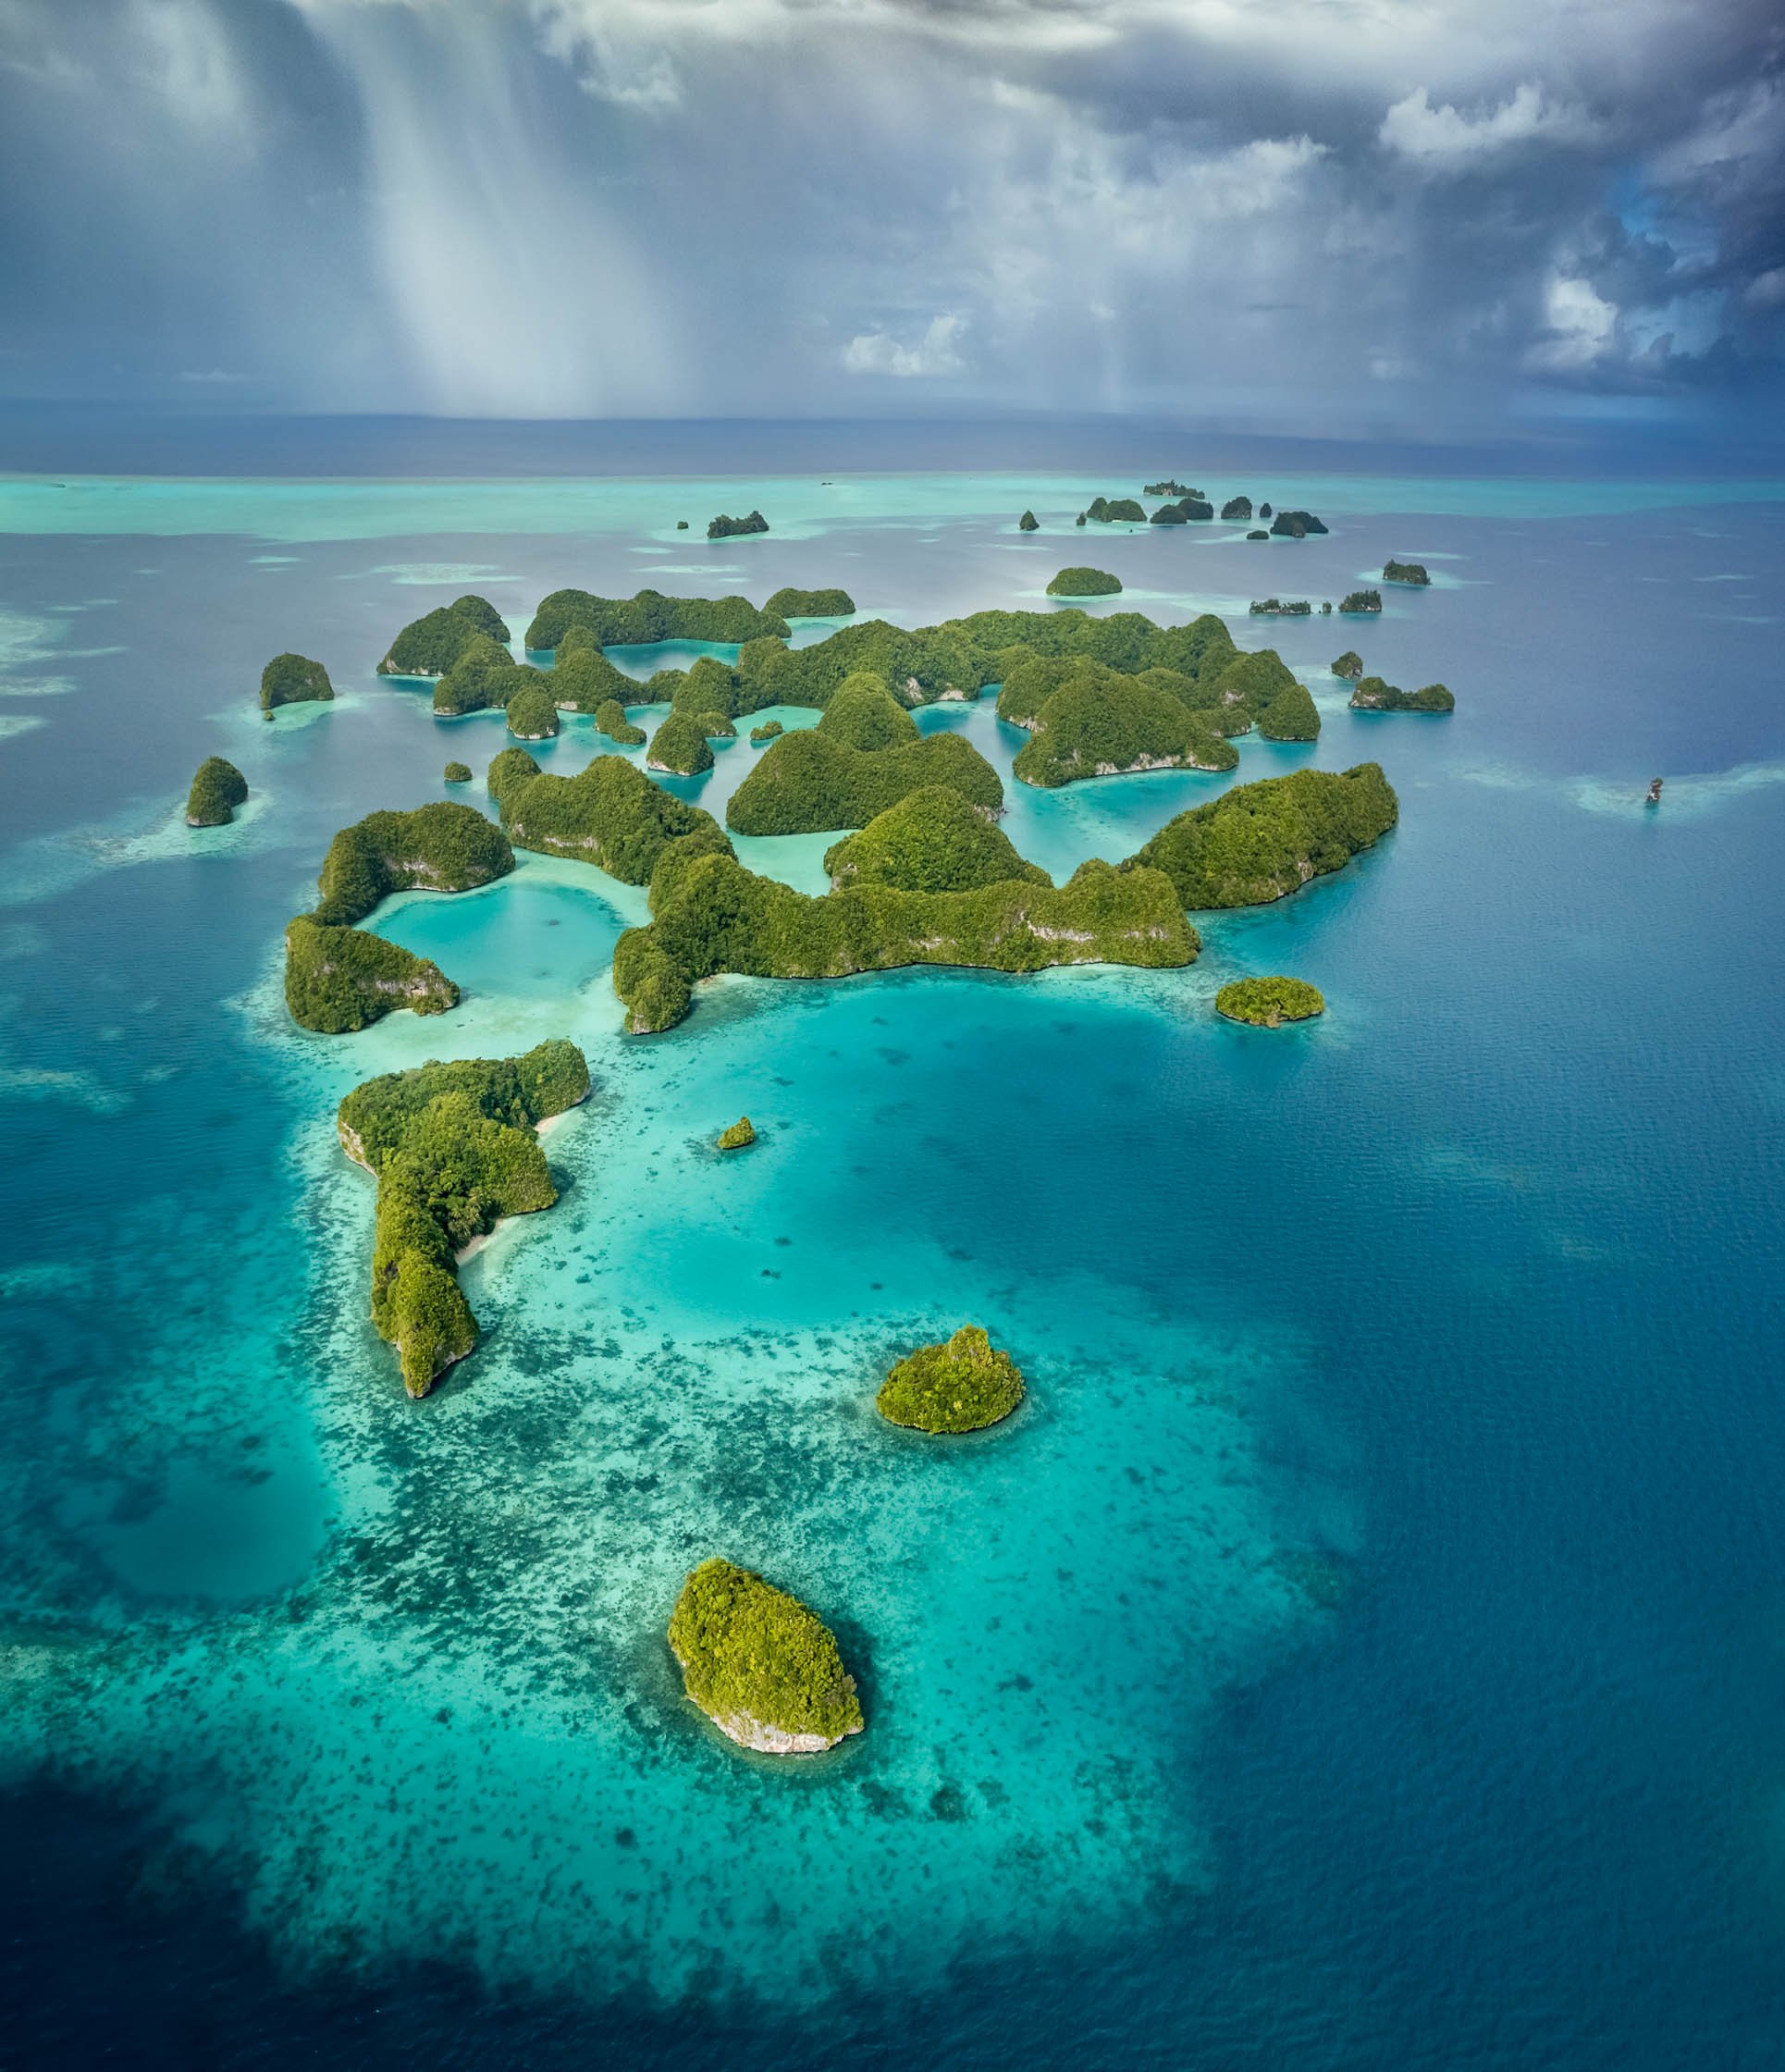
The southern lagoon is full of amazing places, often best seen from the air. Virtually unpopulated, the whole 42 sqkm site was declared a UNESCO World Heritage Site in 2012.


The islands are largely made from coral and limestone, often in beautiful mushroom like formations due to tidal erosion, which also caused this arch.

Goomba Island?
Does anyone else feel like this is straight out of Super Mario? Look at “Goomba” if you don’t believe me…
Underwater Wonders
Of course, an ocean paradise like this offers a whole different view when looking underwater - which admittedly wasn’t such a big focus for me on this trip (I have yet to do my PADI, but on the other hand I finally got an underwater camera case - these photos are shot on iPhone though). Nevertheless, some snorkeling is always on the cards.
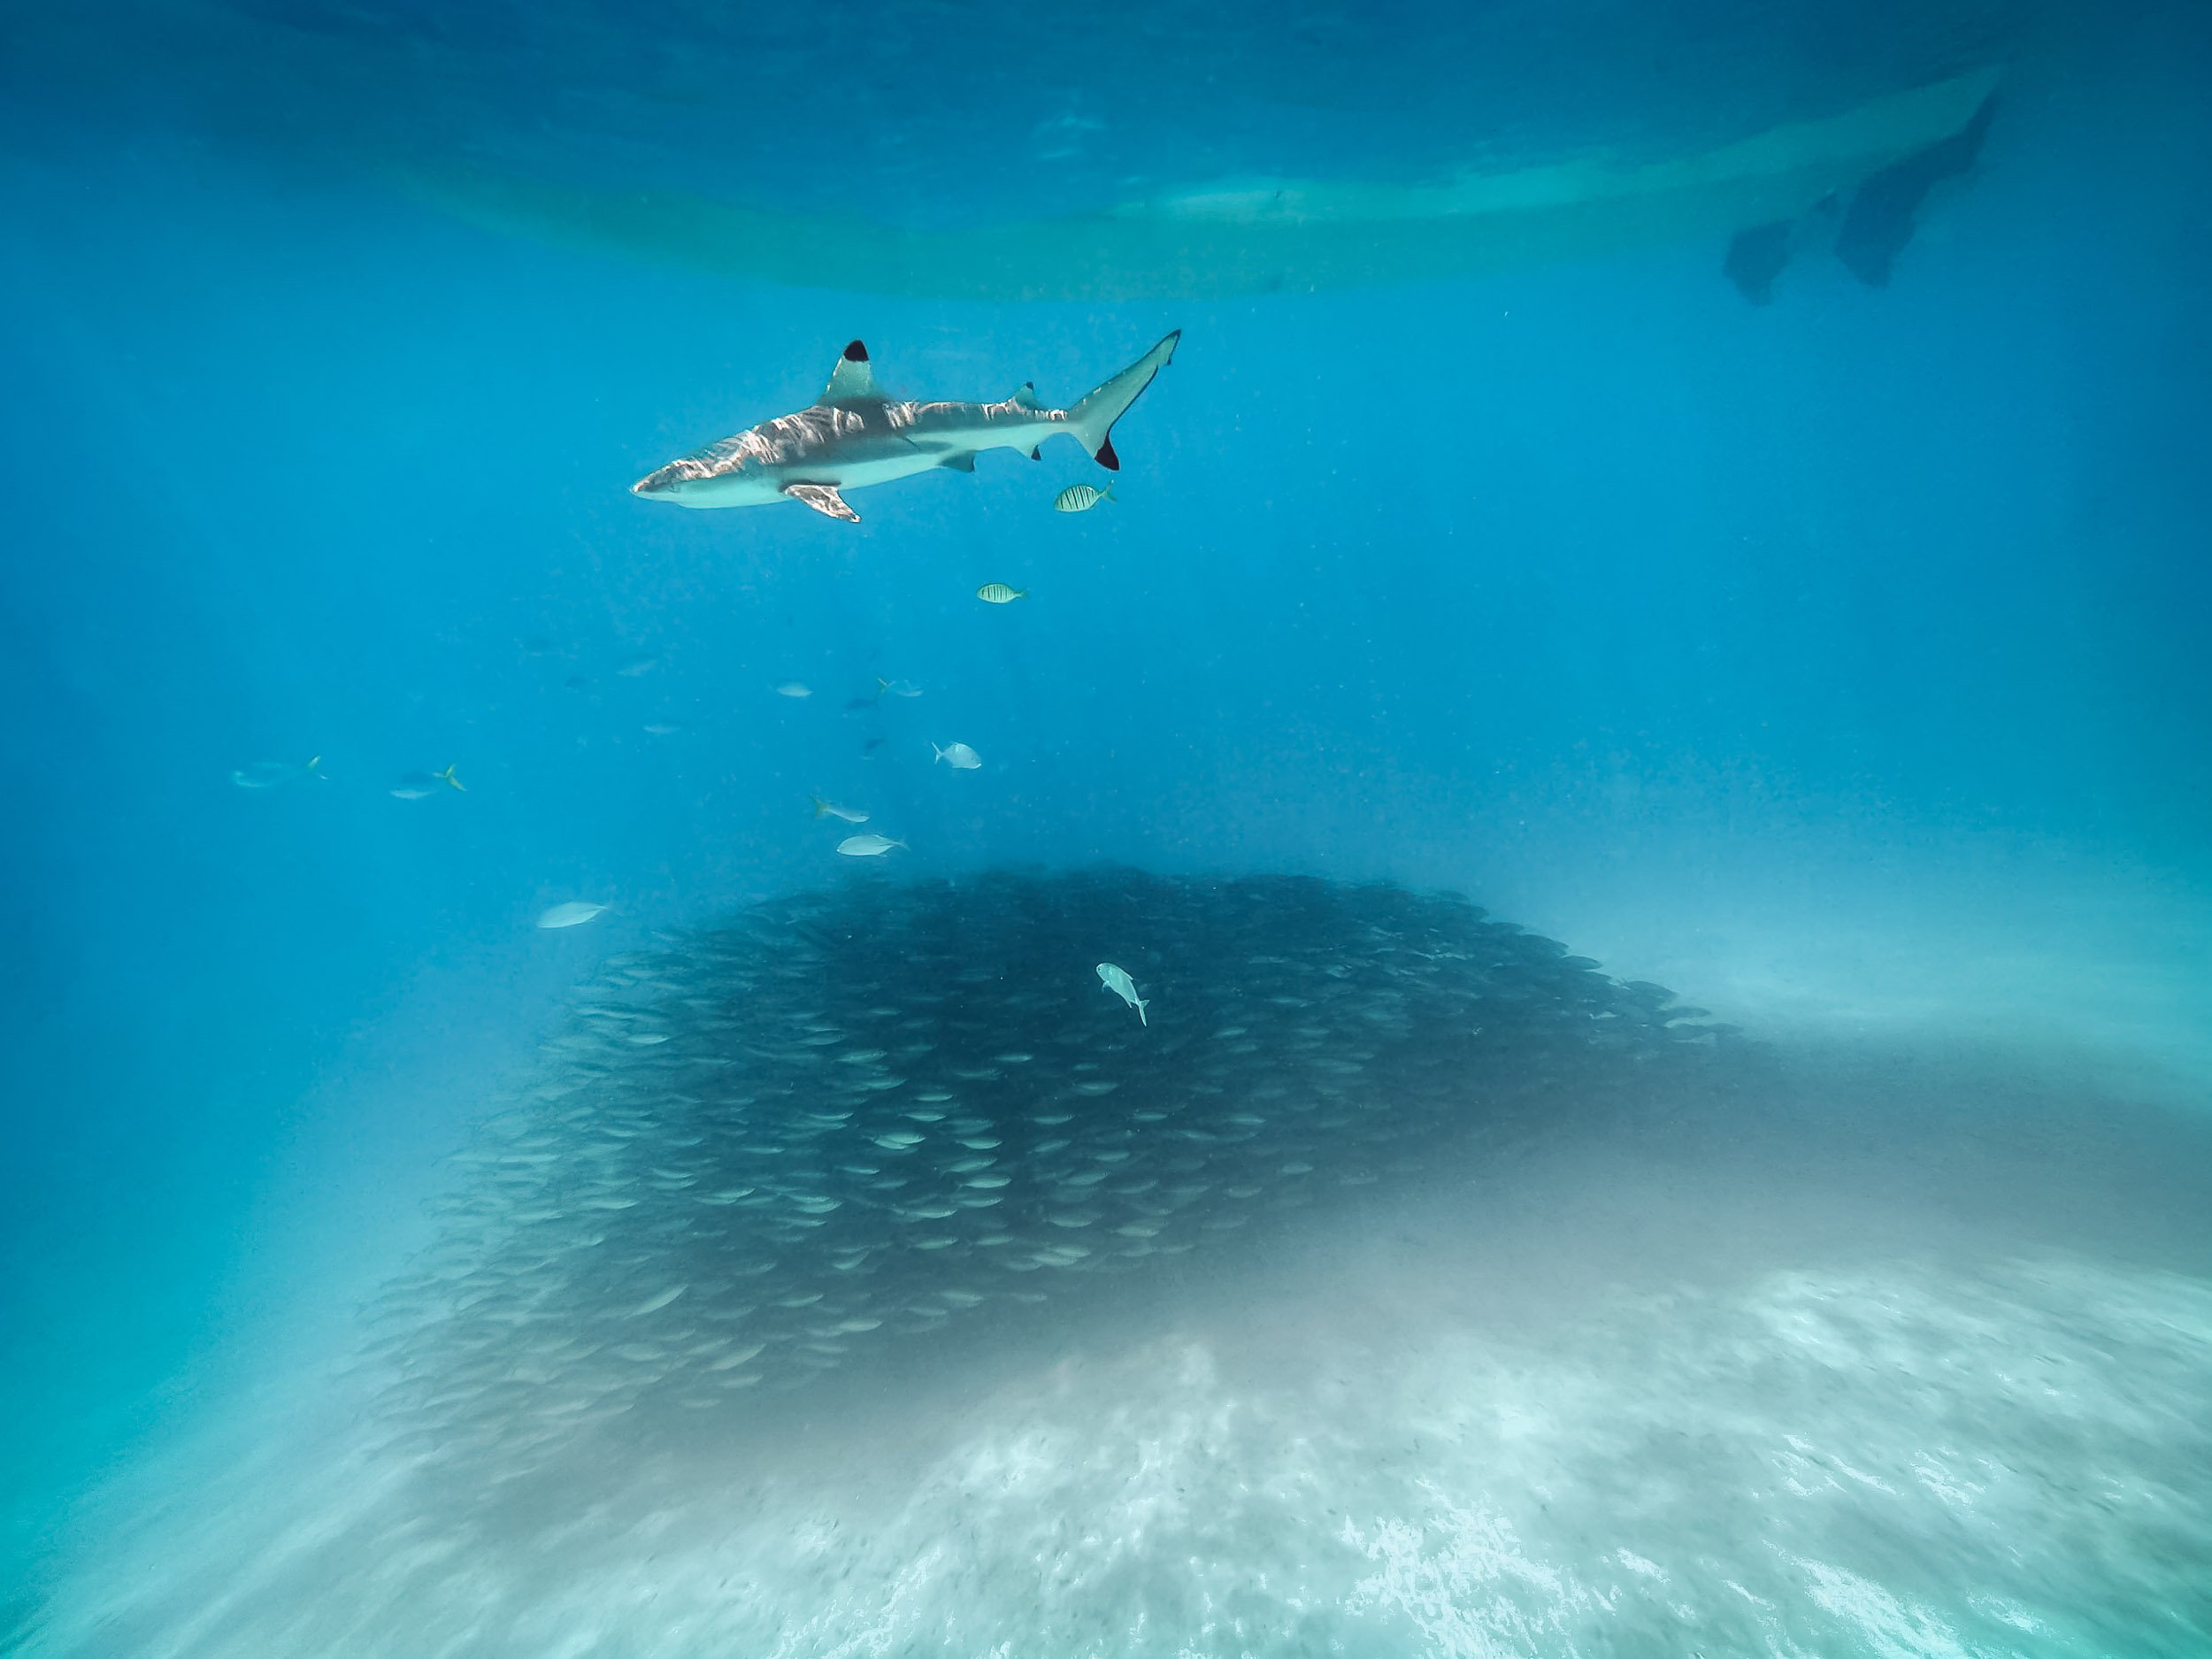

Blacktip reef sharks frequent some of the beach areas in the rock lagoon, allowing you to swim among them. A school of fish found some shelter below our boat, letting me capture these photos.


Palau is also famous for its many marine lakes such as this one - the most well known one is 12,000 year old aptly named Jellyfish lake. It’s home to millions of Jellyfish, specifically the stingless golden and moon jellyfish species - or so it has been for the last years. Unfortunately, the population of golden jellyfish died out almost completely in late 2022, likely due to a rise in water temperatures. This had happened before and they luckily recovered within a few years, but no one knows if this will be the case again.
As a result, snorkeling in the lake was a lot less exciting that it might have been, but I did get to see a few beautiful moon jellyfish individuals, pictured above.

Remnants
Palau’s underwater world is also home to a lot of man-made attractions, albeit unintentional ones. The country was home to fierce battles during the Second World War - this is the coral covered fuselage of a Japanese war plane. The cockpit wasn’t far either.
Lunch spot
This wreck was just a few meters from a small beach where we had our lunch that day - with the backdrop of this beautiful tree slowly shedding some of its orange leaves, creating a beautiful kaleidoscope of colours.


More evidence of the fierce battles that took place here in form of a sunken transport ship, and cannons that were abandoned in small limestone caves on the lagoon entrances. The largest battle that took place here was the US - Japan encounters on Peleliu, which reshaped the geography of the island significantly.

White Rock Lily
The national flower of the country and one of the many endemic plants that occur here.
Back on Land
Palau does have more to offer than its oceanic beauty - the country consists of over 300 islands, while its population of less than 20,000 (!) lives spread out on just a few of them. Koror is the largest city and used to be the capital until 2006, when it was replaced by Ngerulmud on the largest island of Babeldaob in a somewhat odd government plan - more on that below.

Koror–Babeldaob Bridge
The bridge linking Kotor with the main island of the country, built in 2002 with Japanse aid after the previous bridge collapsed unexpectedly 1996.
While the last few hundred years of the country have been shaped by Spanish, German, Japanese, and then US colonialism and influences, traces of the native population go back much further than that, and some of it is preserved around the main island of Babeldaob. The most significant evidence dates back over 2000 years ago in form of the Stone Monoliths of Ngarchelong, a collection of stones in the north of the island, not far from the shoreline.

Basalt Monoliths
The stones have been dubbed the “Easter Island of Micronesia” - although I suspect the original is a little more impressive. Their use has not conclusively ascertained, but one theory is that they served as the base for a very large Bai, the traditional meeting house for the locals. Some of the stones have distinctly anthropomorphic shapes, suggesting a different purpose.


A hidden Stone Coffin
The stone coffin of Tet el Bad is located in the village of Ollei - it is on the tentative list as a UNESCO site, but there is literally no information about it available anywhere that I could find - I could barely find the coffin itself. A deserved addition to the list of oddities I discovered during my travels.

Local Traditions
Until today, some local traditions remain active, such as the building of the traditional canoe like war boats. One can be found near Airai, where it is maintained for festivals and races, although it is a dying art today. Luckily even the most obscure topics are often documented nowadays, such as in this paper describing the building process in great detail.


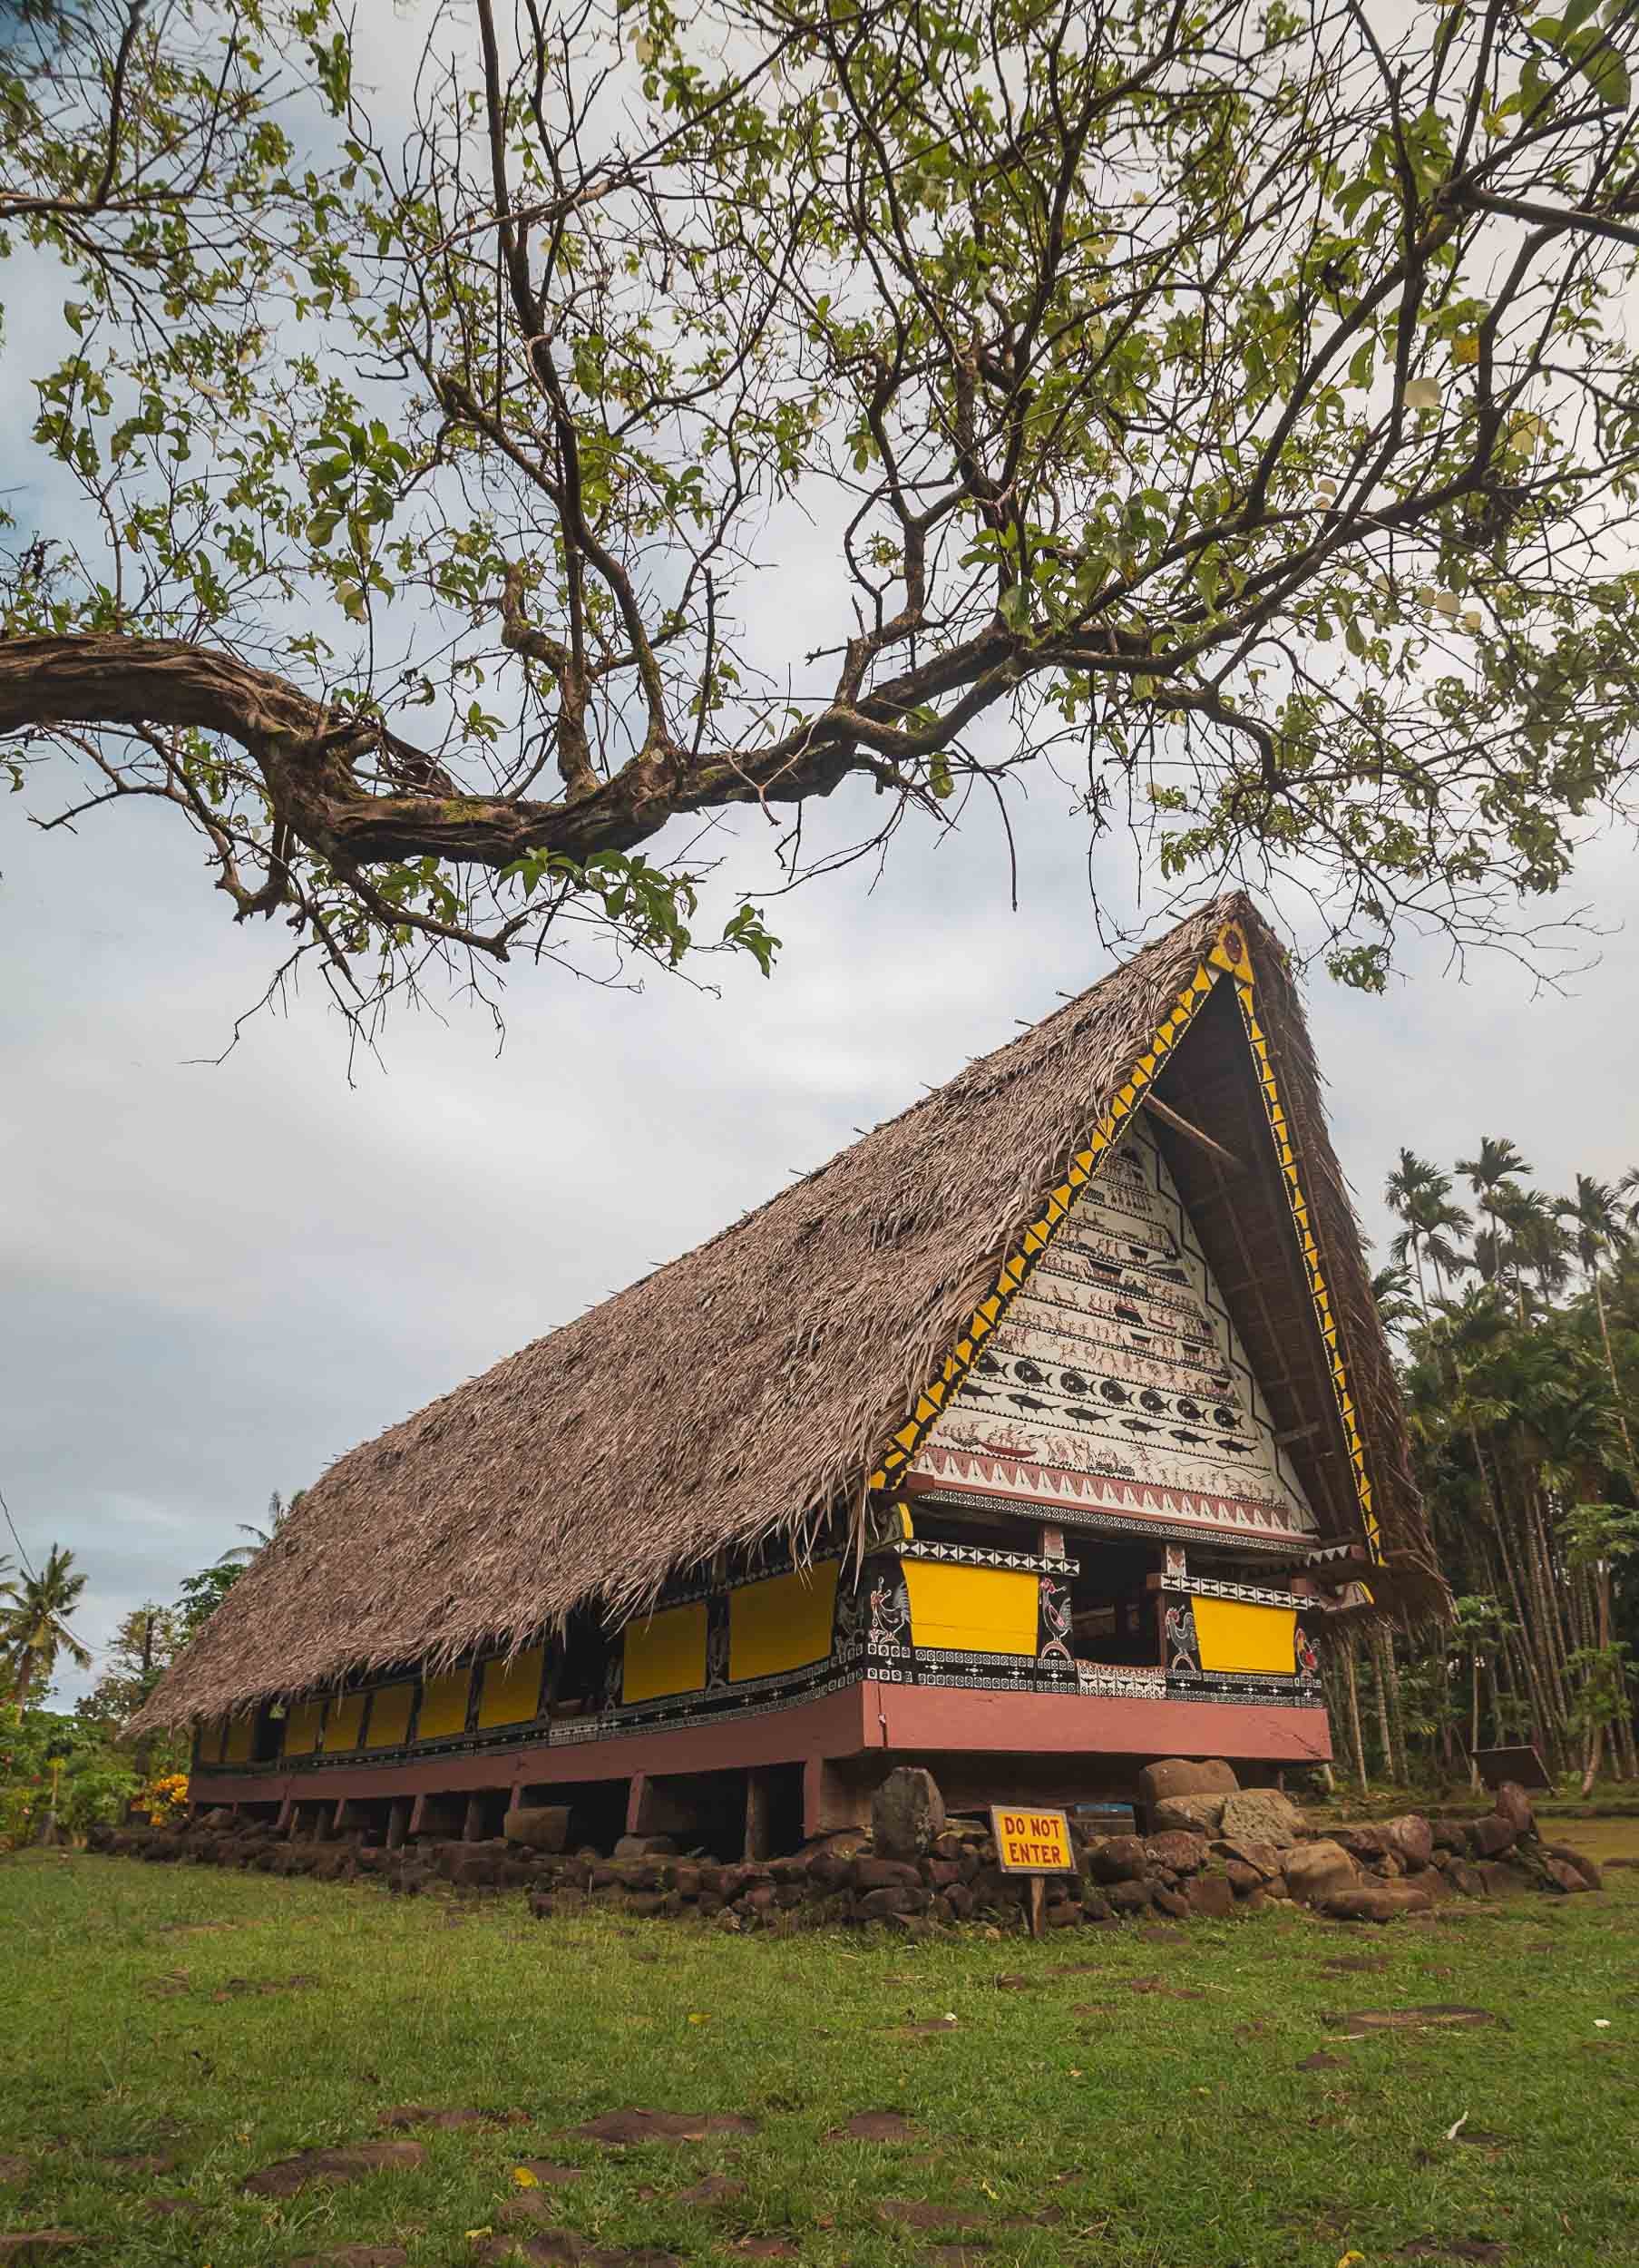
Airai is also home to the oldest Bai ai in Palau, which is still maintained and in use by the local villages, seen on the left here. The right one is located at (interesting) Belau National Museum (Belau is the historic name of the country). Although the Bai is a meeting place for men, Palau’s culture is highly dominated by matrilineal tendencies, evident in practices such as inheritance.

Although there remains a traditional government structure that still influences the country's affairs through its federation of clans, Palau today has a federal government structure that takes the form of a democratic republic. It’s an independent country, but still holds close ties to the US, which provides funding and military support in exchange for its own military rights. The US dollar is the country’s currency and English is widely spoken, although there are still Palauan and other official traditional languages, even Japanese remains an official language in one of the districts.


On the way to Airai lies this abandoned World War II Japanese Communications Center. While there’s a small signboard outside (and an entrance fee to be paid), it is more suitable for an abandoned places exploration than a tourist attraction, offering a few cannons and not much in terms of narrative, but a good chance of getting buried under a crumbling ceiling.
Capital Strangeness
While Koror is the commercial centre (and deserves to be called a city), Palau’s capital Ngerulmud is anything but that - in fact, it is the least-populous capital city of a sovereign nation in the world. Arguably, not one person actually lives in the city boundaries, although the surrounding state is home to a total of just over 300 people. It was created on the basis of the constitution established in 1979, which called for a capital to be established on the main island to avoid concentration of power in Koror. That took way longer than outlined in the constitution, and finally was completed in 2006 at a cost of $45m, through the help of a $20m loan by the Taiwanese government. Brace yourself for what these funds were used for, keeping in mind that the whole country has a population of less than 20,000…

National Capital
Inspired by the Washington Capital building, this complex houses all three pillars of the democratic process.
The parliament is called Olbiil Era Kelulau, which means “House of Whispered Decisions.” It derives from the aforementioned Bais, where the traditional chiefs met to discuss critical topics. During those meetings, no communication that is louder than a whisper is permitted, instead quiet messages are used to negotiate on important topics. Smart approach, although I don’t know if congress functions the same.


The building is in fact not made of massive stone and concrete - it’s publicly accessible and you can walk around in many of the buildings, where I noticed a lot of hollow walls and pillars. It’s also not really suitable for the local tropical climate, mould and ventilation issues have been plaguing it since opening.

More Aerial Glory
I was determined to get more aerial views of the Rock Islands, and have been holding out to get on a plane due to the ever-changing weather conditions. Towards the end of my stay, I took the plunge to fly on a small Cessna with an open door (there are no operating civilian helicopters in the whole of Palau) to get some angles that a drone won’t allow.


Palau’s environmental governance is extremely strong, it created the world’s first shark sanctuary, and makes visitors sign a “pledge” into the passport stamp upon arrival, vowing to protect the environment during their time in the country. It shows - the beaches and rock island areas are one of the least polluted ocean patches I’ve ever seen. Some top down photos from my flight, showcasing the incredible green and blue hues that make up most of the landscape in the country.

A different kind of galaxy
The turquoise waters above show another one of Palau’s attractions: the so-called Milky Way lagoon. It’s a shallow lagoon where limestone mud has settled on the ground, which can be retrieved with a small dive. The locals use this paste for skincare.


German Channel
This artificial channel was dug while Palau was under German administration in the early 20th century to ease access into the lagoon. Today it’s a popular dive site.

Shapes
A reef lagoon in the shape of a ray.

Reality?
Some of the formations look like they have been artificially rendered, but I assure you this is a barley edited real photo.
More images of the underwater world, taken on iPhone while snorkeling among some of the reefs in the rock lagoon during a kayak trip.


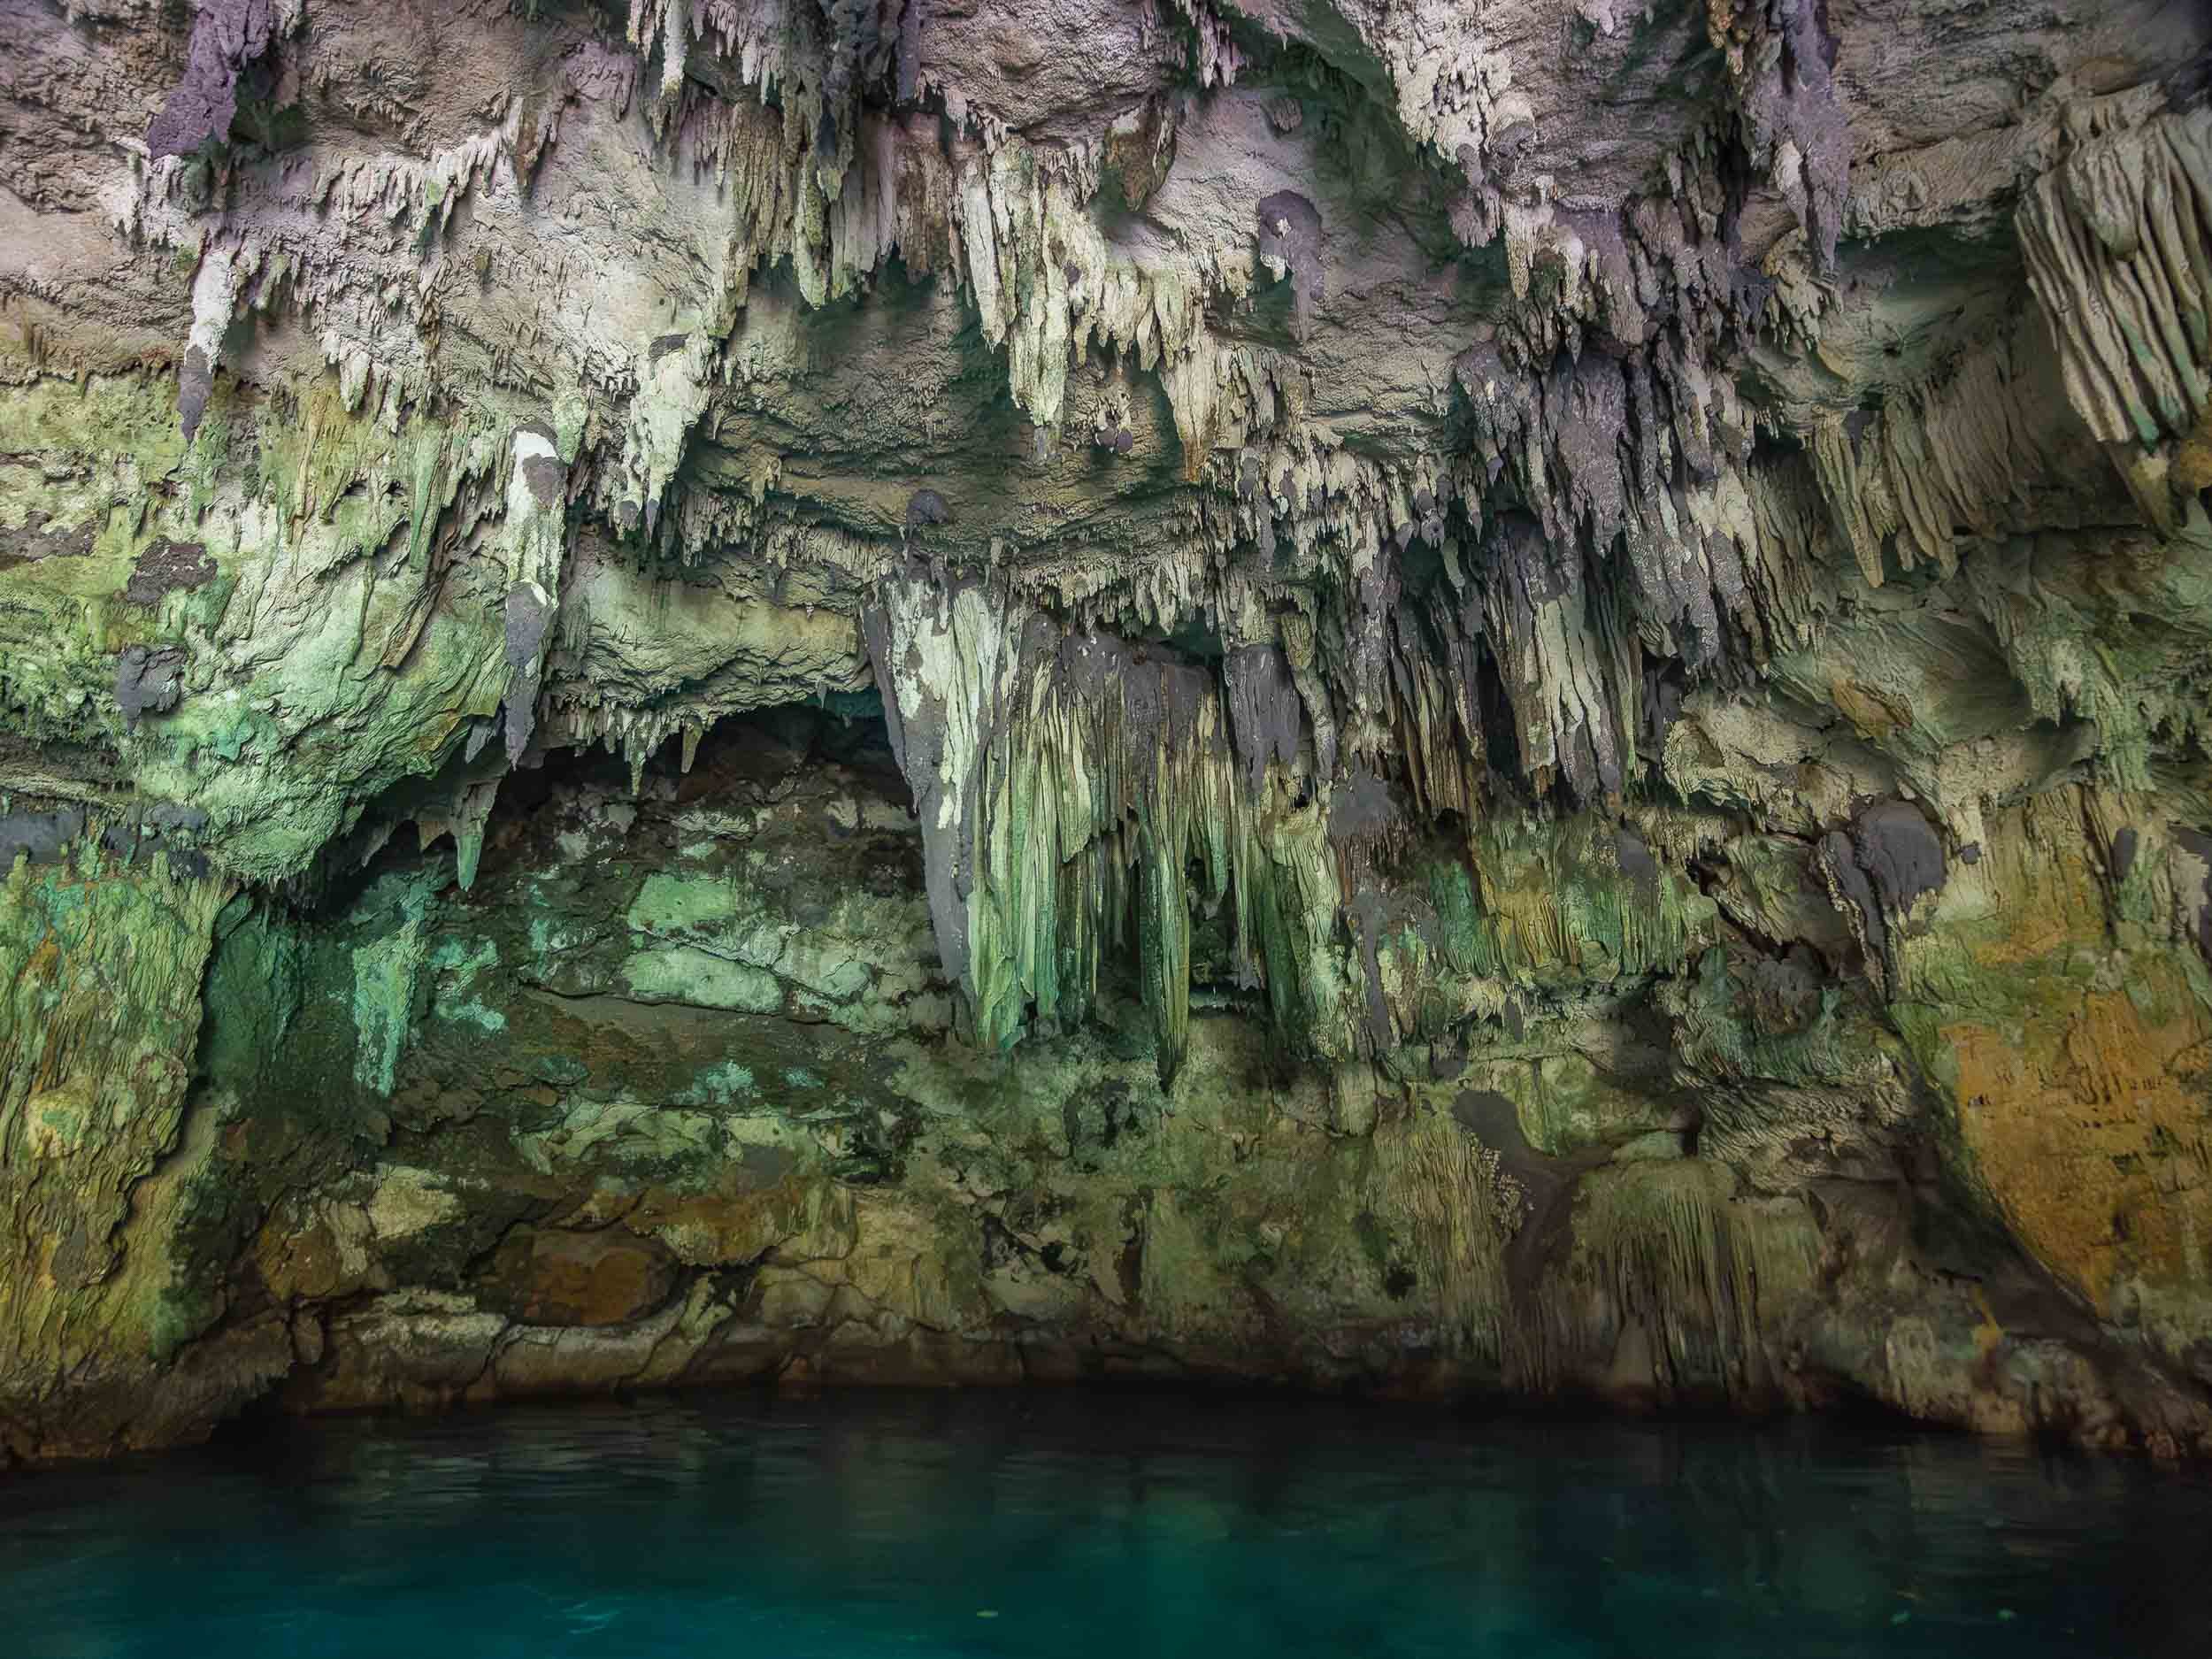
One of the many limestone caves that get carved into the rock formations.
Also came across this incredibly tiny jellyfish, the species of which I cannot determine, with an even tinier fish companion.


And that’s it from beautiful Palau…
Subscribe to my newsletter to get notified and don’t miss out on more Wonders of the Globe.
Other Recent Posts:

Enlaps Tikee 3 - Installation & Configuration (Part 2)

After my previous article giving an overview of the product, I have now created a second video on the Installation & Configuration of the solution, which you can watch below - however, it’s in German, so either use Youtube’s built in translate function for the subtitles, or you can continue reading to get an idea!
In its essence, the Tikee is a time-lapse camera, but it's really an ecosystem for all kinds of long-term projects, monitoring, and analytics. So if you want to document, for example, a construction site, or the set-up and dismantling of an event, or snow conditions in the mountains over longer periods, the Tikee is the right choice. It should be briefly mentioned that I use a Tikee 3 Pro Plus, there is also the normal Tikee, and I have a myTikee unlimited account. There are also the Storytelling or Reporting or a free account on mytikee.io. The differences are particularly evident in the configuration options for recording and editing; the commissioning remains basically the same. So let's take a closer look at it all.

Configuration
The configuration of the Tikee can basically be divided into three steps:
1) Preparing the Tikee:
First of all the Tikee itself, which you have to charge via Micro USB with a standard USB charger. Then you usually insert the micro SD card, which can be up to 512GB in the Tikee 3 Pro Plus. How much space you need obviously depends on the project you want to configure. There is a table from Enlaps to give a rough estimate. Even if you only send the images to the cloud, you still need a micro SD card, in this case of course with minimal space requirements.
The next step is to insert the Micro SIM. Of course, this doesn't apply if there is sufficient WiFi at the location that you can use, or if you only want to save the images locally. However, even if you only want to save the images locally, it can be a good idea to establish a data connection, for example to be able to call up the status of the Tikee on the cloud platform and to know whether the recording sequence is working ideally or there are problems. Two small points about the SIM: First of all, the data volume you need depends on how you configure the camera. Enlaps also has a calculator to estimate this, and it can really do anything from one gigabyte to 50 GB per month, depending on the configuration. The second point: It is advisable to insert a SIM card with your own telephone number; there are also micro SIM cards that only offer data volume, for example as an extension of your primary smartphone SIM card, but myTikee has a function that relies on the SIM card having its own phone number. The function is not necessarily critical but can be an advantage, more on that later, and that is why you should make sure that you have your own phone number when buying the micro SIM card.
2) myTikee Account and Connection
The second step in configuring the Tikee involves creating an account on myTikee. As already mentioned, there are different types of accounts with different costs and different functions, but you can of course also start with the free version. Then you need the myTikee Remote app for iOS or Android, where you can then log in with the same account.
Next, the Tikee has to be nearby and switched on and is then recognized via Bluetooth, and you can see various information about your Tikee in the menu and also format the SD card. You should then set the data connection, as already mentioned, this can be done via WLAN, but also via the SIM card. With the SIM card you usually only need the PIN number and the APN server. You can often find this online and it varies from provider to provider. I haven't had any problems here with T-Mobile. Next you should also test the data connection, you can do this directly in the app and it is of course possible to do the same on site - we know, especially in Germany, that the mobile data network is not always the best and of course it would be very annoying when the Tikee is installed and cannot always reliably send images to the cloud.
I would like to make a few points about connecting the Tikee with the myTikee Cloud platform that might be useful. Normally, the Tikee sends a current status (battery, connection quality, etc.) at least every 24 hours, and at the same time also gets the configuration from the cloud platform, for example if you have configured a new recording frequency for your timelapse. However, this 24h interval also depends on some other parameters. For example, you can configure how often the Tikee sends the images to the cloud, every single image that is taken, or only after (for instance) 25 images have accumulated - the latter is of course much more efficient for battery life. The Tikee has some intelligence built in here: You can then also set that below a certain battery percentage, this interval is automatically increased in order to preserve battery until the battery is sufficiently charged again by sunlight.

Another exciting feature is the ability to bypass this interval. If you want to immediately force a new configuration from the cloud platform without waiting, you can also do this, but you need a SIM card with a phone number as I mentioned before, since this phone number is used internally to wake up the Tikee and upload the configuration, query the status, get a picture, etc. without having to wait for the interval that has been configured to elapse. It is therefore a good idea to familiarize yourself with these small functions in order to find the best compromise for your setup.

3) Setting up an Image Sequence
So, now that we have the whole connection issue out of the way, let's move on to the third part of the configuration, which in my opinion is also the most exciting, namely entering a recording sequence. The Tikee offers 3 different options here:
a) First of all, there is a so-called burst mode; That's 200 images maximum, at short intervals, in JPEG format saved, either to the SD card or sent to the cloud.
b) The second option is event mode, which is a maximum of 24 hours with a flexible interval. The images are only saved on myTikee, and only in JPG format.
c) The third mode is the most exciting and probably the one you will use most often, namely the long-term mode. You have a lot of flexibility here, you can set intervals from 30 seconds to 24 hours, you can configure endless recording sequences and the images are saved either as JPG or as a raw file in DNG format or both, whereby you can send the JPG files to the cloud and the raw format files can be saved on the memory card.
You can also set that, for example, you only take pictures on certain days of the week, for example working days, and only between certain times, for example working hours on a construction site, or you don't need any pictures at night. So you have a lot of flexibility here, but I would still like there to be even more flexibility. For example, you can combine a long-term recording with a burst recording, for example for a day or a few hours where there is a lot going on at a construction site and you would like to have an extra short sequence in addition to the long-term recording. But, for example, you can't configure two long-term recordings at the same time and that can be exciting. For example, you want a long-term recording with quite short ones intervals but low image quality that is sent to the cloud, and also wants one image per day in high quality that is saved to the memory card as a DNG file. This is currently not possible, hopefully such functions will be available in the future.
Installation
With that we have actually completed the configuration part of the Tikee and we come to the installation. In my case, I installed the Tikee on a construction site for two single-family homes and I'll now briefly show you how I did it and what needs to be taken into account.

The Tikee is quite easy to install, it has a quarter inch screw thread at the bottom that can be combined with a ball head or other tripod products to install it. However, for a solid and long-lasting installation, I would recommend the stainless steel arm from Enlaps, which is very flexible and can be installed both horizontally and vertically, and also has a built-in ball head so that the camera position can be adjusted. My Tikee was attached to the wooden slats of the roof terrace of the adjacent house using the stainless steel arm, of course with permission. I simply used four stainless steel screws to fix it horizontally via the recesses on the stainless steel arm, and then adjust the ball head, so that you can place the Tikee on top and then rotate and tilt it so that it captures the construction site perfectly.
I noticed that the wide perspective of 220 degrees can really cover the entire property, even though the Tikee is positioned directly on the property boundary and not slightly set back. This is actually impossible with a normal wide-angle camera, but it would only be possible with a fisheye lens at best.
The next thing you should do is align the solar panel, of course towards the south. This can actually be determined quite easily using the compass app on your smartphone, but of course you don't know what the angle of inclination should be, as the compass app obviously doesn't show the position of the sun exactly, but only the azimuth. To get the altitude, as a photographer I am using an app like Photopills, which uses the augmented reality functions to see exactly how the sun moves across the sky and thus allows me to optimally adjust the angle of inclination. After you've done that, you can simply use the included Allen key to fix the solar panel and ensure that the battery is being charged efficiently.

When aligning the Tikee in a situation like this, it is advisable to mount the camera approximately halfway up the composition to be filmed, this avoids having to tilt the camera up or down. This can be done quite easily with the ball head on the stainless steel arm, but it has the disadvantage that buildings etc. with straight lines will then appear to be angled in the footage. This can be compensated for somewhat in post-processing, but it is time-consuming and should therefore be avoided. Of course, if you're filming landscapes or events from above, this whole aspect isn't really a problem.

For long-term outdoor use, I would also recommend installing an anti-theft device. The Tikee does have GPS, but I would still prefer to avoid running after the thieves - Enlaps has a solution for this, but you can also use any standard theft chain, such as for laptops etc use. One last note about the positioning of the camera - if it is possible, you should avoid important parts of the image section being more than five meters away in front of the tikee in the middle - why - because due to the parallax effect of the two lenses, this part of the image The most difficult part for the algorithm is when combining the final panoramic image. In my experience, the Tikee algorithm does this pretty well, but if you can avoid it, it can of course be an advantage.

A second point about the panoramic image algorithm: It uses the first 100 images that are taken to zero in on the composition and what is happening in this scenery - this means you should make sure that the sequence only begins when the camera is installed in the final position, and ideally start the sequence in good weather and not at night so that the algorithm can work best. After everything has been considered, you can take your first test image. You can do this directly using the preview function of the app, but you have to keep in mind that it can take a few minutes for the image to arrive on the app, so bring some patience. Personally, I would recommend that you try to have a laptop on site where you can check the whole thing on the myTikee platform as well. You can then not only view the test image on a larger screen, but also ensure that all other functions and communication of the Tikee are working before you leave the site.
Finally, make sure that you have entered a sequence or, if a sequence has already been entered, make sure that you press the start button. One more point about this: If you enter a sequence on the app, it may of course take a while, as already explained before, until the sequence is displayed on the cloud platform, so be patient and don't try to enter a sequence on the cloud platform right away, otherwise it can happen that conflicts may arise.

I already have several hundred photos of my construction site sequence on the myTikee platform and can create the first time lapses here. Next time we'll take a look at what functions there are and what you can do with your material. For this article, I can conclude that the installation and configuration are quite well thought out, the whole process is relatively simple. There are a few things to consider, such as the size of the SD card, depending on what you want to achieve with your sequence and what settings you use. It can also be an advantage to familiarize yourself with the instructions that are available online, for example to find the best compromise between battery life and the optimal result.
All in all, it worked well and if you have any questions, please leave them in the comments or contact me. If you plan to buy a Tikee, you can use FLOENLAPS50 on www.enlaps.com to save 50 EUR at checkout!